Ortho4XP Scenery How to Create New Worlds in Minutes!
Ortho4XP Scenery Creating
Beginners Guide
Lets Get Started with the steps to Scenery Creating
1. PLAN our file storage 2. CREATE BASE TILE 3. INSTALLING into X Plane 11 3. CREATE UPDATED ZOOM ZL19 TILE 4. INSTALL THE NEW TILE 5. CREATE A CUSTOM ZOOM AREA ON OUR AIRPORT
Ortho4XP Scenery creating is a lot of fun and in this tutorial I’ll show you how to make your own scenery fast and easy. Then I will show you how to install your scenery and have it ready for your next flight in X Plane 11. You can download the latest file from www.XPlane11.org and search ortho4xp download. The author has a download link in his footer on all his posts or alternatively you can get it here. Download File Herehttps://github.com/oscarpilote/Ortho4XP/
What is ORTHO4XP Scenery Creating
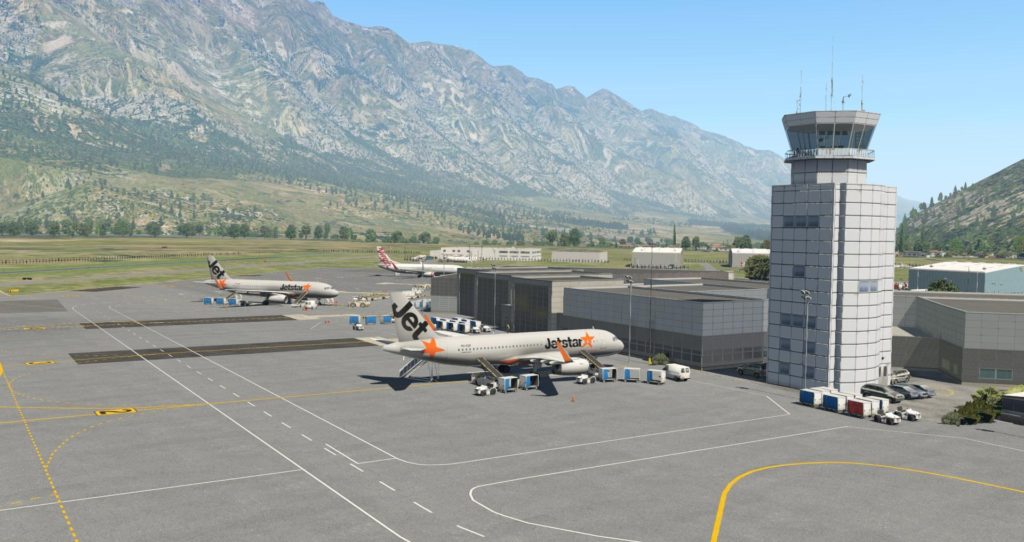
X Plane 11 already comes with fantastic scenery but there are ways to make the scenery even better and it’s so simple. Ortho4XP Scenery creating is easy and free! It is a program that gives you beautiful PHOTO REALISTIC scenery absolutely for FREE all in just a few simple clicks. You can select a zoom level that will adjust the scenery quality and have a plan for not filling your SSD with gigabytes of scenery at max zoom levels when it’s not required.
Making the scenery is very easy and can you have everything selected in possibly a minute or two then you have to wait for the computer to generate it. At Zoom Level 16 taking it will probably take about 20-30 minutes to process depending on your computer and you Internet speed.
Truly amazing program and so simple to use even I can do it so I know you will be able to as well. Let me take you through one step at a time and we can create a new tile together. Once we do this then in the next article we will look at creating extremely high quality scenery at our airports and surrounding area.
Planning
It’s first important to know that the photo scenery tiles come in a few zoom levels. Each one as it grows will become much larger in size so we need a plan to save your SSD/HD from having a heart attack as we build more and more scenery tiles.
You can save them in your X Plane 11 custom Scenery file or you can save them on a completely separate drive if you wish. If you choose to put them on a HD instead of an SSD then the loading time will be a little longer but it won’t hurt any in game performance at all.
You can put them in another location then create a shortcut to the file as simple as RIGHT clicking on the new ORTHO Scenery File and selecting MAKE SHORTCUT. This you put into your C:\\Xplane11\customscenery Directory. The program sees it just like it’s there. What you can do is put you can choose to do is if you have a regular airport or two you tend to fly from then put that tile in the X Plane 11 Custom Scenery folder so your initial load is faster.
Available from AMAZON.com
Available from AMAZON.com
Zoom Levels
Zoom level 16 is the base zoom level and if you’re flying over countryside or a city at a few thousand feet then this is the ideal level of scenery to base most of your tiles I would recommend and the file size is still a few gig in size. Yes they can be very big hence the plan we are discussing this NOW!
If you step up to ZL17 then the file could be 10-15Gig in size and it just goes nuts from here! We need a plane to give us the best flying experience visually in our simulator. I highly recommend creating all your scenery tiles at ZL16. With ZL16 you will have clear crisp terrain from the air at even say 2000 FT. You will be impressed I’m sure.
Create Custom Scenery
The next step is to decide any points on the map that need more detail because we are flying lower maybe on approach to an airport and over cities on our approach.
The idea is to use the custom zoom level tool and we can isolate the area immediately around the airport and bring its zoom level up then step closer again so we get even higher scenery quality till we get zoom level 19 on the airport or a town maybe.
Lets Make A Photo Scenery Tile
Install Ortho4XP anywhere you would like on your computer.
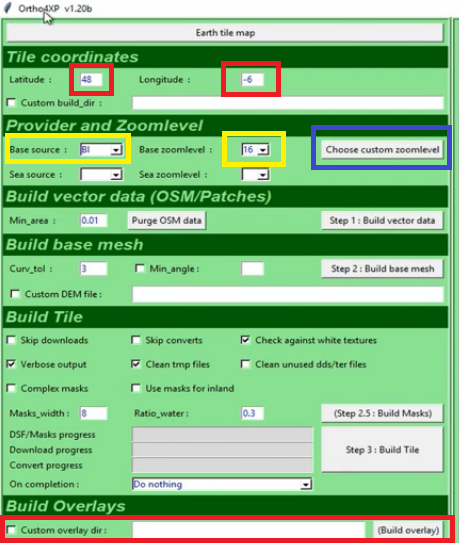
Start Ortho4XP
Set the source – Where Orth4XP gets its information. Bing etc
Set the Zoom Level in the next dropdown. (Default is ZL16)
Click Custom Overlay Directory and navigate to: C:\x-plane11\Global Scenery\Xplane11 Global Scenery
Click FILE MAP at the top of the page: The MAP now appears.
Drag the map to your required location holding a mouse button and dragging the map.
At the desired location Shift + Click on the location and a box will appear. Click to ensure it is
highlighted with a box and is shaded internally. You can select more boxes – just check on the page for instructions …. (CTR + Click etc)
Tick the Two Boxes at the bottom of the page left hand side .. BUILD MEDIA – BUILD OVERLAYS.
Click BATCH BUILD and your building already. Don’t worry nothing happens on this page. Click the – at the top of the page as there are multiple windows open. DONT X Close it.
Check the 1st page where it will be busily creating your tile.
Buy through AMAZON.com
Install Your NEW Ortho4XP Photo Scenery
INSTALLATION:
When Complete:
Navigate to the ORTHO4XP folder and within the tiles folder your NEW ZL116 Tile will be waiting.
OPTION : Copy the file to your C:\\X-Plane 11\Custom Scenery Folder OR Make a shortcut for the file and copy that into the same location as above instead.
Next Start X Plane 11 and once you’re in the opening screen EXIT out. X Plane 11 has found your file and placed a reference at the top of your SYSTEM.INI file.
Navigate to your X Plane 11 directory then to your custom scenery directory and look for the SCENERY.INI file. You can open it with NOTEPAD to edit it.
Cut the top entry which is your Photo scenery File and past it below your Airports list.
Need some new gear? Check out these options and more on Amazon.com. Click on the picture below.
Check out the great AMAZON.com deals today! Click on a picture above!
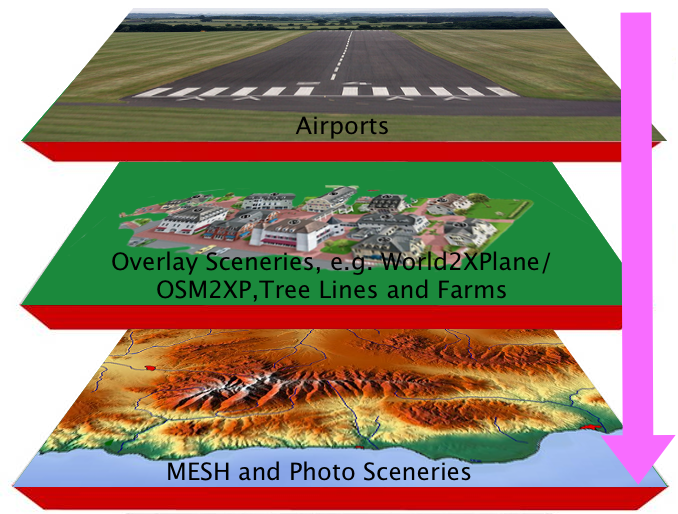
The file structure as you read it should be:
1.. Your AIRPORTS at the top of the list. 2.. Scenery Libraries OVERLAY SCENERY 3. PHOTO SCENERY (Ortho4XP Files) 4. Mesh – These give your flat scenery structure with hills, mountains and sloping runways.
Now restart X Plane 11! You will find beautiful Photo Scenery waiting for you!
As an Amazon Associate I earn from qualifying purchases.