
Amazing OBS Recording Settings 1080p 60fps – ULTIMATE Beginner Guide.
OBS Recording Settings 1080p 60fps.
If your a creator and you use OBS to record your videos, then ensuring you have the best OBS recording settings for 1080p 60fps is imperative. If your on a mid or low tear PC it can be a real challenge to get both great fps and a smooth recording with the GPU already maxed out.
MSFS 2020 VR Recording Challenge.
This has been the problem I have had to resolve. MSFS 2020 taxes my system heavily and although I have recently got a great VR experience my recordings were rubbish. My 2060 super has been pegged at 100% so getting a great screen capture has been a challenge especially in VR. The great news is I have found settings that give me both a smooth VR performance in MSFS 2020 as well as DCS World and X Plane with smooth quality recordings.
The Steps:
- INTRODUCTION
- DOWNLOAD OBS
- START VR
- OPEN YOUR MIRROR (Steam/WMR/Oculus
- OCULUS MIRROR SETTINGS
- MAKE A SCENE
- MAKE A CAPTURE WINDOW
- SET HOTKEYS RECORD ON/OFF
- VIDEO/RECORDING TAB
- AUDIO TAB
- ADVANCED TAB
- TEST
INTRODUCTION to OBS
OBS is a quality free to use open source recording package that has been used by many YouTube creators for years. The software can be downloaded for free and gives you incredible flexibility on how you record your own videos. It covers many different file formats as well as can cope with any resolution you wish to record in.
It will automatically record in 4k but output it as 1080P if you desire. In the case of streaming, it will output 720P or less if needed. This depends on your streaming internet bandwidth. If you’re getting smooth game play already but stuttering when recording. I believe this guide can help you get the quality results in game and on your OBS recording settings for 1080p 60 fps using these settings.
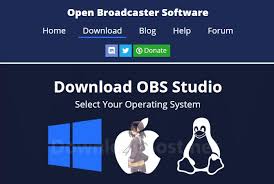
DOWNLOAD OBS
Downloading OBS is easy by simply going to OBS at the website here: https://obsproject.com/
Ensure you get the correct version for your PC. It is available for Windows, Linux and Mac.
I’m going to presume you already have it and have tried to record without a lot of success.
- Joystick / HOTAS – AMAZON.com
- Rudder Pedals – AMAZON.com
- Throttle Quadrant – AMAZON.com
- Gaming Chair – AMAZON.com
- VR Headset – AMAZON.com
1. START VR
START VR before launching OBS STUDIO is the process I have taken so far. If your using the Steam Mirror, WMR (Windows Mixed Reality) or Oculus software it’s the same. Launch the window so OBS can see it when you set up your recording setting with your scene.
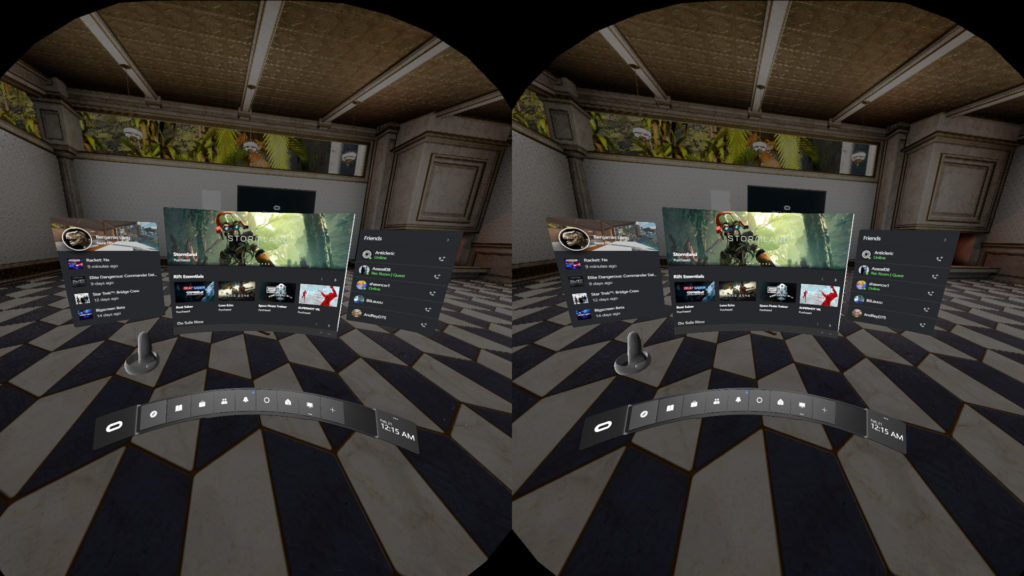
2. OPEN YOUR MIRROR.
I have the following settings as when using the Oculus mirror. I use and highly recommend stabilization (F8) which helps smooth the head movement out considerably. Unfortunately you have to remember to turn stabilization on every time.
OCULUS MIRROR SETTING
To record 1080P with your Oculus mirror with the Right Eye view create a shortcut from your Oculus Mirror.exe located in the Oculus Support folder. You can paste the info below into the path box and save the settings.
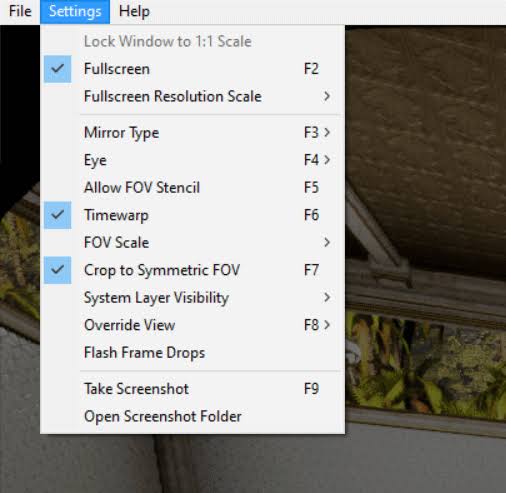
The Oculus mirror in default only displays a very low resolution if you don’t edit it. You can choose 2K or 4K by changing the resolution figures from 1920 X 1080 to your desired resolution.
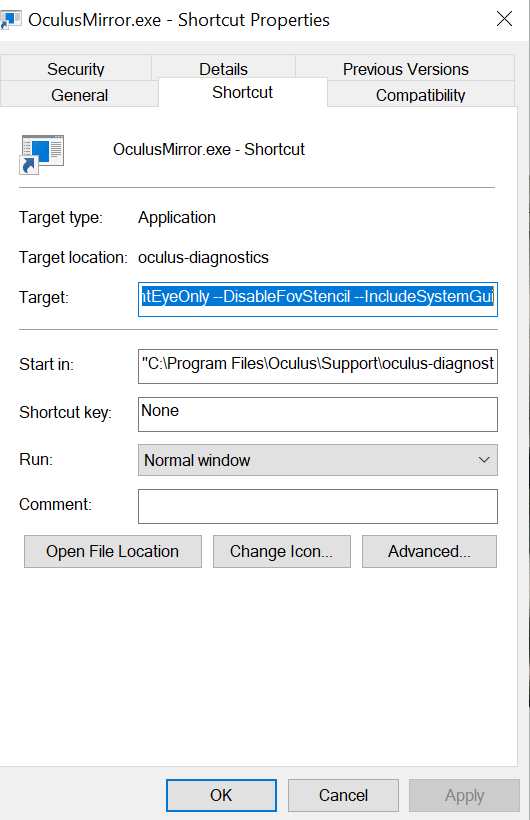
“C:\Program Files\Oculus\Support\oculus-diagnostics\OculusMirror.exe” –1920 x 1080 –DisableTimewarp –SymmetricFov –RightEyeOnly –DisableFovStencil –IncludeSystemGui
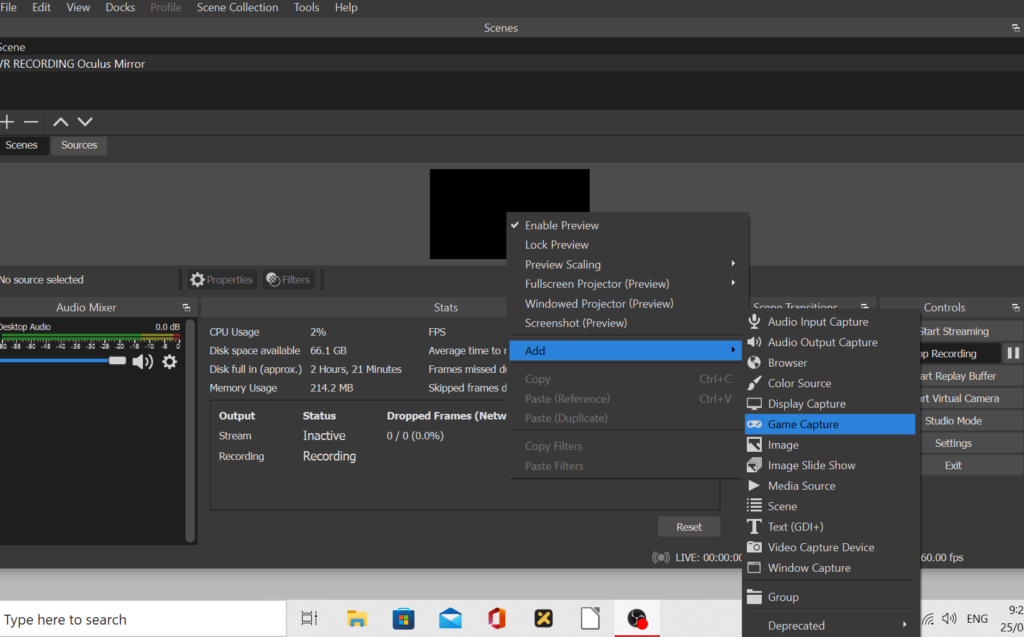
3. MAKE A SCENE
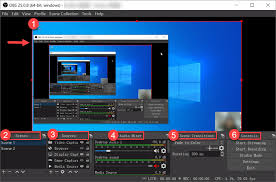
Open OBS STUDIO to start your recording. The first step to creating your new recording is to create a new scene. The scene will remember your specific settings and how you want to record via full screen, a specific window or your VR Mirror display. Click scenes and hit the plus and name your new scene. You can see mine is called VR Recording Oculus Mirror. You can set up different scenes for different recording options. You may just want to record your desktop so you can have a different scene.
3. MAKE A CAPTURE WINDOW.
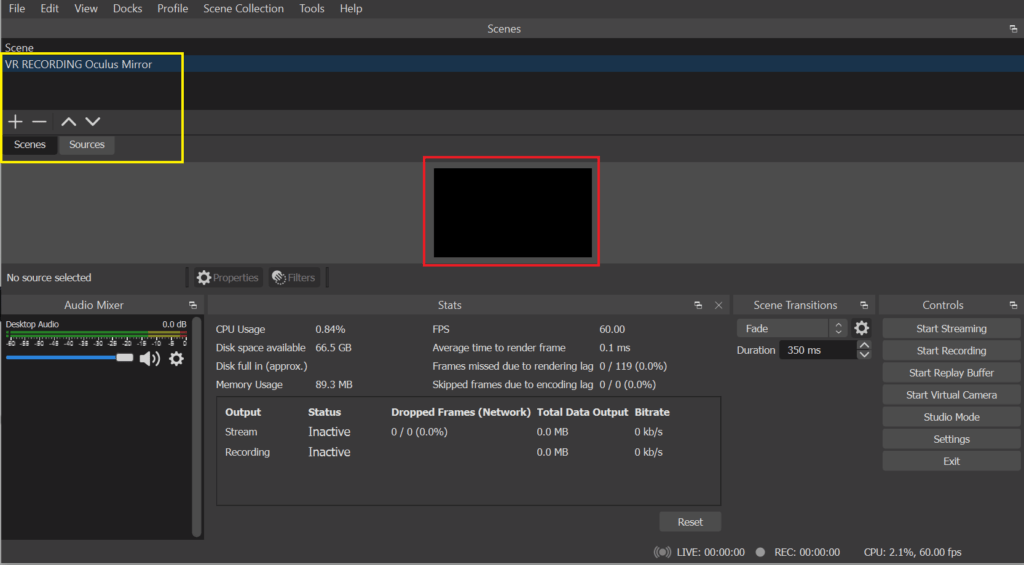
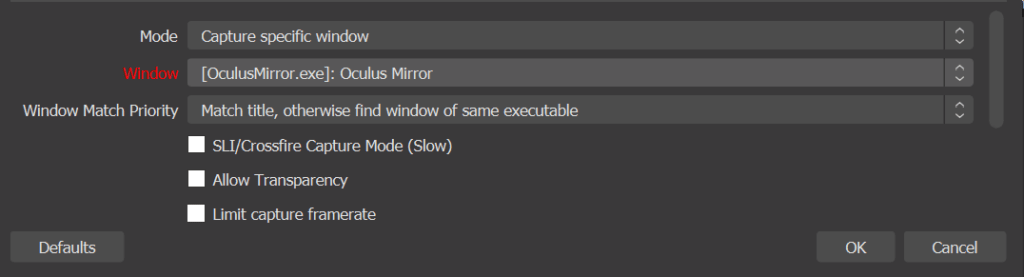
Create a Capture window so OBS STUDIO knows which window to record for you. Click on your new scene so it is highlighted. Right click with your mouse on the black display screen in the centre of your display. A drop down menu will appear. Click on Game capture and your new capture window will be created.
The next step is to open the capture window and in the drop down select your VR Mirror. It must be already open so OBS can see it. This done your ready!
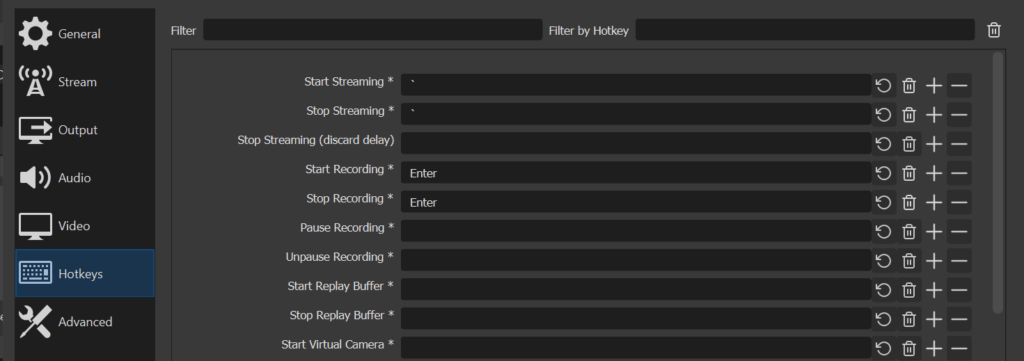
4. SET HOTKEYS RECORD ON/OF
Hot Keys are a great idea to start and stop recording on a convenient key. I chose to use the enter key on the numpad because it’s easy to identify when in VR. You can set the same key to start and stop the recording as you please.
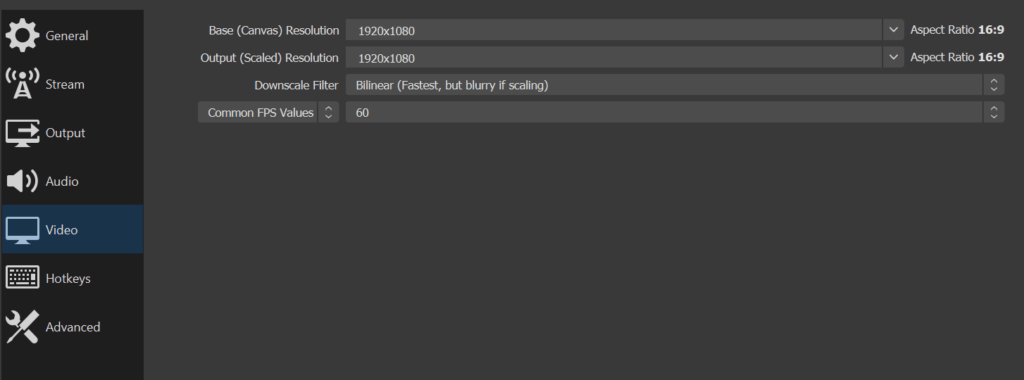
5. VIDEO/RECORDING TAB
Let’s get started with my settings in the Video tab. I am using 1080P so I have both dropdowns on 1920 X 1080. If this works for you and you have a higher quality display you should have your monitor resolution here.
6. OUTPUT TAB
The output tab is really where the magic happens and getting the settings correct here have made my OBS Settings 1080p 60 the success I now have.
The settings here are the secret sauce for OBS recording settings 1080p 60 and a smooth experience in game.
Ensure you are on the RECORDING TAB and make the following settings.
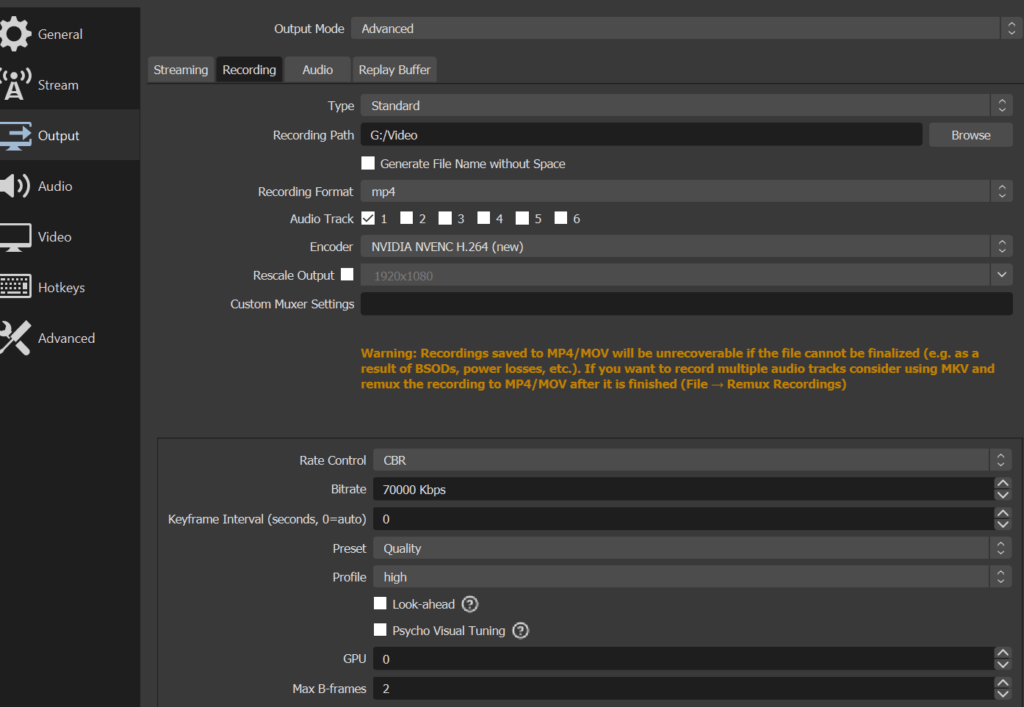
- Choose a saving location. Your files can be large so a big SSD is a great idea.
- Select Nvidia NVEMC x 264 New. This will have your GPU do the work.
- Select CBR (constant bit rate)
- Bit Rate 1080p,should be around 70,000 kb. 2 and 4k are around 100,000kb.
- The preset should be quality.
- The profile should be high.
- Look ahead and Psycho look ahead unticked.
- GPU – 0
- Max B frames 2
AUDIO TAB.
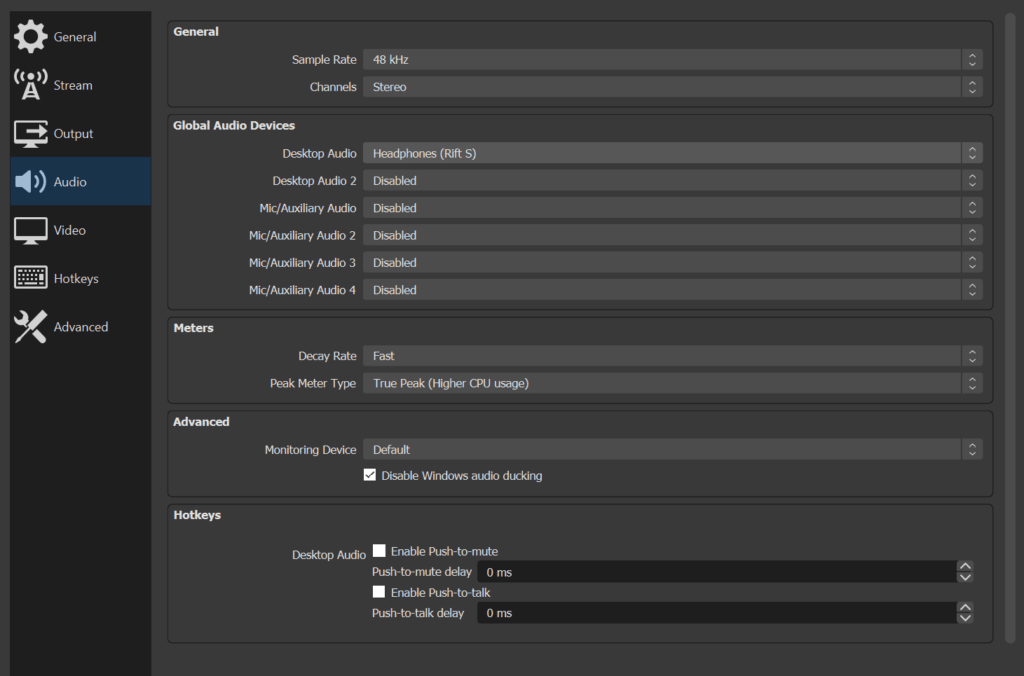
Audio Tab is important to get your sound correct. In this tab Isimply have the OCULUS Rift Headphones so it’s recording the game sounds and not voice.
If you wish add a second device that is attached to your system like a microphone and turn all the other tabs off.
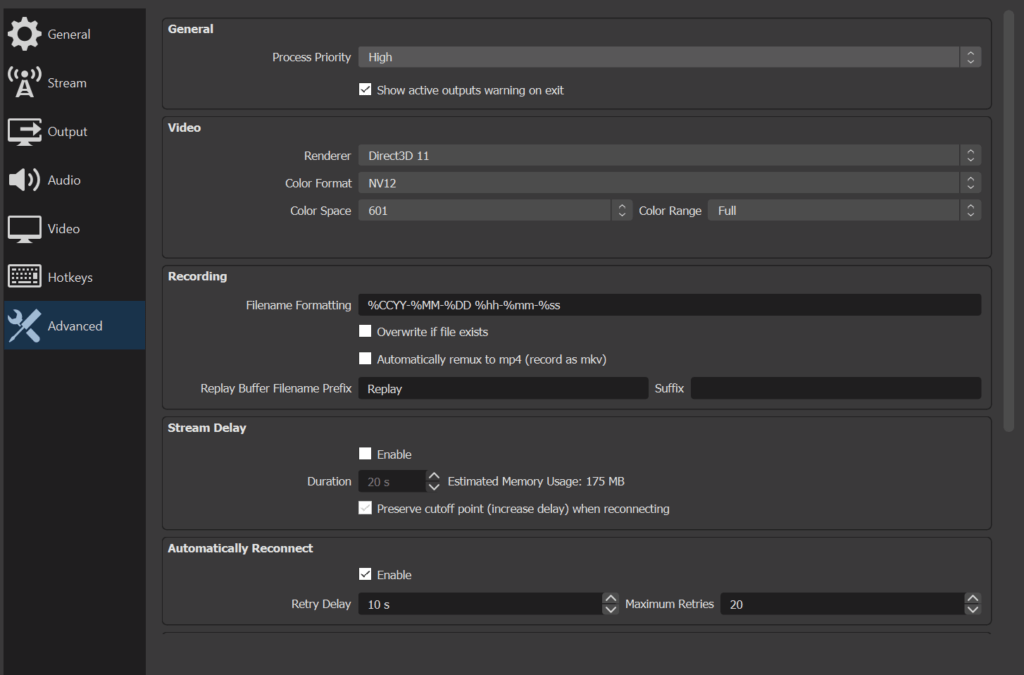
ADVANCED TAB
The Advanced tab has a couple settings to consider but personal choice come to the for here. You could ignore the settings here and leave them default. Just ensure the OBS PRIORITY is set to HIGH so it can get the resources it needs to run smoothly.
This is super important to use OBS recording settings 1080P 60 to be effective. This is probably the most important setting. A second option is to run OBS as an administrator. This gives it priority to system resources above other programs. I’d suggest not doing this for now. It’s an option for you if needed.
TEST
Testing is always important. If you’re using these settings I am confident OBS recording settings 1080p 60fps will impress you. Subsequent recordings have proven to be a good quality as well as smooth and the gameplay has remained smooth whether recording or not.


- Latest CPU’s Available Now – Amazon.com
- Get a NEW GPU Best Performance – AMAZON.com
- Upgrade RAM Here today – AMAZON.com
- Prebuilt PC Options – AMAZON.com
Author
Brendon McAliece (Aka Gunnie) is a military veteran with 23 years working on Jet Fighters, their weapons systems and ejection seat/module systems as well as munitions and R&D. Involved with flight simulation since the 1980s, he has flown all the major flight simulators over the years.
He is an Australian expat who has lived in Malaysia, UK, Saudi Arabia and more recently Thailand. He is a multi-lingual blogger who loves to share his life experiences here on LetsFlyVFR.com and DreamingGuitar.com, with his lifestyle and Travel experiences Blog plus his Dreaming Coffee website.
Learn More @ DreamingGuitar.com – DreamingCoffee.com – LetsFlyVFR.com
( HOME – BLOG – SHOP – ABOUT )
As an Amazon affiliate I may benefit from qualifying sales.