Realistic DCS World 2.7 VR Videos Made in Minutes – Just Amazing!
DCS World 2.7 VR Recording Tutorial
DCS World 2.7 VR Recording in DCS – Fast and Easy!
If you have been wanting to record your flights in DCS World 2.7 VR it has been a challenge with the Oculus Mirror not working, at least that’s my experience. when trying to record my flights in Virtual reality. I decided to look for an easy option to record these flights so I can share them on LetsFlyVFR YouTube Channel.
The procedure I have put together is fast and pretty easy to implement and only needs a few basic settings in Windows, Nvidia Control Panel as well as editing in Davinci Resolve which is a freeware video editor. I have included the full procedure below with all settings plus screen shots so you can also share your amazing combat videos from DCS World. Flying and enjoying the immersion of VR is great to be able to share so I hope you find this easy to follow and effective .
- Latest CPU’s Available Now – Amazon.com
- Get a NEW GPU Best Performance – AMAZON.com
- Upgrade RAM Here today – AMAZON.com
- Prebuilt PC Options – AMAZON.com
DCS World Settings – Great Performance.
DCS World 2.7 VR recording starts with settings in DCS World itself. These settings are still subjective and dependent on your system as far as graphics settings for general play go. The important settings are the VR settings which I wanted primarily to include but thought I would share my current graphics settings as well.
There is no special magic in these basic graphics settings, just what I have been using with my Ryzen 2600 and Nvidia RTX 2060 Super. These can now be improved as I have now have my Ryzen 5600X installed and works a treat.
DCS Graphics Settings.
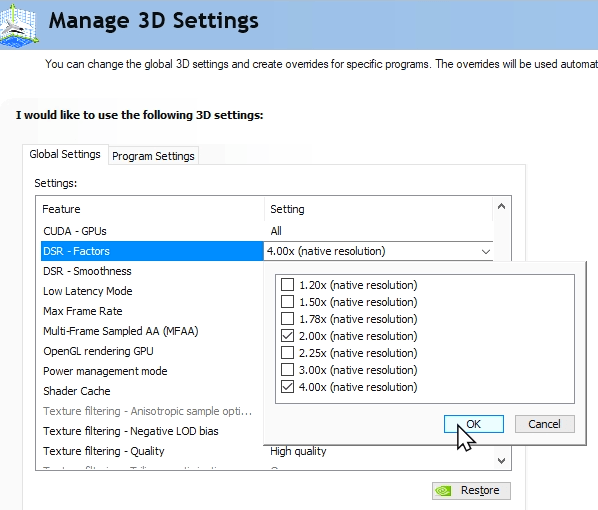
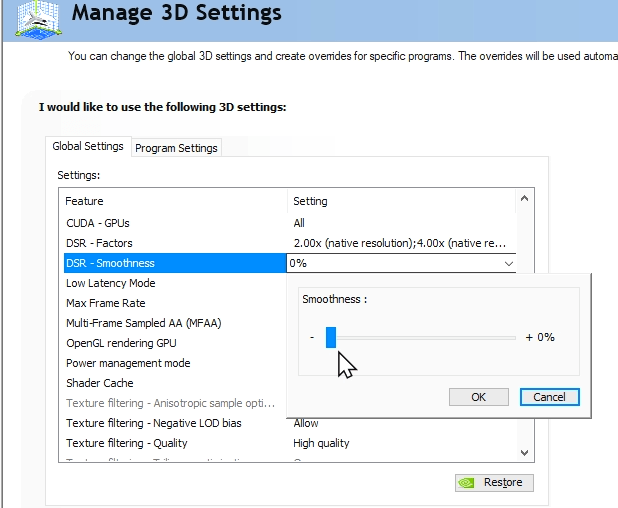
DSR or Dynamic Super Resolution has been around in the Nvidia Control panel for a few years. It seems to be ignored my many gamers but I have found it very useful especially using a TV as a monitor for a while. I have been using the Nvidia DSR and like it personally. I am getting a 4K resolution on my 1080P screen which clears the picture up on my 1080P TV.
I think its very good so please try it out. You need to set this up in the NVIDIA control panel and Ill show you this down below. My general settings are pretty high and in VR in my Oculus Rift S I get a fantastic experience.
DCS World 2.7 VR – DCS Virtual Reality Settings
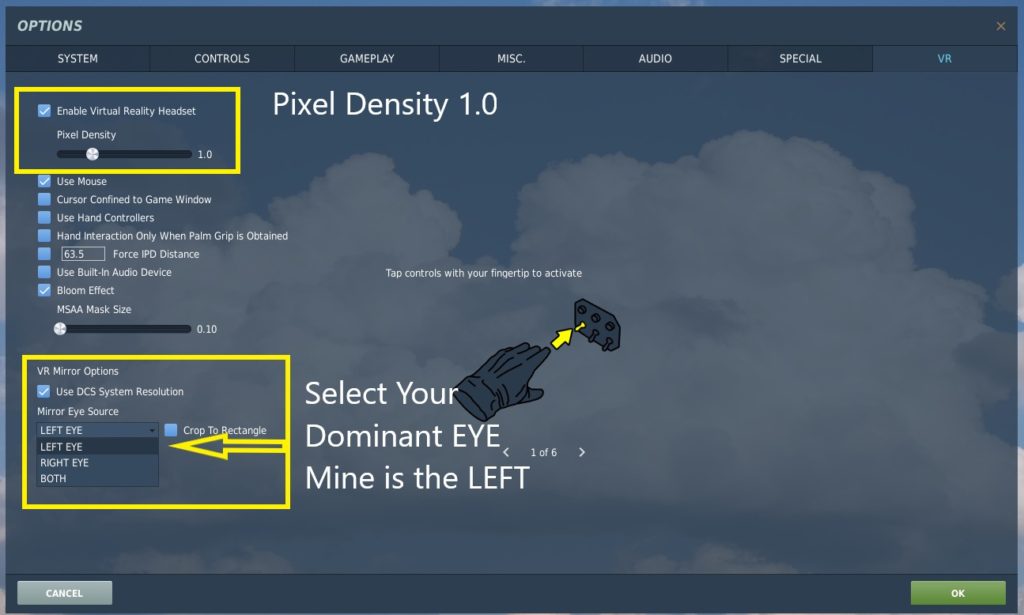
There are a couple important settings in getting ready to record your VR flights and these are personal. The EYE choice is one that will change depending on person. You need to display either RIGHT or LEFT eye only. Displaying both wont allow you to get a decent picture for your recordings for your videos. If you need test one side then the other and see if their is any real difference for you.
I have found my LEFT eye more dominant so I have selected it in the DCS VR preferences. I am a little conscious of which side is more dominant it in game ensuring I try and center the HUD view by checking my left eye view. Close and eye and ensure the HD is centered in the screen. Simple as that. If you find your RIGHT eye is more dominant then simply select it.
In recording you may see the HUD symbology off to one side or the other so this will let you know which eye is more dominants.
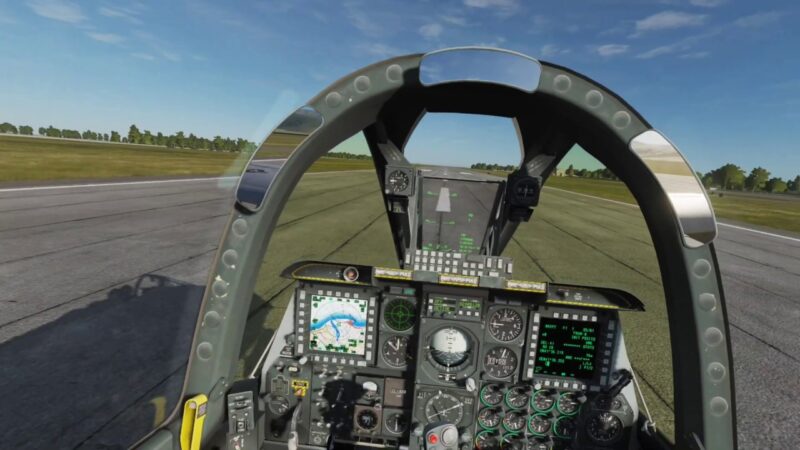
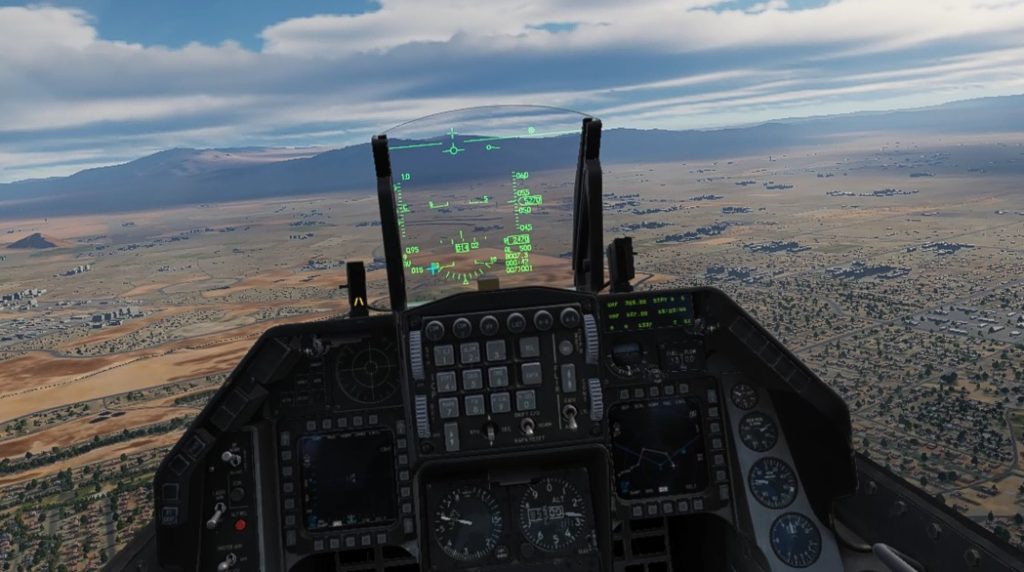
DCS World 2.7 VR – DCS In Game SCREEN VIEW
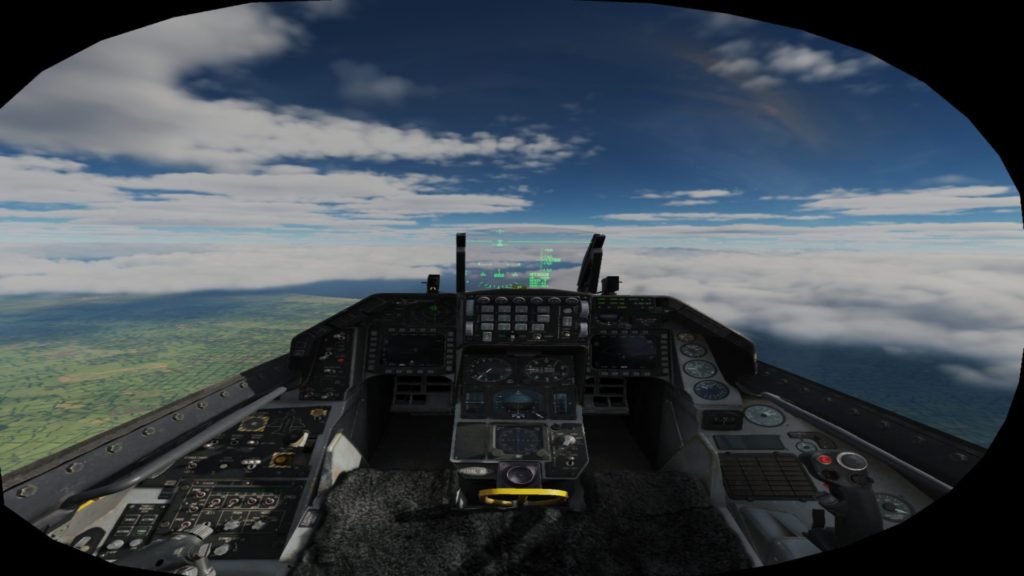
When you fire your mission up and you have selected an eye choice you will see this on the screen. Yes the view is a little long and I implore you to get your view back as far as practicable so your view is wider. In VR you can lean in and check a gauge if needed. This is the beauty of Virtual Reality. Everything is one to one scale. If you need to move your view back or forward you can use the L CTR + L SHIFT and the Num Pad / or * to move in and out.
BEFORE EDITING AFTER EDITING
NVIDIA Control Panel Settings – Edit Your DCS Virtual Reality Video in Davinci Resolve FREE
Once you have flown your mission and killed as many enemies as possible its time to share your victories with the world. If you don’t have Davinci Resolve 17 or a newer version please consider downloading it. My process may also be possible in other editing suites but this is what I use.
Davinci Resolve can be Downloaded FREE HERE. The only limitations are 4K editing and some other 3D and VR auto options. This is all we need to use this simple editing process. If you need go download it and read on.
Setting the ZOOM Settings for Full Screen. – IMPORT YOUR VIDEO. Lets get started with creating your VR Video.
- Using your mouse click in the MEDIA Area (top Right) and right click. You can now navigate to where you saved your original video. Use the IMPORT MEDIA option to select your video and import it into Davinci Resolve.
- Now your video is sitting in the media pool you can click and hold the clip and drag it down to the time line. Let the mouse go and the Video and its Audio tracks will be in your timeline area.
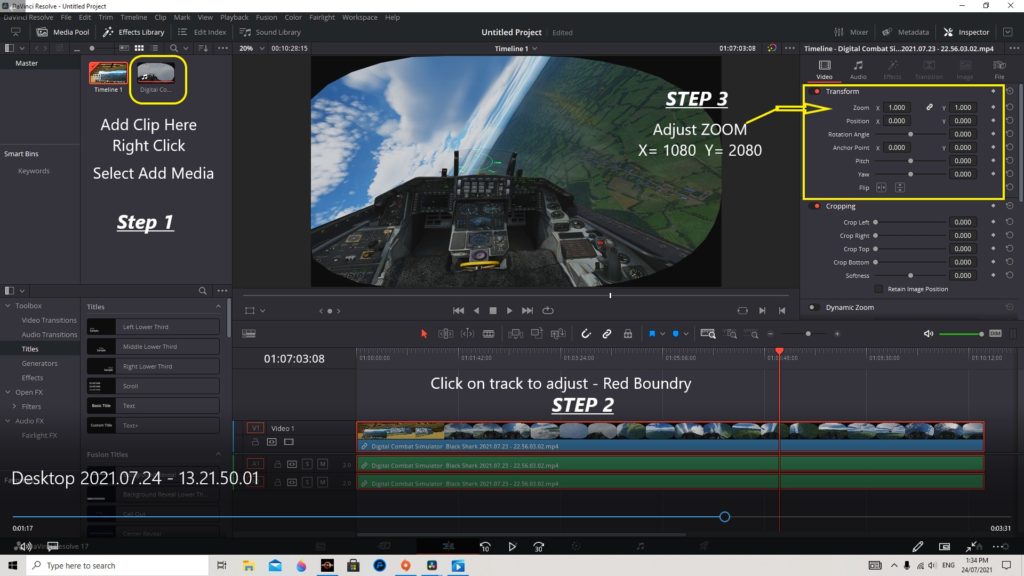
- Now its time to make the magic with simply apply a couple ZOOM adjustments. This will bring the video into FULL SCREEN and no black boundary. On the right hand side you will see the edit area. This is where we have the zoom controls. It is important to “Please click on your clip first” to select it so you can edit it.
- IMPORTANT – Click on the little chain link between the two zoom options in the menu. This unlinks them or they will move together and we need to adjust them independently.
- Select by clicking on the box and drag it slowly sideways to adjust it to read 1.080 or just clicking and typing in the value into the blank box.
- Select in the right box and drag it out to read 2.080 or again you can type it in the box..
- Your Video will now fill the screen and have no BLACK BARS around the edges. Hit CTR + S and save your project. Give it a name.
DCS World Video – Stabilize for Smooth Play
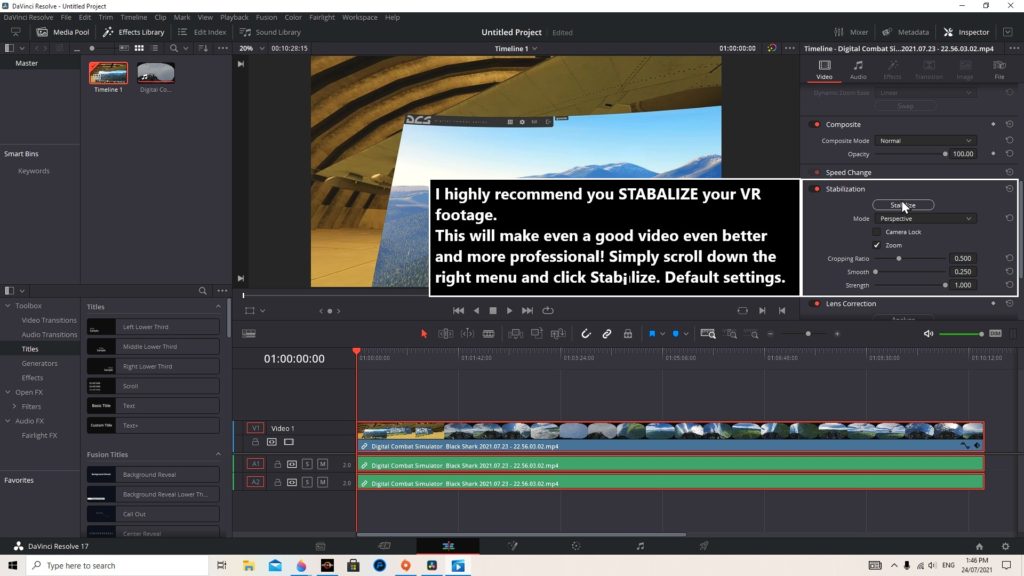
The next step I recommend is to stabilize your video. This will remove a lot of the shaking and make it smooth for the viewer to watch. There are quite a few options available but I have found the DEFAULT settings to be fine in most occasions.
The stabilize tab may be hidden and is down the right side menu below the ZOOM Controls you just used. Click on the panel that says Stabilize and the panel will open up for you.
Again I would recommend just trying the default settings. Its important to ensure you Click on the track in your timeline so it has a red border and select stabilize in the menu and sit back while it does its magic.
If its a long clip it can take a while but you can do other things on your PC while it works. I recommend you do this now before editing it further. It will ensure the whole video is consistently stabilized.

- Joystick / HOTAS – AMAZON.com
- Rudder Pedals – AMAZON.com
- Throttle Quadrant – AMAZON.com
- Gaming Chair – AMAZON.com
- VR Headset – AMAZON.com
EDITING Your NEW VR Video.
Editing your VR Video is pretty easy and If you have any experience in any editing suites then you will find this a breeze. The basic tools are CUT which is the razor tool located just above the timeline where your video resides. You can use this to cut sections you don’t want and once there are a beginning and end cut you can hit DELETE and it will disappear for you.
There are transitions available in the menu to the right of the timeline to make the cuts in your video blend together like a professionally edited movie. Selecting VIDEO transitions you will find plenty but normally a simple dissolve transition works well. When you have cut a section of your video out click on the Dissolve Transition and drag it onto the join between the new edited timeline video.
EXPORT YOUR VR VIDEO
The final task is to EXPORT your video so you can then Upload it with your friends and subscribers on YouTube. This is an easy task as well in DaVinci Resolve. We first need to get to the OUTPUT tab which is the last one on the bottom of the screen. It looks like a little rocket. Click on this and you will be taken to the EXPORT Video Page.
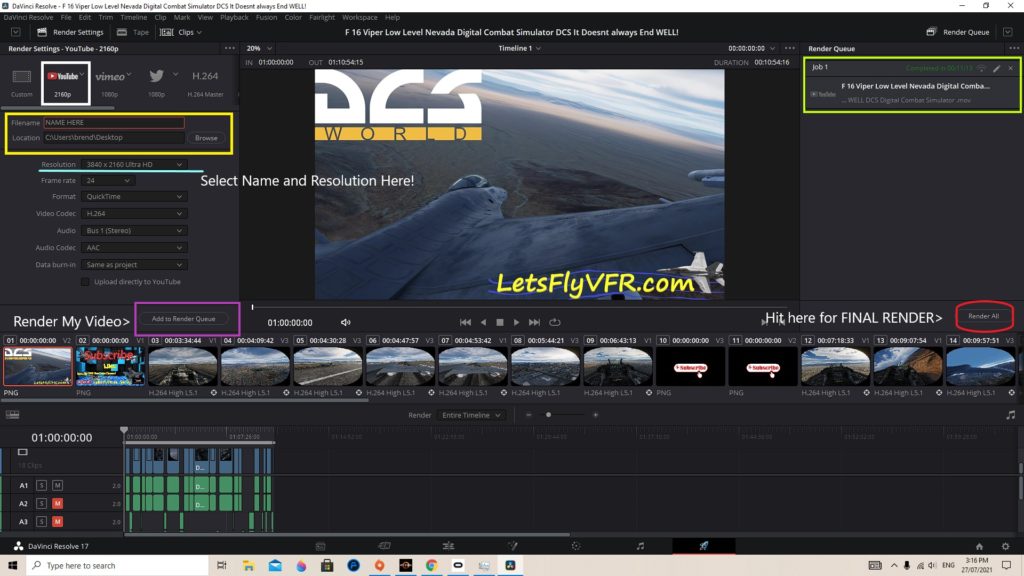
- Selecting the YOUTUBE icon
- Clicking on the YouTube Icon there will now be a range of resolutions to choose which in my case is always 4K. If you choose the wrong resolution the video will be small or only partly seen. Ensure if your following my DSR 4k Choices you select 4K here.
- Next you need to give the Video a title in the box which will be blank.
- The next task is to select a destination to save the video. The desktop may be an easy place to save it. Here it will be fond quickly for your upload but you can choose anywhere you like. I delete them once they are uploaded to YouTube so I dont fill my system with already made videos.
- The next step is to tell the system your happy and click on the Render button. Your Video will now appear on the righthand side of the page. It is ready to render now.
- Click the render video and the system will commence rendering the video for you. Once completed and the green bar ends as it progresses Davinci will tell you it is complete. Now you may wish to CTRL + S to save your project and go to where you saved the video and play it. Make sure the video looks the way you want it to. If yes then Go ahead and upload it to YouTube. Your all finished. Wasn’t that very easy.
The Results – Amazing VR Video to Share.
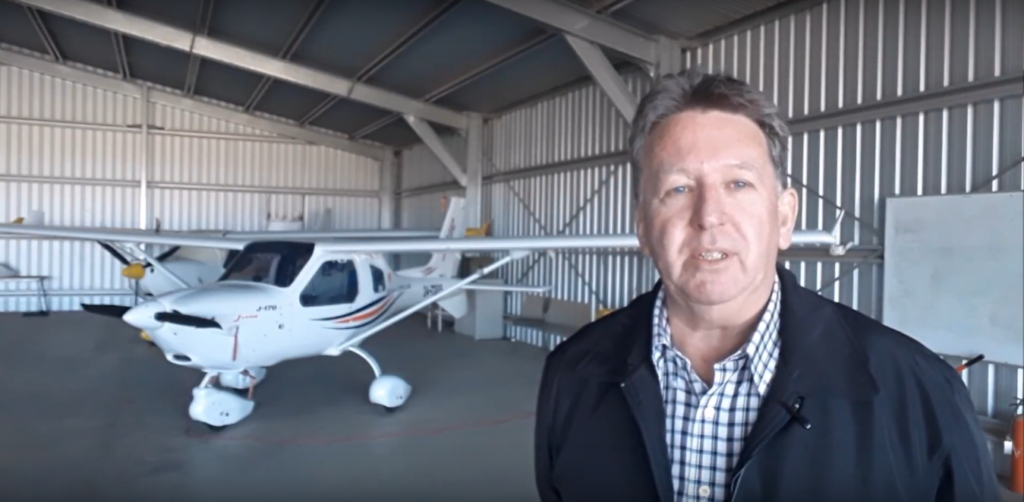
The Author:
Brendon McAliece is a multi lingual-expat who brings over three decades of flight simulator/PC building experience as well as over two decades of real world jet fighter experience as a weapons/egress technician.
He holds a sport pilot certificate giving him real world flying experience. Hi travels have taken him from Europe to the Middle East, Asia and his home of Australia. He has a passion for travel, languages, flight simulation as well as guitaring and coffee. You can read more in his blogs below.
Learn more @
DreamingGuitar.com – DreamingCoffee.com – LetsFlyVFR.com
( HOME – BLOG – SHOP – ABOUT )
As an Amazon affiliate I may earn on qualifying sales.