



X-Plane 12 VFR Flying: Your First Flight From Startup to the Runway.
If you’ve ever loaded into X-Plane 12, looked around the cockpit of a Cessna 172 and thought:
“Okay… now what? – What Should I do?”
You’re definitely not alone.
Flight simulators can be incredibly realistic, but realism can also make them intimidating. There are switches everywhere, instruments you’ve never seen before, radios to configure, frequencies to understand and procedures that seem to assume you already know what you’re doing.
That’s exactly what we’re going to change. This guide is the beginning of a structured VFR flying series for X-Plane 12, designed to take you from the basics and gradually build your skills. We’re not going to throw a 200-page aviation manual at you. We’re going to learn one skill at a time.
And in this first lesson, we’re going to take the aircraft from sitting on the ground to entering the runway ready for takeoff.
We’re deliberately stopping there. The actual takeoff deserves its own lesson.
What Does VFR Mean?
Before we touch the aircraft, let’s establish what we’re learning.
VFR stands for Visual Flight Rules. This means you have restrictions on when and where you fly because of visibility. No you can all of a sudden become an instrument pilot!
Everything is PURE VISUAL!
That’s a bad idea and will get you virtually killed! If you fly in VR as I do it’s still possible to suffer from “Spatial Disorientation – (Wiki to Read More)”. Its a spooky feeling when your head says your level but your turning more and more and if not corrected you will be in a spiral dive and going to die even in a sim like X-Plane 12. You need to crawl before you walk then you can run!
Pilots Perspective.
The graphic below shows you the different separations between clouds both horizontally and vertically as a basic flight sim reference. It also shows you the visual difference you need to have to fly in VFR conditions. Take a look and remember.
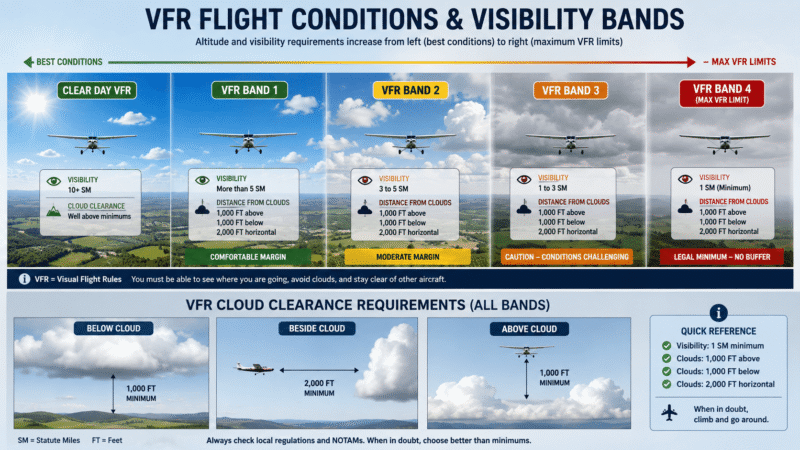
In simple terms, VFR flying means that the pilot uses outside visual references to control and navigate the aircraft, while still using the aircraft’s instruments and other available information to maintain safe flight.
Experience Flight Simulation Like Never Before!
Choose Your Pimax Crystal Light, Crystal Super or Dream Air Today and Enjoy an Exclusive 2% LetsFlyVFR Discount*
Take your cockpit to the next level with Pimax VR. From the exceptional value of the Crystal Light to the flagship Crystal Super and the revolutionary Dream Air, there’s a headset designed for every serious flight simmer.



Pimax VR Buyers Guide – 2026 Read Now!
*Discount applies to eligible Pimax headsets. Dream Air SE excluded.
Making a Turn – Point of View!
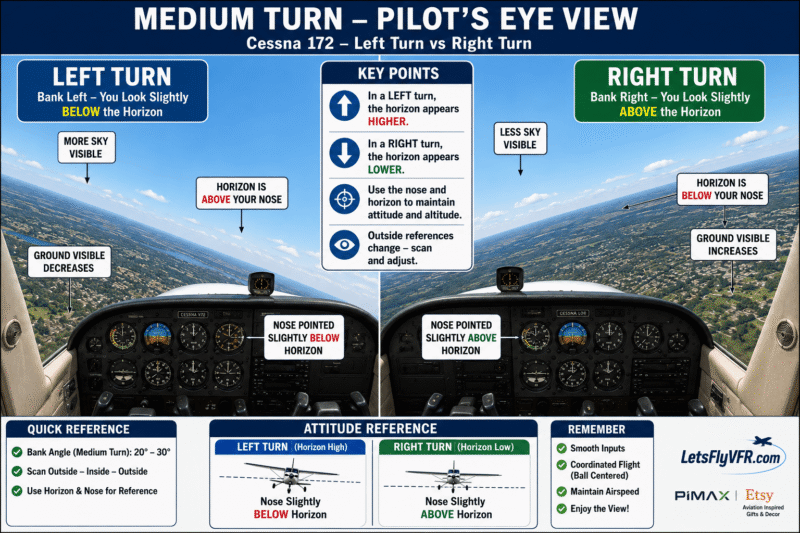
This also applies to you when your turning or either climbing or descending. Your required to recognise all of these without referencing instruments. You reference the horizon against where it aligns in your own cockpit. Is the top of the instrument panel above/below or inline and by how much.
The same also is true in turns left and right. In a Cessna 172 your perspective as Pilot in Command (POD) is below the horizon then above the horizon in a right turn. Remember your not on the centreline so you cannot remain neutral. (See graphic below).
For a simulator pilot, VFR is one of the best ways to learn the fundamentals of flying. You aren’t simply following a GPS route from one airport to another.
You’re learning to:
- Control the aircraft.
- Understand the environment around you.
- Navigate visually.
- Communicate on the radio.
- Follow airport procedures.
- Manage the aircraft.
- Make decisions.
- Maintain situational awareness.
And most importantly, you’re learning why you’re doing things.
That is going to be a major theme throughout this series.
This Isn’t Just an X-Plane Tutorial.
There’s an important distinction here. We’re using X-Plane 12 as our training environment, but the objective isn’t simply to teach you which buttons to press.
A tutorial could tell you:
Turn the battery on.
Turn the avionics on.
Start the engine.
Tune the radio.
Taxi to the runway.
That’s useful but it doesn’t necessarily teach you to fly.
Instead, we’re going to ask:
Why are we doing that?
What are we checking?
What could go wrong?
What should the pilot be thinking about?
That’s what turns simulator flying from button pressing into actual pilot training.

BUILD THE PERFECT COCKPIT… THEN DRESS THE PART.
Discover Premium Flight Simulator Apparel, Wall Art, Pilot Gifts and Aviation Accessories at LetsFlyVFR – ETSY STORE.






Lesson 1: Before You Start the Engine.
Before starting anything, take a moment to look at the aircraft. This sounds obvious, but it’s one of the easiest habits for a new simulator pilot to skip. You spawn into the aircraft, immediately start flipping switches and, thirty seconds later, you’re wondering why something isn’t working.
Slow down!
A pilot should know the condition of the aircraft before attempting to start it.
In the real world you would have checked the Aircraft Documentation – So open up your aircraft before you load into X-Plane 12 and check the FAILURES – Reset them but I would always leave them as possible. This is realistic and how the real world operates.
Next – What Are You Planning to Fly Today?
Honestly before anything else take a second to consider this question. If your planning just to do some circuits or fly full stop landings and take offs as well as touch and go’s? Plan and think what you need to do that.
What’s the aim of this flight? Learning? Scenic Flight? Fly over your own home in the sim? What do you want to achieve???????
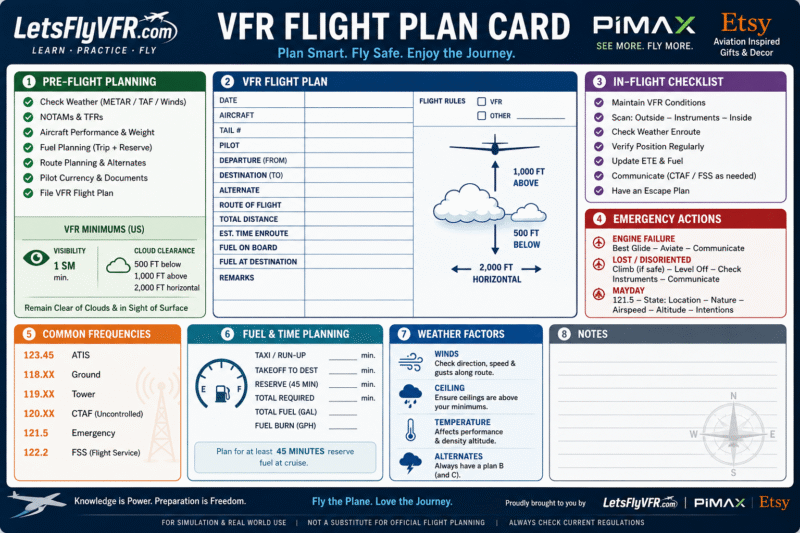
LetsFlyVFR – Flight Planner – Download.
Going on a Cross Country Flight?
What if your planning a short cross country flight. Lets put that in a plan before we go.
- Where are you?
- Where do we want to go?
- What waypoints do you plan to use?
- Note – Headings and distances plus time to each waypoint.
- What aircraft are you flying today?
- Do you know its critical speeds?
- Rotate – Climb – Cruise settings – decent – Best glide speed – if you loose an engine etc.
Ok, now you have a plan and a goal for the flight. Great!
Look Around the Cockpit.
Take a few seconds to identify the major controls.
You don’t need to understand every instrument yet.
Start with the basics:
- Flight controls
- Throttle
- Mixture
- Carburettor heat if fitted
- Flaps
- Trim
- Brakes
- Master switch
- Avionics
- Magnetos/ignition
- Primary flight instruments
- Engine instruments
- Radios
You don’t need to memorise everything in one sitting.
The objective is simply to start becoming comfortable in the cockpit.
Know Where You’re Parked.
Before starting the aircraft, establish where you are. There are lots of resources that have maps of airports with labels for each runway, taxi way as well as parking areas too. If you fly regularly from a specific airport like I often do get its airport map.
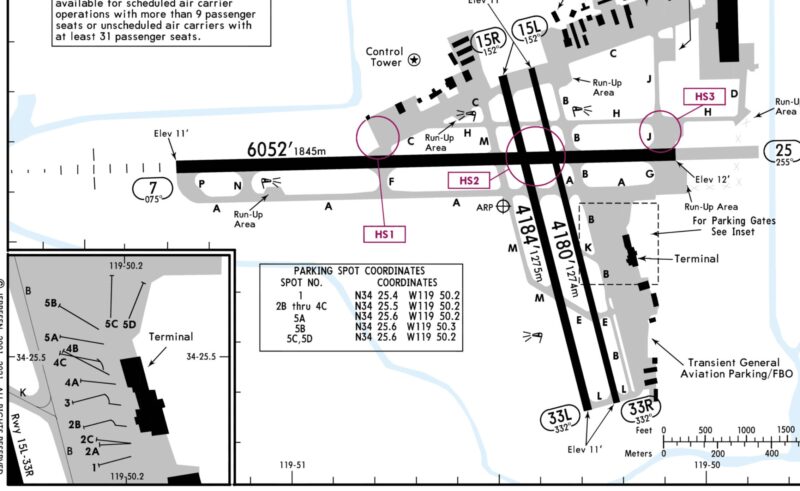
Are you:
- On a parking stand?
- At a general aviation ramp?
- At a fuel area?
- Near a taxiway?
- Already facing a taxiway?
- Somewhere that requires a turn before taxiing?
This matters because your first movement of the aircraft should be deliberate. You should already have an idea of where you’re going.
Don’t start taxiing and then decide where the runway is.
Before You Starting the Engine!
If your at a towered airport at this point you would get the ATIS report and this will give the Active Runway so you can plan your taxi path even if the tower gives you directions you can be mentally prepared. If at a non towered airport then your on your own!
The ATIS will give you weather reports and also any NOTAMS (Notice to Airmen) which may be maintenance on taxiways or Runways closed as well as other important information.
Finally you need to ask for permission to start your engine!
Don’t just kick the engine it into life, X Plane 12 ATC will allow you to do this correctly as well as give you the latest ATIS and other important local information.
Lets Start!
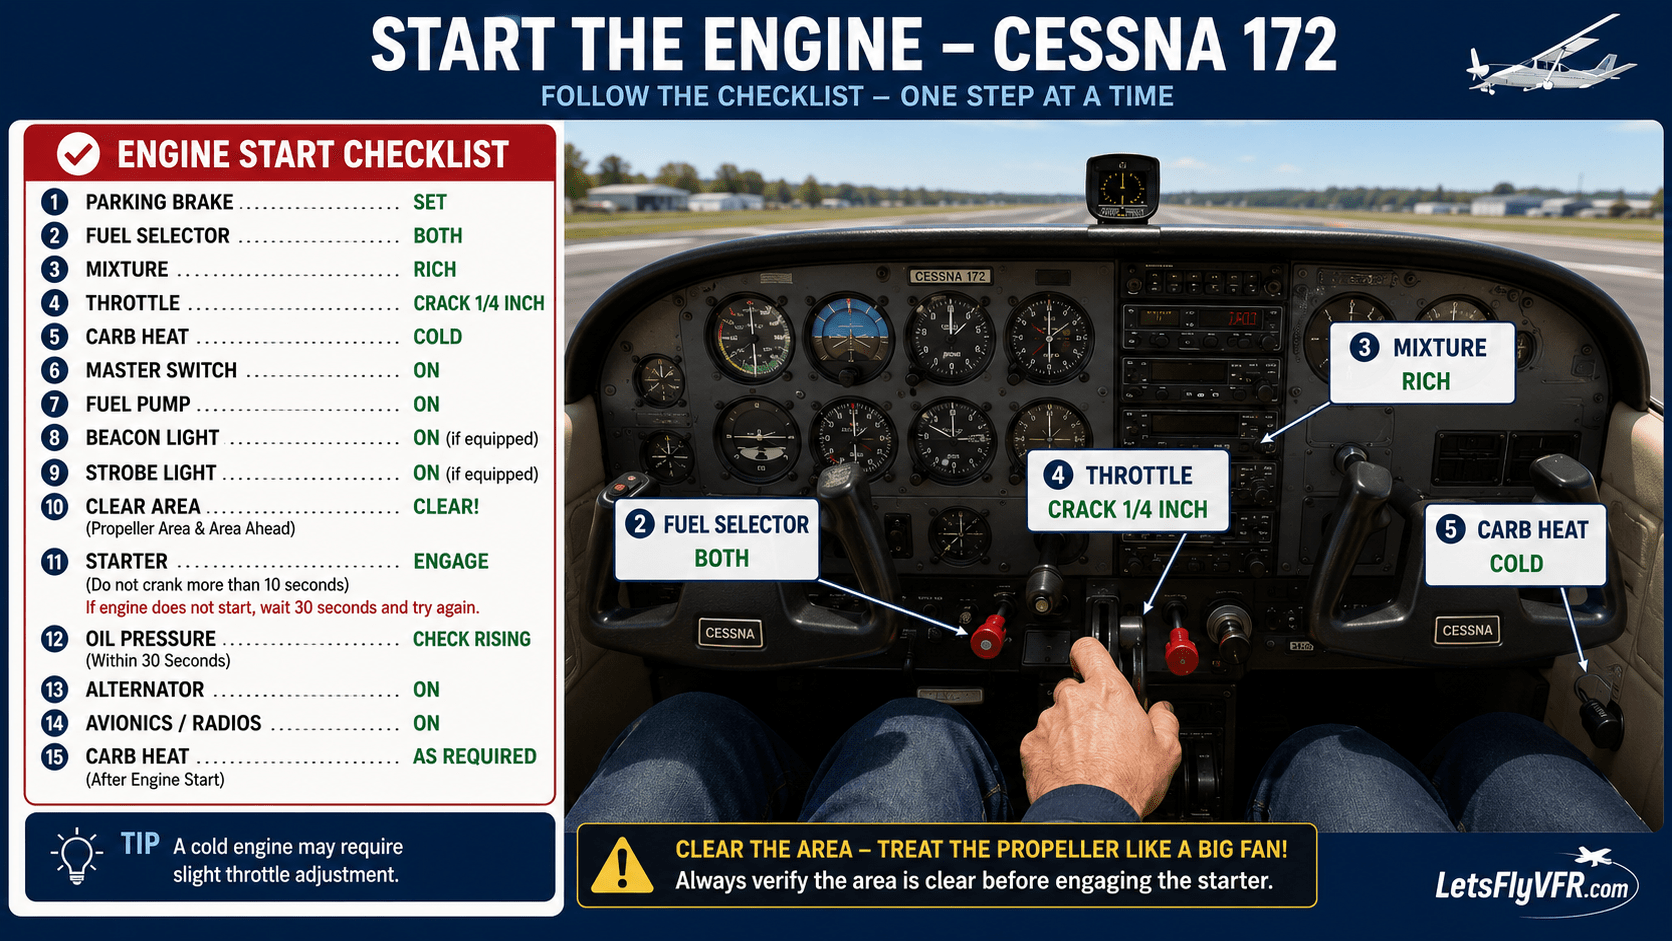
The exact startup procedure will depend on the aircraft you’re flying. For this series, we’ll use a conventional light aircraft (Cessna 172) as our basic example.
The important thing isn’t memorising a magical sequence of switches.
It’s understanding the process.
Before starting the engine, you want to establish that the aircraft has the power and configuration required for a safe start as well as the area is clear! Don’t want anyone unknowingly walking into a spinning propeller do we. It happens!
That means checking things such as:
- Battery/master
- Fuel system
- Mixture
- Throttle
- Primer if required
- Magnetos
- Propeller area
- Parking brake
Then comes the starter.
Once the engine fires, don’t immediately start taxiing.
The engine has started be patient. The aircraft isn’t ready to move yet because the engine must warm up. Now its time to check all the doors and winds are where they need to be. Check the surrounding area for hazards.
Engine Running Doesn’t Mean You’re Ready to Taxi.
This is one of the first important lessons for new simulator pilots. Starting the engine is only one part of the process. Now you need to confirm that the engine is actually operating correctly.
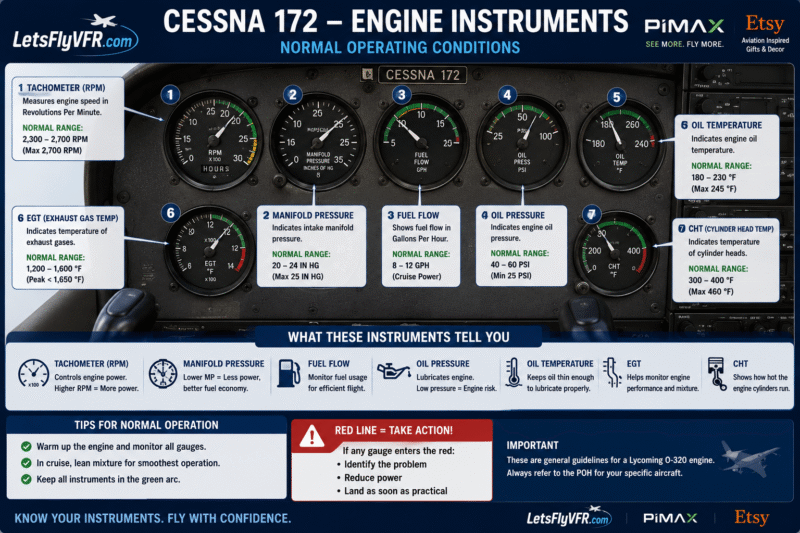
Look at the engine instruments.
Depending on the aircraft, you’ll be checking things such as:
- Oil pressure
- Oil temperature
- RPM
- Fuel pressure
- Electrical system
- Vacuum/suction where applicable
The specific instruments vary from aircraft to aircraft.
But the principle remains the same:
Start the engine → verify the engine → configure the aircraft → then taxi.
Don’t simply assume that because the propeller is turning, everything is fine.
Before Taxi: Get Organised.
Now we’re approaching one of the most important stages of the flight. Before moving, the aircraft should be configured for taxi. This is where you should start developing a cockpit flow.
Rather than randomly looking around the cockpit, develop a consistent sequence.
For example:
Aircraft
- Engine instruments checked
- Flight controls checked
- Trim set
- Flaps configured as appropriate
- Brakes checked
- Doors/windows checked
Electrical
- Master checked
- Avionics configured – Programmed Waypoints – Freq Set.
- Lights as required
Navigation
- Heading information checked
- Airport diagram available
- Taxi route understood
Communications
- ATIS/AWOS obtained where available
- Ground frequency identified
- Radio volume checked
- Transponder configured as appropriate
The goal is simple:
Don’t move until you’re ready to move. Don’t Move till You Have Permission!
Radio Communications in X-Plane 12.
This is where many new flight-sim pilots become uncomfortable. They can fly the aircraft perfectly well, but the moment someone asks them to use the radio, everything falls apart.
Don’t worry. Radio communication becomes much easier once you understand its structure. You don’t need to sound like an airline captain. You need to communicate clearly.
Always Remember: AVIATE – NAVIGATE – COMMUNICATE .
Start With the Information You Need.
Before calling Ground, obtain the airport’s current information if available.
This might come from:
- ATIS
- AWOS
- Airport information
- Other available airport sources
You’re looking for information such as:
- Active runway
- Wind
- Weather
- Visibility
- Altimeter setting
- Airport information identifier
You don’t necessarily need to memorise every piece of information immediately. You can have charts and follow them.
The important thing is to understand that this information helps you build the picture of what is happening at the airport.
Ground Frequency.
Once you’re ready to taxi, you need to communicate with Ground when the airport’s procedures require it. Your call should be short and structured. If you have an airport diagram from the airport itself it often has all the radio frequencies on it.
For example:
“Example Ground, Cessna 12345, at the general aviation ramp, VFR departure to the north, information Alpha, request taxi.”
Notice how little information is actually needed.
You’re telling Ground:
Who you are → where you are → what you want.
Don’t turn the radio call into a speech. Brief – Concise – Accurate.
The Readback. Have your Note Pad Ready!
Eventually you’ll receive a taxi instruction. This is where another important skill begins.
Read it back. THis confirms you have the correct information before you move anywhere.
If Ground tells you:
“Taxi to Runway 18 via Alpha and Bravo, hold short Runway 12.”
You need to understand the instruction.
Your readback should confirm the important elements, particularly the runway and hold-short instruction. This is not simply an X-Plane rule. It is an important part of aviation communication.
Taxiing in X-Plane 12.
Now we’re finally ready to move. Release the brakes carefully. Add only the power required to get the aircraft rolling. A common mistake for new simulator pilots is using too much throttle during taxi. You don’t need to race to the runway.
Taxiing should be controlled and deliberate.
Look Outside.
One of the biggest mistakes new flight-sim pilots make is staring at the instruments while taxiing. Look outside. Your primary job during taxi is to know:
Where is the aircraft going?
Use:
- Taxiway markings
- Signs
- Airport layout
- Runway markings
- Other aircraft
- Your airport diagram
Your instruments still matter, but they aren’t the thing you should be staring at continuously.
The Yellow Taxiway Line.
The yellow taxiway centreline is an extremely useful visual reference. But don’t fall into the trap of simply following the yellow line without knowing where it leads. You should understand your taxi clearance.
If Ground tells you:
Taxi Alpha, Bravo, hold short Runway 27.
You should be mentally following that route.
The line helps you execute the clearance.
It doesn’t replace understanding it.
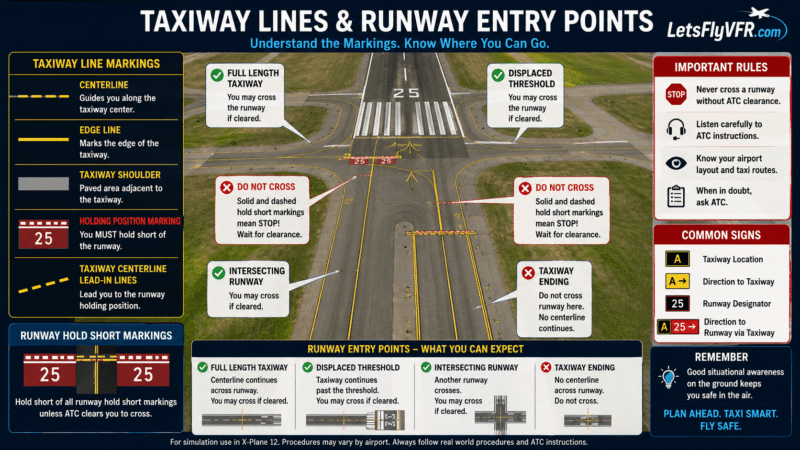
Hold-Short Lines.
This is one of the most important markings you’ll encounter. When you approach a runway, you will normally encounter a holding position. This is where you stop unless you have been cleared to proceed.
This distinction is critical:
Taxiing toward a runway does not mean you are cleared onto the runway.
You may have permission to taxi to a runway while still being instructed to hold short.
That means:
Stop.
Don’t cross the line because the runway looks empty. Don’t cross because you’re in a simulator.
If you get taxi via Alpha – Charlie – Echo & Cross at Foxtrot – You MUST check the Approach and Runway are clear before crossing.
f you get taxi via Alpha – Charlie – Echo & HOLD at Foxtrot – You MUST STOP & wait for permission to cross!
Develop the habit correctly now.
The Run-Up – More Important Than you Think!
Once you’ve reached the appropriate run-up area, it’s time to check the aircraft before committing to the takeoff.
This is the run-up.
The exact procedure depends on the aircraft.
In a typical light aircraft, the run-up can include checks such as:
- Engine RPM
- Magnetos
- Carburettor heat where applicable
- Oil pressure
- Oil temperature
- Suction/vacuum
- Electrical system
- Engine response
But the run-up isn’t only about the engine.
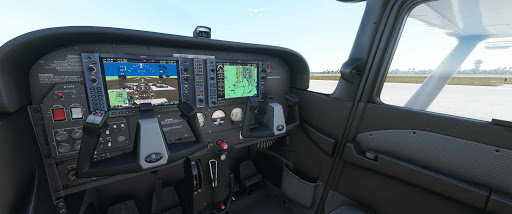
This is where you park generally off the main taxiway then put the brakes on. In the X Plane 12 Cessna 172 you select 1750 RPM and cycle the Magneto from BOTH – to Left and check the RPM drop. Its normally about 50 rpm. Return it to both then go back from both then right. You should expect 50 RPM drop if all is well.
You’re also confirming that the aircraft is configured for departure.
Flight Controls.
Before takeoff, you need to know that the aircraft’s flight controls are responding correctly.
Check:
- Ailerons
- Elevator
- Rudder
And verify that the controls are moving in the correct direction. This ensures a control lock has not been forgotten and lock your controls on takeoff! This has happened so don’t be complacent!
The Ailerons and Elevator should move smoothly and not have any restriction.
This is particularly important in a simulator because hardware configuration errors can occur.
Your joystick or yoke might be:
- Reversed
- Misconfigured
- Not recognised correctly
- Assigned to the wrong axis
- X Plane 12 Decides to go to a Default {parameters and not YOUR Chosen one).
Finding that out after takeoff is a terrible time to discover it.
Find it on the ground.
Trim and Flaps.
Check your trim. Make sure it is configured for the planned departure.
Then check the flaps. Don’t simply assume they’re correct because they were correct on your previous flight.
Develop the habit of checking.
Every flight.
Before Entering the Runway.
We’re now approaching the final stage of Episode 1.
The aircraft is:
- Started
- Checked
- Configured
- Communicating
- Taxiing
- At the run-up area
- Ready for departure
But there is one final mental transition. You’re about to move from the taxi environment into the takeoff environment. This is where you should stop and think.
Confirm the Runway.
Look at the runway numbers. Do they check with your desired heading. Does your secondary compass also agree with your heading? Check them all!
Don’t rely entirely on the radio. Don’t rely entirely on the GPS. Don’t rely entirely on the airport diagram.
Look outside.
Confirm:
- Correct runway
- Runway direction
- Runway condition
- Traffic
- Wind
- Departure path
Then check the aircraft.
Your Takeoff Briefing!
Before entering the runway, know what you’re about to do. You should have a basic plan.
Think about:
Where are we going?
Which direction are we departing?
What happens if the engine fails?
Where could I land?
What is my initial climb direction?
What altitude am I targeting?
What Speed You Intend to Climb At?
What’s your Go / No Go point down the Runway?
You don’t need to give yourself a ten-minute briefing for a Cessna.
But you should have a plan.
Are You Actually Cleared Onto the Runway?
This is another critical distinction.
If you’re operating at an airport with ATC, receiving a taxi instruction to a runway is not automatically the same as receiving clearance to enter that runway.
You may be told:
“Taxi to Runway 18, hold short.”
That means exactly what it says.
Hold short.
You need the appropriate clearance before entering the runway.
This is one of those habits that we want simulator pilots to learn correctly from the beginning.
Entering the Runway.
Eventually, you’ll receive the appropriate instruction or clearance. Now you can cross the holding position and enter the runway.
Before you ENTER:
- Look for traffic. Runway – Pattern – Downwind – Base – Final!
- Confirm the runway.
- Check the final approach path.
- Enter the runway.
- Align with the centreline.
- Stop or position yourself as appropriate.
- Complete your final scan.
Now you’re ready.
BUILD THE PERFECT COCKPIT… THEN DRESS THE PART.
Discover Premium Flight Simulator Apparel, Wall Art, Pilot Gifts and Aviation Accessories at LetsFlyVFR – ETSY STORE.






And That’s Where We Stop!
At this point, you’ve taken the aircraft from its parking position all the way to the runway. You have learned the basic sequence:
Start → Check → Configure → Communicate → Taxi → Run-Up → Hold Short → Clear → Runway
And that’s enough for one lesson. We’re deliberately not taking off yet.
Because takeoff deserves its own lesson.
In the next part, we’ll look at what happens once you’re sitting on the runway:
- Final pre-takeoff checks
- Power application
- Directional control
- Acceleration
- Rotation
- Initial climb
- Engine monitoring
- Maintaining runway heading
- What to do if something goes wrong
- And how to avoid the mistakes that cause so many new simulator pilots problems
The Bigger Goal: Learning to Fly, Not Just Learning X-Plane 12.
This is the philosophy behind this entire series. We aren’t trying to turn you into someone who can memorise a sequence of buttons. We’re trying to make you a better virtual pilot.
Every lesson will build on the previous one.
Today:
Get the aircraft ready and reach the runway.
Next:
Take off safely and establish the climb.
Then:
Fly the circuit.
Then:
Understand downwind.
Then:
Learn when and how to turn base.
Then:
Build a stable final approach.
Then:
Land consistently.
And eventually, we’ll move into more advanced VFR skills, navigation, emergencies and decision-making.
That’s the progression.
Beginner → competent → confident → advanced.
Your X-Plane 12 Challenge!
Don’t just read this article.
Open X-Plane 12.
Choose a familiar light aircraft. – Get its Important Speeds from a Reliable Source.
Pick a reasonably simple airport. Lets take some of the worry of a bit busy airport away!
And practice the sequence:
Startup
↓
Aircraft checks
↓
Radio
↓
Taxi
↓
Run-Up
↓
Hold Short
↓
Runway
Then stop.
Don’t take off.
Do it again.
And again.
The objective isn’t speed.
The objective is to make the process deliberate and repeatable.
Eventually, you should be able to sit in the cockpit and instinctively know:
“Okay. What’s next?”
That’s when you’re actually learning to fly.
X-Plane 12 VFR Series — What’s Next?
This is Episode 1: From Startup to the Runway.
In Episode 2, we’ll finally leave the ground and tackle one of the most important skills in VFR flying:
How to make a controlled, predictable takeoff and climb.
Because getting airborne is easy.
Getting airborne properly is the skill.
Want to become a better virtual pilot? Follow the series and build your skills one flight at a time.
Author

Brendon McAliece (Aka Gunnie) is a military veteran with 23 years working on Jet Fighters, their weapons systems and ejection seat/module systems as well as munitions and R&D. Involved with flight simulation since the 1980s, he has flown all the major flight simulators over the years.
He is an Australian expat who has lived in Malaysia, UK, Saudi Arabia and more recently Thailand. He is a multi-lingual blogger who loves to share his life experiences here on LetsFlyVFR.com and DreamingGuitar.com, with his lifestyle and Travel experiences Blog plus his Dreaming Coffee website.
Learn More @
DreamingGuitar.com – DreamingCoffee.com
LetsFlyVFR ETSY Store – Discover PIMAX VR Now!