
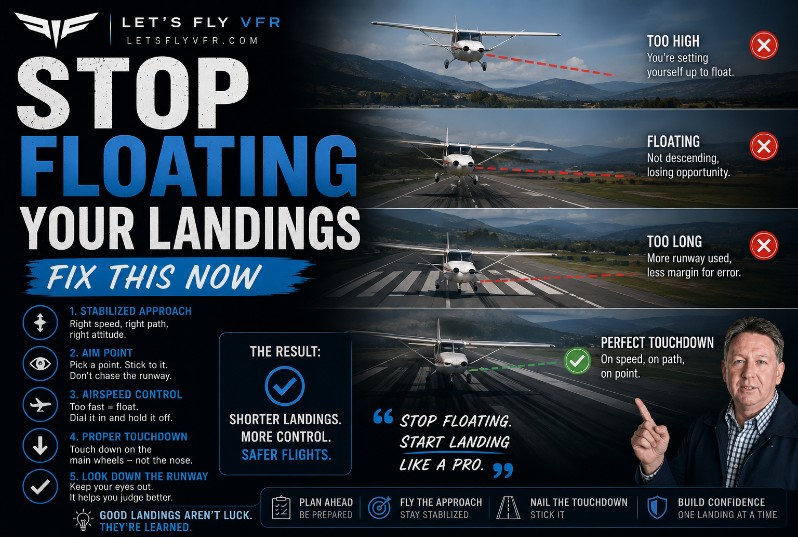
Fix Your Landings Now!
SEO Title: Stop Floating Your Landings in X-Plane 12 — Fix This Now
Meta Description: Floating halfway down the runway in X-Plane 12? Learn why landings float, how excess speed and energy cause it, and how to fix your approach and flare.
Primary SEO Keyword: stop floating landings
Secondary Keywords:
- X-Plane 12 floating landings
- X-Plane 12 landing tips
- X-Plane 12 landing tutorial
- how to stop floating landings
- why does my plane float on landing
- X-Plane 12 Cessna 172 landing
- VFR landing mistakes
- flight simulator landing problems
- how to land properly in X-Plane 12
- X-Plane 12 approach speed
- landing too fast
- VFR landing technique
- how to improve landings
- X-Plane 12 VFR flying
- flight simulator landing tips
Suggested URL Slug:/stop-floating-your-landings-x-plane-12/
Stop Floating Your Landings – Fix This Now
Let’s talk about one of the most frustrating things that happens when you’re learning to land in X-Plane 12.
You’ve flown what looks like a good approach.
You’re lined up.
You’re over the runway.
You start the flare…
And then:
Nothing.
The aircraft doesn’t land.
It just keeps flying.
And flying.
And flying.
You keep pulling back slightly.
Still floating.
The runway markings are disappearing underneath you.
You start wondering:
“Why won’t this thing land?”
Then you finally touch down.
Except you’re now halfway—or more—down the runway.
Sound familiar?
If it does, you’re not alone.
And here’s the good news:
The problem probably isn’t your flare.
Your flare is often only revealing a problem that started much earlier in the approach.
Why Does an Aircraft Float?
The short answer is:
Too much energy.
And one of the most common reasons for that excess energy is excessive airspeed on final.
The FAA’s Airplane Flying Handbook explicitly identifies excessive final-approach airspeed as a common cause of floating during the round-out. The aircraft can remain airborne well beyond the intended touchdown point, potentially using up a large amount of runway.
This is one of the most important concepts to understand.
You don’t fix a floating landing by trying harder to land.
You fix it by arriving at the runway with the right amount of energy.
The Classic Beginner Mistake
Here’s how it often happens.
You’re flying final.
Your target approach speed is, for example, around 65 knots.
But you’re actually doing:
72 knots.
You know you’re a little fast.
But you think:
“That’s okay. I’ll slow down when I flare.”
You cross the threshold.
You’re still fast.
You start the flare.
The nose comes up.
The aircraft’s angle of attack increases.
Lift increases.
And instead of touching down…
You fly.
And fly.
And fly.
The runway is disappearing.
You start pulling back more because you think the aircraft isn’t landing.
That makes things worse.
Eventually, you either:
- Land far too long
- Bounce
- Balloon
- Force the aircraft onto the runway
- Or decide you’ve run out of runway and go around
The solution isn’t to become better at forcing the aircraft down.
The solution is:
Don’t arrive at the runway carrying too much energy.
Your Landing Starts Long Before the Flare
This is probably the single most important lesson in this article.
A good landing doesn’t begin when the wheels are five feet above the runway.
It begins:
On downwind.
Then:
Base.
Then:
Final.
Your speed, altitude, configuration and flight path are progressively setting up the landing.
If you arrive at the threshold too fast, the flare can’t magically remove all that energy.
You’ve brought the problem with you.
Think About Energy, Not Just Airspeed
Airspeed is important.
But energy is the bigger concept.
An aircraft with too much speed has excess kinetic energy.
That energy has to go somewhere.
During a normal landing, you are progressively managing the aircraft’s energy until it reaches the runway at an appropriate touchdown condition.
If you arrive too fast, you have more energy than you need.
And ground effect can make the problem even more obvious.
The FAA’s Pilot’s Handbook of Aeronautical Knowledge explains that as an aircraft enters ground effect, induced drag is reduced and the aircraft can experience a floating effect; excess speed at the flare can therefore produce considerable additional float distance.
That’s why a few extra knots can make a surprisingly large difference.
Ground Effect: Why Won’t It Land?
This is where some of the mystery disappears.
As the aircraft gets close to the ground, it enters ground effect.
The aerodynamic environment changes.
Induced drag is reduced.
The aircraft can maintain flight more easily.
So if you’ve arrived at the runway with excess speed, the aircraft may suddenly seem to have discovered a new lease on life.
You flare.
The aircraft should settle.
Instead:
It keeps flying.
That’s not the aircraft being stubborn.
It’s physics.
You’ve given it enough energy to keep flying.
The Biggest Mistake: Pulling Back More
This is what many beginners do.
The aircraft isn’t landing.
So they pull back.
It still isn’t landing.
So they pull back more.
Now the aircraft’s nose is getting higher.
The angle of attack is increasing.
The aircraft may balloon upward.
And now you’ve created another problem.
The FAA specifically warns that excessive angle of attack during an attempt to get the aircraft down can cause the aircraft to gain altitude or balloon.
So remember:
If the aircraft is floating, pulling back harder isn’t necessarily the solution.
Don’t Force It Onto the Runway
This deserves its own section.
Imagine you’re floating down the runway.
You’re running out of runway.
Your brain says:
“Put it down!”
So you push the aircraft toward the runway.
That’s a dangerous habit to develop.
If the approach or flare isn’t working, forcing the aircraft onto the runway isn’t the answer.
The FAA specifically warns pilots not to force an aircraft onto the runway when a landing problem develops; depending on the situation, a go-around may be required.
In the simulator, this is an excellent opportunity to practise the correct decision.
If the landing isn’t working:
Go around.
So How Do We Stop Floating?
Let’s break it down.
Step 1 — Fix the Approach Speed
This is usually the first place to look.
What speed are you carrying on final?
Not:
“What speed did I intend to fly?”
What speed are you actually flying?
If you’re consistently arriving too fast, you’ve found one likely cause of the float.
Use the appropriate aircraft-specific approach speed.
Don’t simply copy a generic speed from another aircraft.
A Cessna 172 and a Piper Cherokee don’t necessarily want the same numbers.
Step 2 — Get Configured Earlier
Configuration changes affect the aircraft’s energy state.
Depending on the aircraft, this can include:
- Flaps
- Power
- Trim
- Landing gear
- Mixture/propeller settings where applicable
The objective is to have the aircraft configured and stable before you’re trying to land it.
Don’t leave everything until the last few seconds.
The FAA’s stabilized-approach guidance emphasises arriving at the landing phase with appropriate speed, configuration and descent rate rather than trying to fix everything close to the runway.
Step 3 — Stop Diving at the Runway
Here’s another common problem.
You’re high.
So you push the nose down.
The aircraft accelerates.
Now you’re at the correct altitude.
But you’re too fast.
You reduce power.
Then you’re low.
You add power.
Now you’re bouncing around the desired approach path.
The better solution is to manage the aircraft’s energy and flight path together.
Don’t simply dive toward the runway to lose altitude.
Step 4 — Fly a Stable Final
A good final approach should look boring.
That’s what we want.
You should have:
- Appropriate airspeed
- Appropriate configuration
- Appropriate descent
- Good alignment
- A stable aiming point
- Small corrections
The FAA describes a stabilized approach in terms of maintaining appropriate speed and descent toward a suitable landing position, with excessive speed, altitude or manoeuvring contributing to destabilisation.
If you’re still trying to sort out your speed and altitude at 100 feet:
You’re late.
Step 5 — Understand the Aiming Point
This connects directly to our earlier article:
How to Judge Your Approach Without Instruments.
Your aiming point is a visual reference.
You should be flying the approach so that the runway picture remains stable.
If the aiming point is moving significantly in your view, your flight path is changing.
Don’t wait until the flare to discover that you’re high or low.
Read the runway earlier.
Step 6 — Get Your Flare Right
Now we finally get to the flare.
The flare—or round-out—is the transition from the normal approach toward the landing attitude.
It should be:
Smooth.
Progressive.
Controlled.
Not:
Yank the nose up.
Not:
Push the nose down because it won’t land.
Not:
Freeze the controls.
The FAA emphasises that the flare needs to be initiated at the appropriate height, with the correct visual cues varying by aircraft type and cockpit geometry. Starting too high can produce a long float; starting too late can result in a hard touchdown.
Don’t Flare Too High
This is another major cause of floating.
You’re approaching the runway.
You see the ground getting closer.
You think:
“Flare!”
But you’re still too high.
You raise the nose.
The aircraft climbs slightly.
Now you’re floating.
And because you’ve started the flare too early, you’re trying to maintain a landing attitude while still several feet above the runway.
The result can be:
Float.
Or:
Balloon.
Or both.
Don’t Flare Too Late
The opposite is also a problem.
You stay in the approach attitude too long.
The runway gets closer.
You finally pull back.
But there’s not enough time to establish the landing attitude smoothly.
You may touch down hard.
So we’re looking for the middle ground.
Not too early.
Not too late.
A smooth transition.
Every Aircraft Has a Different Sight Picture
This is especially important for simulator pilots.
You can’t simply learn one flare picture and use it everywhere.
The cockpit geometry changes.
Your eye height changes.
The position of the nose changes.
The landing gear geometry changes.
The runway appears differently from different aircraft.
The FAA specifically notes that pilots should learn the flare characteristics of each aircraft model because the visual cues vary with window geometry, visibility and the relationship between the pilot’s eye and landing gear.
So:
Cessna 172?
Learn its sight picture.
Piper Cherokee?
Learn its sight picture.
Taildragger?
Different again.
High-performance aircraft?
Different again.
Don’t assume one aircraft teaches you the exact flare for another.
What Should You Look At During the Flare?
Don’t stare at the altimeter.
Don’t stare at the airspeed indicator.
Look outside.
As the aircraft gets close to the runway, your visual focus should move toward the runway environment and the far end rather than fixating directly on the ground immediately ahead.
You’re trying to judge:
- Height
- Alignment
- Sink
- Runway perspective
- Aircraft attitude
The runway itself becomes your visual reference.
Don’t Stare at the Touchdown Point
This is a subtle but important point.
If you’re staring at the exact spot where you want the wheels to touch, you can lose the broader visual picture.
Instead, let your vision broaden.
Look toward the runway ahead.
Use your peripheral vision.
Notice how the runway edges move.
Notice how the horizon relates to the nose.
Notice your lateral movement.
You’re not trying to place the aircraft onto a pixel.
You’re trying to establish the correct landing attitude and let the aircraft settle.
The “I’m Not Landing!” Trap
This is one of the most common psychological problems.
The aircraft is floating.
Your brain says:
“I’m not landing!”
So you do something.
Anything.
Usually:
Pull back.
Or:
Push down.
Or:
Change the power dramatically.
This often makes the situation worse.
Instead, ask:
“Why am I floating?”
Is the aircraft:
Too fast?
Too high?
Too much power?
Too early in the flare?
In ground effect with excess energy?
Once you identify the cause, the solution becomes much clearer.
What If You’re Already Floating?
Okay.
You’ve made it to the runway.
You’re floating.
What now?
First: Don’t Panic.
Keep the aircraft under control.
Maintain directional control.
Don’t make huge pitch changes.
Don’t force the aircraft onto the runway.
Evaluate the remaining runway.
If the aircraft isn’t going to touch down within a safe area:
Go around.
This is one of the most important habits you can develop.
A go-around isn’t a punishment.
It’s a safety tool.
The FAA specifically identifies go-arounds as one of the best defences against landing accidents and recommends making the decision early when the approach isn’t stable.
Your New Rule
Here’s one I’d like you to remember:
If you’re still floating when you’re running out of runway, you waited too long to make the decision.
The go-around decision should happen before you reach the point where you have no options.
Why Pilots Keep Floating the Same Landing
If you repeatedly float, don’t just keep practising landings.
Find the common cause.
Ask:
Am I consistently too fast?
If yes:
Fix your approach speed.
Am I consistently too high?
If yes:
Fix the circuit and descent profile.
Am I flaring too early?
If yes:
Work on the visual cue.
Am I carrying too much power?
If yes:
Review your power management.
Am I trying to touch down exactly at my aiming point?
If yes:
Understand the difference between aiming point and touchdown point.
Am I looking inside too much?
If yes:
Look outside and learn the visual picture.
The 5-Knot Problem
Here’s something worth experimenting with in X-Plane 12.
Take your normal aircraft.
Fly the same approach repeatedly.
Now compare:
Approach A: Correct approach speed.
Approach B: 5 knots faster.
Approach C: 10 knots faster.
Notice the difference.
Don’t just look at the airspeed indicator.
Look at:
- How the aircraft behaves in the flare
- How long it floats
- How much runway disappears
- How difficult it is to establish the landing attitude
- How much correction is required
You will quickly understand why speed matters so much.
The FAA explicitly notes that excess speed at the flare can produce considerable float distance.
The 10-Knot Experiment
This is an especially useful simulator exercise.
Fly a normal approach.
Then, on another circuit, deliberately arrive at the flare with excessive speed.
Don’t try to force the landing.
Just observe.
How far do you travel?
How much runway disappears?
How different does the aircraft feel?
Then go around.
Fly another circuit at the correct approach speed.
Compare the two.
This is much more powerful than simply reading:
“Don’t land too fast.”
You’re seeing the consequences yourself.
The Energy Management Experiment
Now try something different.
Fly the same approach three times.
Approach 1
Too much energy.
Approach 2
Correct energy.
Approach 3
Too little energy.
Observe the differences.
You’re building a mental library of what:
Too much
and
Too little
look like.
Eventually, you’ll recognise those states much earlier.
Floating Isn’t Always Just About Speed
This is important.
If you’re floating, don’t automatically blame airspeed.
Other factors can contribute.
For example:
- Flare started too high
- Excessive power
- Incorrect configuration
- Tailwind
- Runway slope
- Aircraft weight
- Density altitude
- Wind conditions
- Ground effect
- Incorrect approach profile
That’s why the better question isn’t:
“How do I stop floating?”
It’s:
“Why is this particular approach floating?”
Wind Changes Everything
Imagine your normal approach.
Now add a tailwind.
Your groundspeed increases.
You may cover more runway distance during the same amount of time.
Your visual picture can change.
Your touchdown point can move.
This is why wind needs to be part of your pre-landing thinking.
A headwind generally reduces groundspeed for a given airspeed.
A tailwind increases it.
And the runway doesn’t care how quickly you’re covering the ground.
It simply gets shorter.
Don’t Use a Generic Landing Speed
This deserves emphasis.
You will find people online saying:
“Just land at 65 knots.”
Don’t blindly follow that.
The correct approach speed depends on the aircraft and operating conditions.
Use the aircraft’s appropriate procedures and published information.
The objective of this article is not to give you one magic number.
It’s to teach you why being too fast for your aircraft and configuration creates problems.
Your Flare Isn’t a Button
Another simulator habit is treating the flare as a single control input.
At a certain height:
Pull back.
Done.
That’s not really how a good flare works.
The flare is a transition.
You are progressively changing the aircraft’s attitude and managing its remaining energy as it approaches touchdown.
The FAA describes the round-out as a gradual transition from the normal approach toward a landing attitude, rather than a single abrupt movement.
Think:
Smooth.
Progressive.
Continuous.
What Should a Good Landing Feel Like?
In a simulator, the exact feel depends heavily on your hardware and force-feedback setup.
But visually, a good landing should feel like:
The aircraft is settling.
Not:
The aircraft is being forced onto the runway.
The transition should be controlled.
The aircraft should lose energy.
The wheels should contact the runway without a dramatic pitch change.
And then you should transition your attention to:
Directional control.
Because landing isn’t finished when the wheels touch.
The Landing Isn’t Over at Touchdown
Another common mistake is mentally celebrating the landing before the aircraft has slowed down.
You’re on the runway.
But you’re still flying the aircraft.
You need to maintain directional control and manage the rollout.
Your available stopping distance depends heavily on where and at what speed you touch down.
The FAA notes that the available runway to stop is greatest when touchdown occurs in the intended touchdown zone and that excess speed increases the energy that must be dissipated.
So:
Touchdown is not the end of the landing.
It’s the beginning of the rollout.
The Best Fix Is Usually Earlier
This is the central lesson.
If you keep floating:
Don’t spend all your time practising the last five seconds.
Go back.
Look at the approach.
Were you too fast?
Fix that.
Were you too high?
Fix that.
Was your circuit too large?
Fix that.
Was your base turn late?
Fix that.
Did you carry too much power?
Fix that.
Did you flare too high?
Fix that.
The landing is often simply the final result of everything that happened before it.
Your X-Plane 12 Anti-Float Training Exercise
Here’s your challenge.
Choose a familiar light aircraft.
The Cessna 172 is perfect.
Choose a runway you’re comfortable with.
Then fly five circuits.
Circuit 1 — Establish Your Baseline
Fly normally.
Don’t deliberately change anything.
Observe where you touch down.
Did you float?
How far?
Circuit 2 — Watch Your Speed
Concentrate on getting the aircraft to the appropriate approach speed.
Don’t obsess over the exact number.
Get the aircraft stable.
Then observe the difference.
Circuit 3 — Watch the Visual Picture
Look outside.
Pay attention to:
- Runway
- Aiming point
- Horizon
- Centreline
- Flare height
See if your visual picture improves.
Circuit 4 — Practise the Go-Around
If you float excessively:
Go around.
Don’t rescue it.
Practise the decision.
Circuit 5 — Put It Together
Now combine:
Correct approach speed
Stable approach
Good visual judgement
Smooth flare
Proper touchdown
That’s the landing we’re looking for.
The Anti-Float Checklist
Before landing, ask yourself:
- Is my approach speed appropriate?
- Is the aircraft configured correctly?
- Am I on the correct flight path?
- Is my aiming point stable?
- Am I carrying unnecessary power?
- Am I aligned with the runway?
- Am I looking outside?
- Am I prepared to go around?
Then:
Fly the landing.
If You Remember Only Five Things
1. Don’t arrive too fast.
Excess speed is one of the biggest causes of floating.
2. Fix the approach, not just the flare.
The problem often starts well before touchdown.
3. Don’t flare too high.
An early flare can turn into a long float or balloon.
4. Don’t force the aircraft onto the runway.
If the landing isn’t developing correctly, go around.
5. Learn the visual picture.
Every aircraft has a different sight picture.
The Big Secret About Good Landings
Here’s something you eventually discover:
Good landings aren’t really about the landing.
They’re about setting up the aircraft so that the landing becomes almost inevitable.
If you have:
- The right speed
- The right configuration
- The right flight path
- The right alignment
- The right energy
- The right visual picture
then the flare becomes much easier.
But if you arrive:
High
Fast
Misaligned
With too much power
then you’re asking the flare to solve five problems at once.
It can’t.
Your New Landing Mindset
Instead of thinking:
“I need to land the aircraft.”
Think:
“I need to arrive at the runway correctly.”
That’s a completely different mindset.
You’re not trying to force a landing.
You’re setting up a situation where the aircraft can settle onto the runway naturally.
The LetsFlyVFR Landing Challenge
Now it’s your turn.
Open X-Plane 12.
Pick your normal training aircraft.
Fly five circuits.
Your goal isn’t to make five perfect landings.
Your goal is to identify:
Why do I float?
Then fix that one thing.
Maybe it’s speed.
Maybe it’s altitude.
Maybe it’s configuration.
Maybe it’s your flare.
Maybe you’re simply carrying too much energy.
Find the cause.
Fix it.
Fly again.
And Here’s the Test
On your final circuit, ask yourself before you cross the runway threshold:
“If I do absolutely nothing dramatic from here, is this aircraft going to make a good landing?”
If the answer is:
Yes.
Excellent.
Keep flying.
If the answer is:
No.
Don’t hope.
Don’t force it.
Go around.
That’s the decision-making skill we’re trying to develop throughout this series.
From Floating Landings to Better Landings
We’ve now added another important piece to our VFR training progression.
We’ve learned:
How to start and taxi
→ How to use the radio
→ How to perform the run-up
→ How to enter the runway
→ How to judge an approach visually
→ How to recognise common VFR mistakes
→ How to fly a challenging circuit at Sedona
→ And now, how to stop floating the landing
This is deliberate.
We’re not trying to give you 100 unrelated tips.
We’re building one skill on top of another.
That’s the progression approach we established for LetsFlyVFR: beginner → intermediate → advanced, with every lesson giving the pilot something concrete to improve.
What’s Next?
Now that we’ve tackled the float, we need to address another incredibly common problem:
You’re Turning Base Too Late — Here’s Why
Because here’s the uncomfortable truth:
A lot of bad landings are created on downwind.
If you turn base too late, you’re already behind the aircraft.
You end up:
- Too far from the runway
- Turning too aggressively
- Overshooting final
- High on approach
- Or trying to rescue the landing
So our next lesson is going to go back up the circuit and fix the problem before you ever reach final.
A Final Note About Real-World Flying
This article is written primarily for X-Plane 12 simulator training.
Aircraft-specific speeds, configurations, flare techniques and go-around procedures vary. In real-world flying, use the aircraft’s approved operating information and the instruction of a qualified flight instructor.
The FAA’s Airplane Flying Handbook remains an excellent reference for approaches, round-outs, floating, landing technique and go-arounds. The current FAA handbook identifies excessive final-approach speed as a common cause of floating and specifically warns against forcing an aircraft onto the runway when a landing is not developing correctly.
Stop Chasing the Landing.
Fix the approach.
Control the energy.
Learn the sight picture.
And let the aircraft land.
Learn the picture. Fly the approach. Manage the energy. Become a better virtual pilot.
Leave a Reply