
DCS WORLD T-45 Goshawk EASY Navigation for Beginners.
DCS WORLD T-45 Goshawk EASY Navigation for Beginners is simply that. We do our planning in the DCS World Editor where our waypoints are automatically loaded into the T-45 Goshawk or any other jet we choose that has the ability to display waypoints.
Download VNAO T-45C Goshawk V 1.02 Freeware.
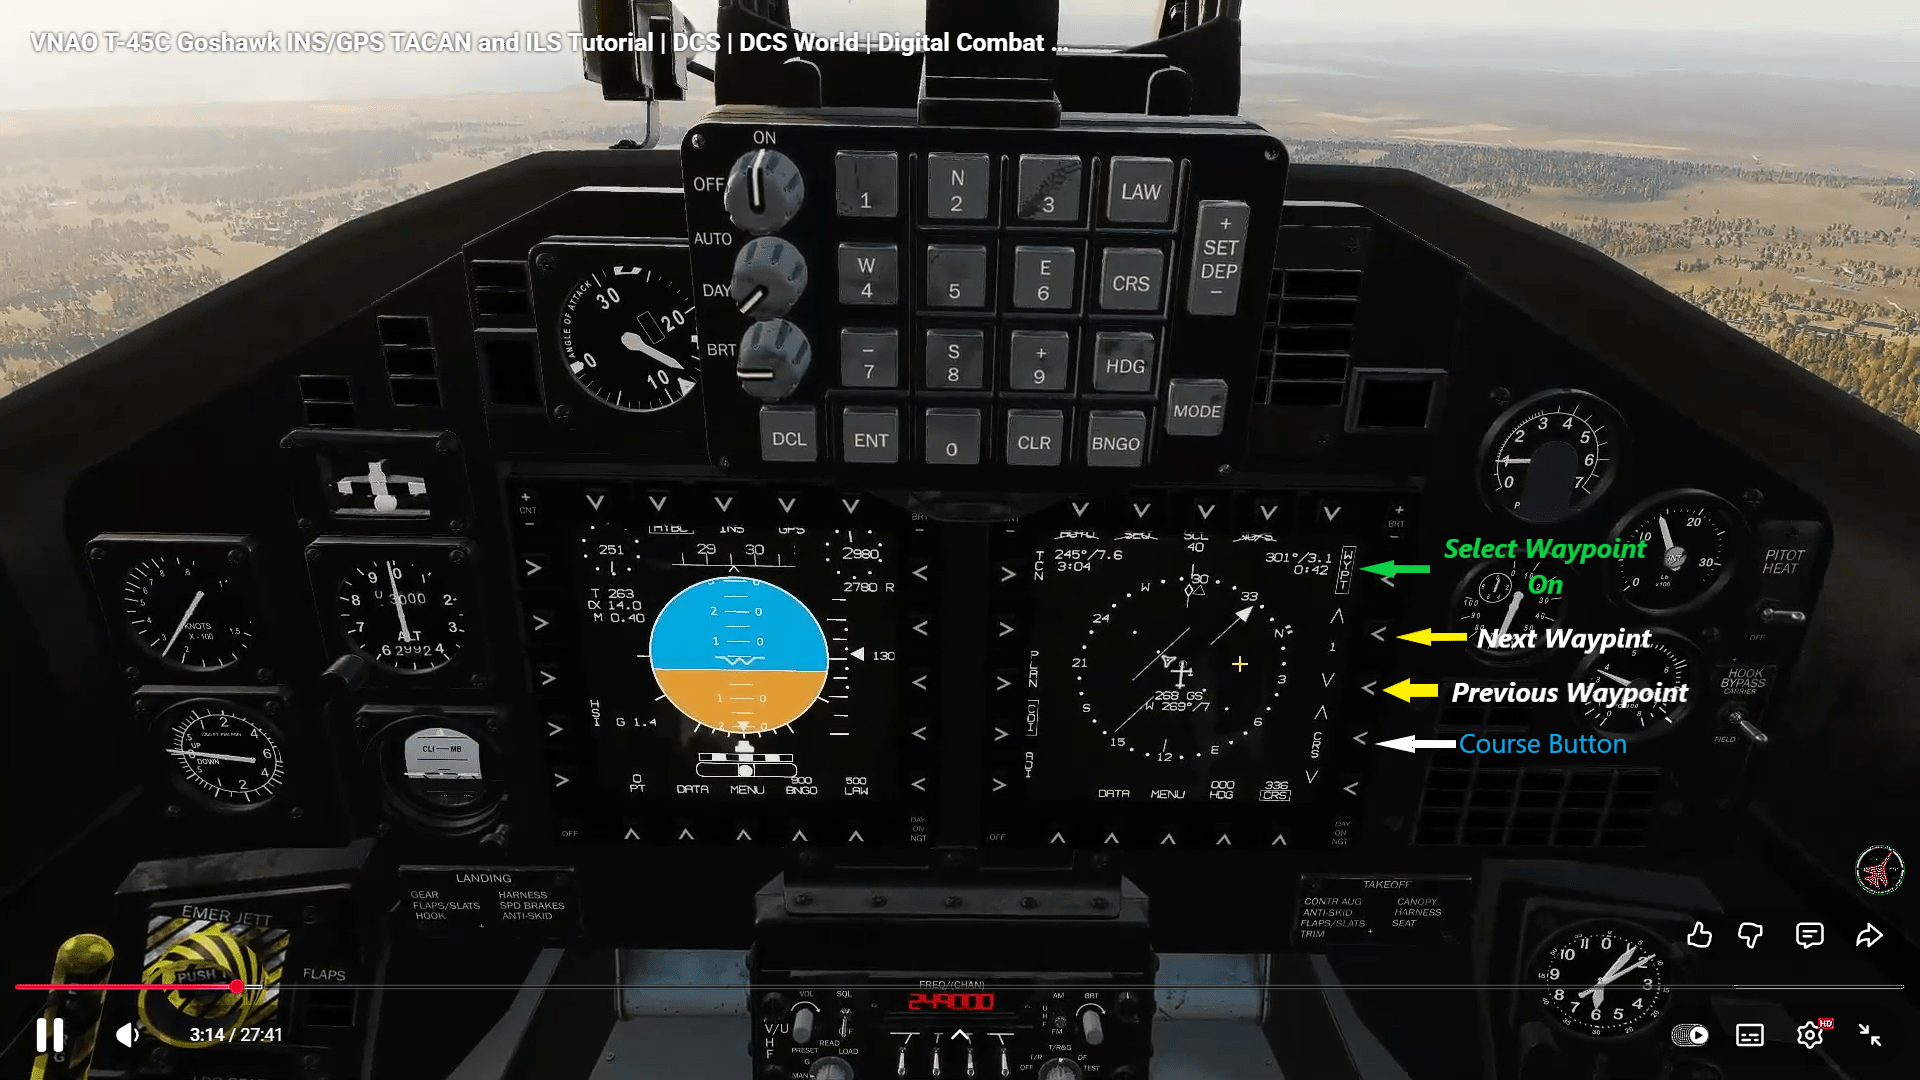
These waypoints can be displayed on our MFD as well as a Carrot on the HUD to visually guide us to the specified waypoint. Check out the cockpit picture below showing the button uses because you need to manually step through each waypoint as you complete that leg. The DCS World T-45 Goshawk does not have auto step to the next waypoint so be on your game.
How to Navigate in the T-45 Goshawk.
Waypoint Creation.
Create your waypoints in the DCS WORLD Mission Editor. They will be loaded into the aircraft system automatically.
When creating a waypoint it will automatically be given a number but you also need to select the altitude and speed to be flown at that waypoint with options to change from both ground speed to air speed (ground is default) plus Barometric or Radar Alt with Baro being the default.
You can specify what each waypoint represents from a fly over point so you can start in the air if you wish. This could be WP1 but XP2 could be land and Ai aircraft follow these directions as well. Options to start from Cold and dark to engines running in a number of locations such as ramp or runway to name a couple.
- Waypoint Number – Basic sequential numbers.
- Waypoint Type – Take off Hot – Take-off from Runway – Start From Ramp Cold – Fly Over Point – Landing.
- Waypoint Altitude – Barametric altitude is default but the box allows for Radar Altitude which is handy for low level routes so the AI does not hit the mountains etc.
- Waypoint Speed – Not Ground Speed is set by default, If you want Airspeed then turn this off in each waypoint.
1. GPS Operation
The GPS operations is pretty simple so lets dive in. THere is a range button which cycles through ranges the MFD displays from 10nm up to 160nm. The next option is the waypoint spep button which you need each time tou reach a waypoint to spep to the next one.
The Screen also displays information in the top right corner with time to waypoint, distance and number of the waypoint. Its all pretty simple stuff to get around DCS WORLD.
Managing the waypoints and GPS is done with the:
- Push WP Button to bring up Waypoint
- Push Next Waypoint to step forward
- Push Last waypoint button to step backwards.
- Push Course Button (CRS) to bring up steering lines.
- Waypoint Number / Distance / Heading are in the top RH Corner of the display next to the COURSE BUTTON.
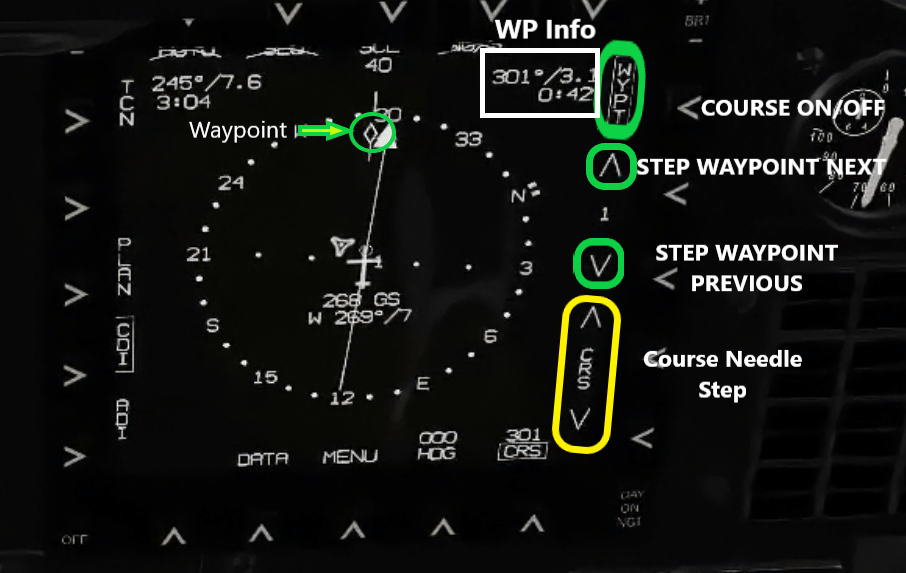
One factor is the DCS WORLD does not have an AUTO step in the waypoints. You Must step manually each time you need a new waypoint.
You also have to continually step the COURSE LINE by clicking the mouse on the Course Needle Step buttons. The CRS line gives you a more easily seen guide to the waypoint. It also has a deviation line showing if your right/left or right on track. This could be super way to keep on track through ground defences etc where you need to be accurate on your flight path.
On the button itself 1 click is One Degree so this is a bit tedious if you want to move it a long way. Each time you change to a new waypoint you need to manually do it if you want the course button to line up.
REMEMBER your triangle waypoint will move in each time you step to the next/previous waypoint but the course line will not.
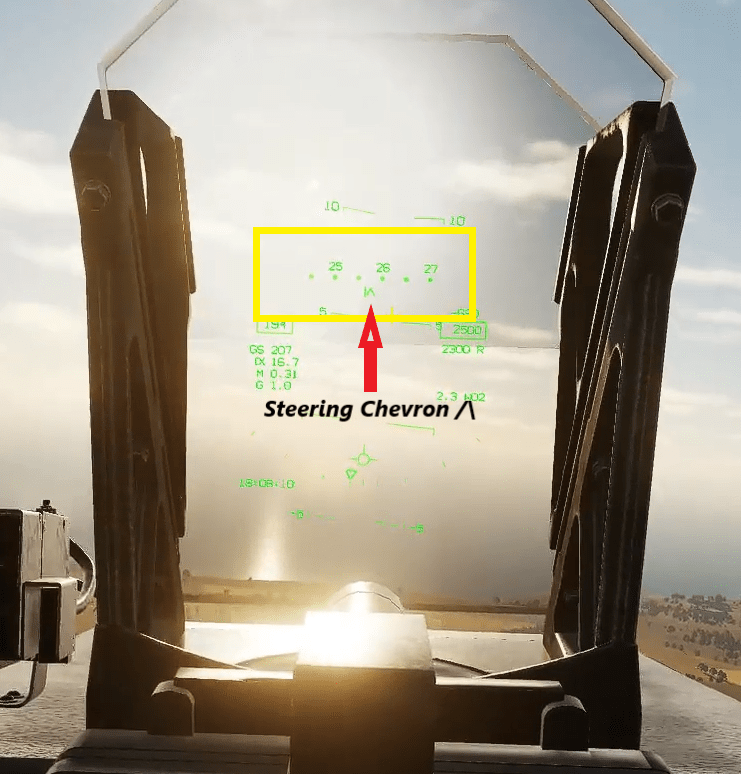
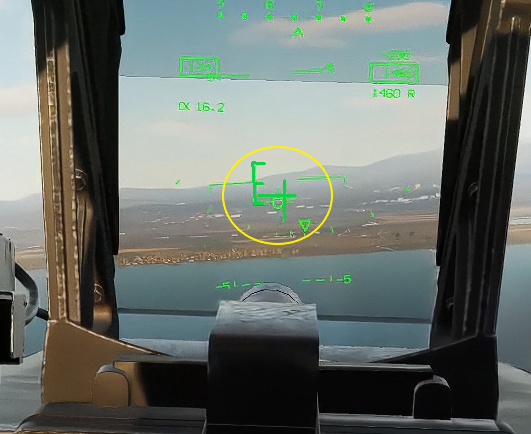
HUD Navigation.
The T-45 Goshawk Hud also has a STERRING CARROT /\ to follow. This makes it pretty easy when your low level and don’t want to look at the MFD inside the cockpit. It makes for a good argument to MAP the specific Keys for your NAV WORK to be more VFR in flight.
VFR Waypoints.
The waypoints I have chosen for the attached mission are quite easy VFR style visual points to track and be ready for the next turn. I have used villages initially but the rivers and Islands in rivers plus lakes all indicate a way point is imminent. If you see a river coming up then your approaching a turn point.
It feels like the leader pivots down on LH turns and upward on a right hand turn so also be ready for this. If you maintain your 2000 ft level as you turn with him you should be OK and he can pivot around you! This is how it seems to happen anyway.
2. VOR Navigation
VOR navigation uses fixed radio beacons often on airbases that you can use. The beam is transmitted from the beacon like a wagon wheel outward giving 1 degree difference in bearings while your flying. It tells you if your flying toward it or away and can provide distance information as well but not always.
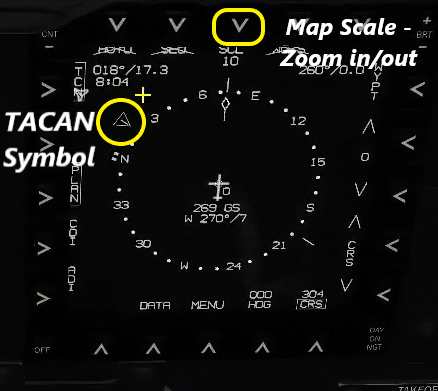
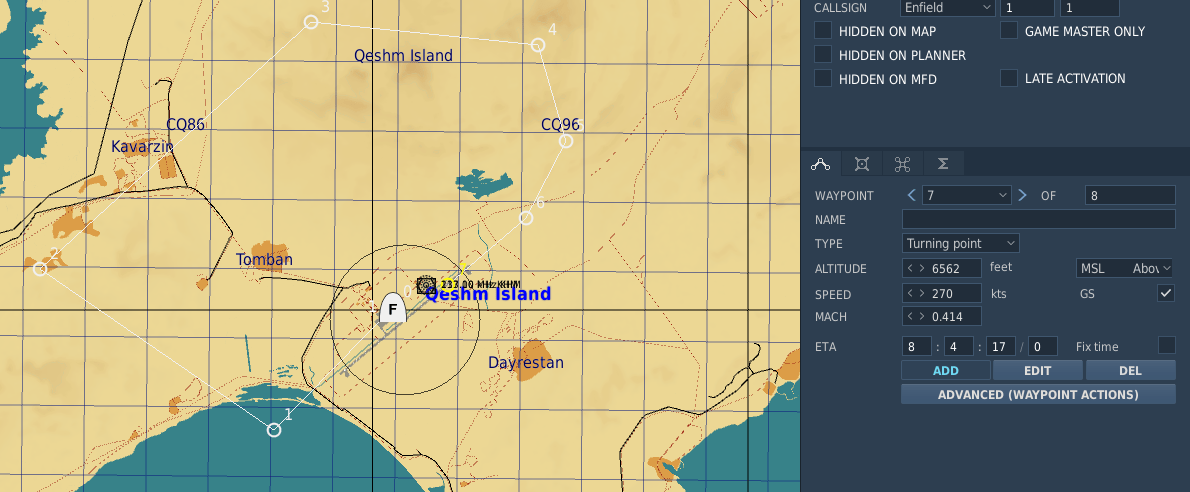
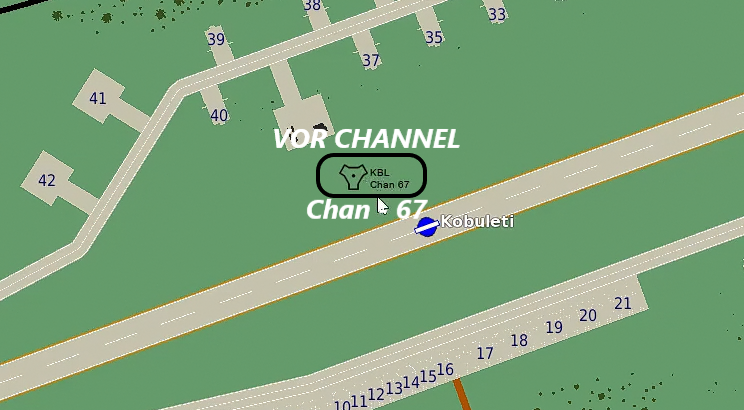
You find your required beacon information on the mission editor map as you see here. The TACAN SYMBOL is located on the screen as a Diamond. Using the TACAN is quite simple.
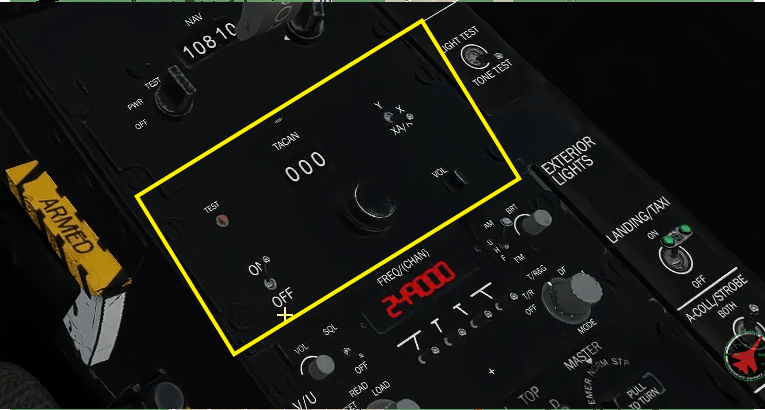
Once you have the TACAN code from the map inset this by rotating the TACAN Knob to change single digit and X 10 digit on the right hand panel next to your right knee.
The TACAN control panel is on the right hand panel towards the middle. The central knob is controlled with the mouse cursor. On the top of it rotates the single digit numbers i.e. 1-9 and if the cursor is on the left side close to the knob it changes in 10’s i.e. 10 – 20 -30 etc.
On the MFD you can select VOR and the information is displayed similar to the initial waypoints. The VOR is displayed as a VOR SYMBOL so you can identify it easily. If your some distance from it then zoom out till it appears. It is line of sight so if your in valleys you may not receive the signal.
If you want to fly directly to it then simply turn till the VOR symbol is at the 12 o’clock but VOR signals can be directions to targets because if you have a known distance that is static then you can align yourself with the Tacan beam on a specific heading to make an attack. This also gives you distance from the VOR so if the distance to the target is know then you will know when your getting close.
3. ILS Setup
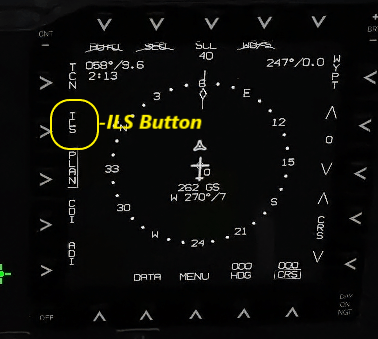
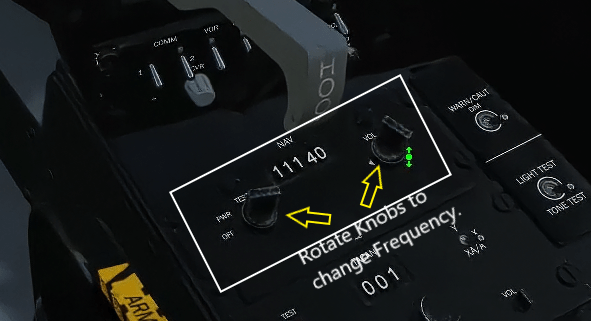
ILS is also quite easy to setup by simply adding the frequency you saw on the map page for the specific airport. Simply use your mouse to:
1) Turn It On at the On/Off switch on the lower LH corner of the ILS Radio. This radio is the very first one on the left hand side console.
2) Rotate the two rotary knobs with your mouse. The Left does 10 frequency jump each time and the Right Rotary button moves the number by 5 per click.
3) Click the ILS button on the MFD and your Vertical as well as Horizontal Bars will appear in your HUD as well as the Artificial Horizon which you select in the other MFD.
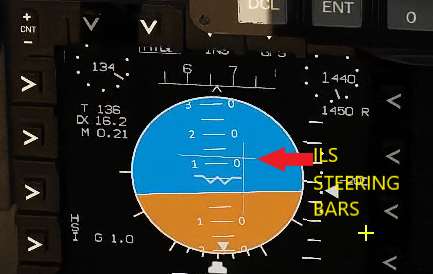
Simply follow the ILS bars as you may have done in any other flight simulator.
In the example we are Low and Left of the target so always fly towards the error so again turn right to bring the bar across as well as hold altitude and the vertical bar will come down to meet you is best.
Carrier Use Issue.
NOTE: The T-45 has a BUG with the SUPER CARRIER and the marshaller instructs you to fold or unfold your wings you cannot so you get stuck and cannot proceed.
In Version 1.02 the WORK AROUND is to RAISE AND LOWER your FLAPS fully and this should allow you to continue to the launch crew and fly again!
Conclusion
I hope this simple no nonsense navigation guide for the T-45 Goshawk helps you have a lot of fun getting around and even bombing a few targets. This DCS WORLD T-45 Goshawk EASY Navigation for Beginners guide was a great help to myself learning how this great little jet around the map.
Author
Brendon McAliece (Aka Gunnie) is a military veteran with 23 years working on Jet Fighters, their weapons systems and ejection seat/module systems as well as munitions and R&D. Involved with flight simulation since the 1980s, he has flown all the major flight simulators over the years.
He is an Australian expat who has lived in Malaysia, UK, Saudi Arabia and more recently Thailand. He is a multi-lingual blogger who loves to share his life experiences here on LetsFlyVFR.com and DreamingGuitar.com, with his lifestyle and Travel experiences Blog plus his Dreaming Coffee website.
Learn More @
DreamingGuitar.com – DreamingCoffee.com – LetsFlyVFR.com
( HOME – BLOG – SHOP – ABOUT )
As an Amazon Affiliate I may earn on qualifying sales.