

X-Plane 12 VFR Training – Flight Simulator Landing Tips.
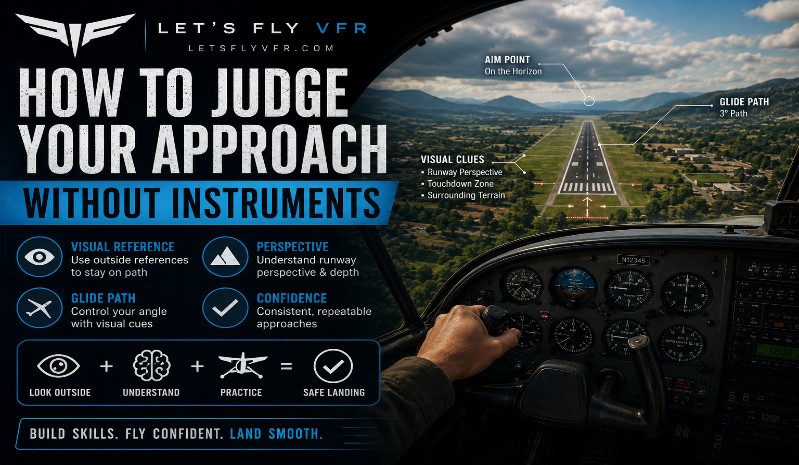
One of the biggest steps in becoming a better VFR pilot is learning to look outside the cockpit and understand what the aircraft is telling you visually. This is particularly important when you’re learning to fly in X-Plane 12.
It’s very easy to become dependent on the instruments. You look at the airspeed indicator then the altimeter followed by the vertical speed indicator & finally the GPS. Rinse and repeat when you can simply and easily reference the horizon against your aircraft.
You should also be listening to the aircraft. Engine settings as well as airflow can tell you a lot of things about what your doing. High or low engine power along with sight picture can help you fly well in VFR.
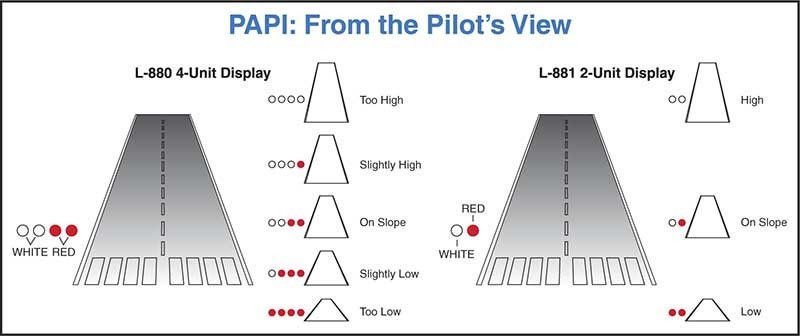
You look at the glide slope.
And before you know it, you’re flying an approach by numbers rather than actually learning to judge the approach.
But what happens if you deliberately take those instruments away?
Can you still tell whether you’re:
- Too high?
- Too low?
- Too fast?
- Too slow?
- Too steep?
- Too shallow?
- Going to land short?
- Going to land long?
That’s the skill we’re going to develop in this lesson.
And it is one of the most useful skills a VFR pilot can have.
The Goal Isn’t to Ignore Your Instruments.
Before we go any further, let’s clear something up.
“Without instruments” does not mean that real pilots ignore their instruments.
They don’t.
Your instruments remain essential sources of information but the point of this exercise is to develop your visual judgement so that you don’t become completely dependent upon them.
When you’re flying VFR, the outside world is giving you an enormous amount of information.
The runway itself is telling you about:
- Your height
- Your approach angle
- Your lateral alignment
- Your rate of closure
- Your position
- Your likely touchdown point
The FAA’s Airplane Flying Handbook specifically describes the runway image and the apparent movement of the aiming point as important visual cues for judging the approach.
The objective is to learn how to read those cues.
BUILD THE PERFECT COCKPIT… THEN DRESS THE PART.
Discover Premium Flight Simulator Apparel, Wall Art, Pilot Gifts and Aviation Accessories at LetsFlyVFR – ETSY STORE.






Your Eyes Are Another Flight Instrument.
Think about that for a moment. A pilot approaching a runway isn’t simply seeing a runway, they’re interpreting a picture. That picture changes depending on where the aircraft is so practice determining if you’re too high, the runway looks different and more a top down view.
If you’re too low, it looks different again and it will look flatter by perspective. If you’re approaching too steeply, it looks different with an impression of diving. If you’re approaching too shallowly, it looks different with again a low angle to the runway.
If you’re drifting left or right, the runway tells you that too with the runway moving to the side.
Your job is to learn to recognise those changes.
Start With the Runway.
Let’s make this as simple as possible. Forget the airspeed indicator for a moment as well as the altimeter, vertical speed indicator & look at the runway.
Ask yourself:
“Where does it look like I’m going to land?”
That’s your first visual judgement. You’re not necessarily trying to identify the exact touchdown point. Instead, you’re developing an impression of where the aircraft’s current flight path will take it.
The Aiming Point.
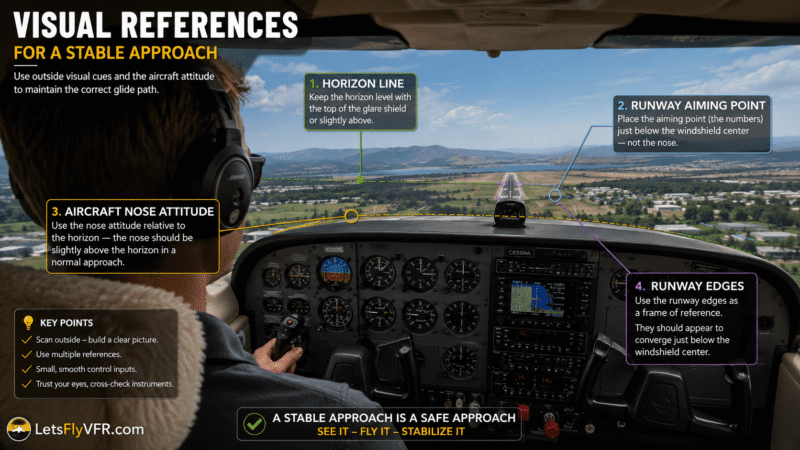
Most runways have markings that give you a useful visual reference for the intended landing area. That area is commonly used as the aiming point.
But here’s an important distinction:
Your aiming point is not necessarily where the aircraft will actually touch down.
During the round-out and flare, the aircraft’s flight path changes and the aircraft will normally touch down farther along the runway.
There is a very important visual technique to learn too as a new VFR pilot. This holds true in flight simulation as well as in real life and I can attest that it works very well.
Pro Tip!
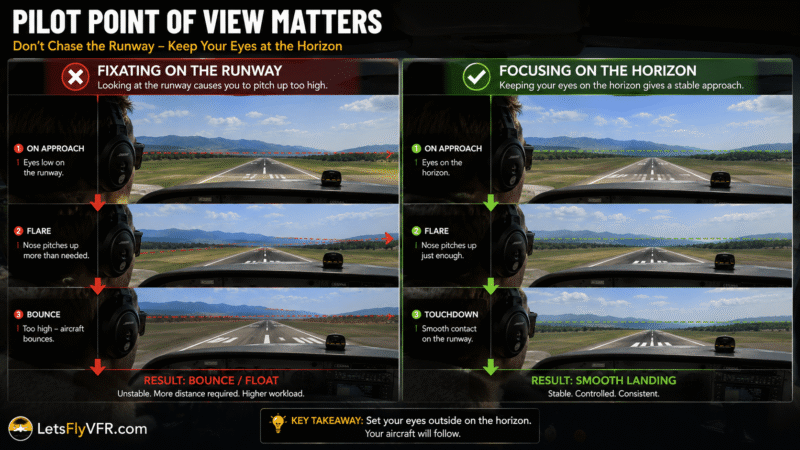
The PRO tip here is you focus on the point you wish to land at while your descending on final. What changes and is crucial to a smooth landing & that is changing your point of view from the runway landing point to the end of the runway as you transition from approach to flare.
If you don’t do this you slam the aircraft into the runway and it will bounce! If its hard you will balloon back into the air and if you do this GO AROUND!
It’s better to go around than try to save a bad bounce. Hold it steady smoothly re-apply power and be ready to counteract the P Factor i.e. twist from engine torque. Take a breath and climb away then relax! Its fine, we all have been here!
Next time as you get to the round out point and raise the nose look to the horizon/end of the runway and use that to slowly pull the nose up to arrest your decent and touch down smoothly!
The FAA specifically makes this distinction in its Airplane Flying Handbook.
So don’t think:
“I need to touch down exactly on the aiming point.”
Think:
“I want my approach to take me toward my intended touchdown area.”
That’s a much better mental model.
Experience Flight Simulation Like Never Before!
Choose Your Pimax Crystal Light, Crystal Super or Dream Air Today and Enjoy an Exclusive 2% LetsFlyVFR Discount*
Pimax VR Buyers Guide – 2026 Read Now!
*Discount applies to eligible Pimax headsets. Dream Air SE excluded.
The Most Important Visual Cue: The Aiming Point.
Here’s one of the most useful things you can learn.
Pick a point on the runway and now watch what that point does relative to your view. If the aiming point appears to remain stationary, you’re maintaining approximately the same flight path toward it.
If its moving down you may adda little power to arrest the movement or reduce power to stop the upward movement.
That’s extremely useful.
The FAA describes the same principle: when the aircraft is established on a constant glide path, the perceived aiming point remains stationary relative to the pilot’s view.
This gives us a simple rule.
Aiming point stays still.
Your flight path is approximately correct.
Aiming point moves down in your view.
The aircraft is tending toward a shallower approach, meaning the actual touchdown point will move farther down the runway.
Aiming point moves up in your view
The aircraft is tending toward a steeper approach, meaning the actual touchdown point will move closer.
This is an incredibly powerful visual skill.
Don’t Chase the Runway.
Here’s where many beginners get into trouble.
They see the runway.
They think:
“I’m too high.”
So they push the nose down. This is not the way to control it. Simply reduce power a few hundred RPM in a Cessna 172 and your decent rate will likely increase by a small amount.
Then you will reduce altitude till the sight picture is as required. When it is add a little power to stabilise the approach once again. Use power to select your decent or climb rate while holding you attitude.
Then:
“Now I’m too low.”
So they pull up. Again here you can add power by a few hundred RPM and counter the decent or the low attitude. Need to climb then add a little more power but maintain the attitude. Once the sight picture has returned as you desire reduce power a little and monitor the sight picture.
Then:
“I’m too high again.”
And suddenly the aircraft is bouncing all over the place.
This is chasing the approach. Small power changes will smooth this out most often!
Instead, think about the trend.
Don’t ask:
“Where am I right now?”
Ask:
“Where is the runway telling me I’m going?”
That subtle change in thinking makes a huge difference.
What Does a Good Approach Look Like?
A stable approach should look boring & that’s exactly what you want. The runway should appear reasonably consistent in your view with your lateral alignment should require only small corrections.
Your aiming point shouldn’t be racing around the windscreen but instead your descent should be controlled as well as your airspeed should be appropriate.
Your aircraft should be configured for the landing and you’re making small, deliberate corrections rather than constantly moving the controls.
The FAA’s guidance on stabilized approaches emphasises establishing the appropriate configuration, speed and glide path early enough that the final approach can remain stable rather than becoming a series of last-minute corrections.
The Runway Gets Wider as You Get Lower.
Here’s another useful visual cue.
Look at the runway edges when you’re farther away, the runway appears relatively narrow. As you descend toward it, the runway becomes increasingly large in your field of view.
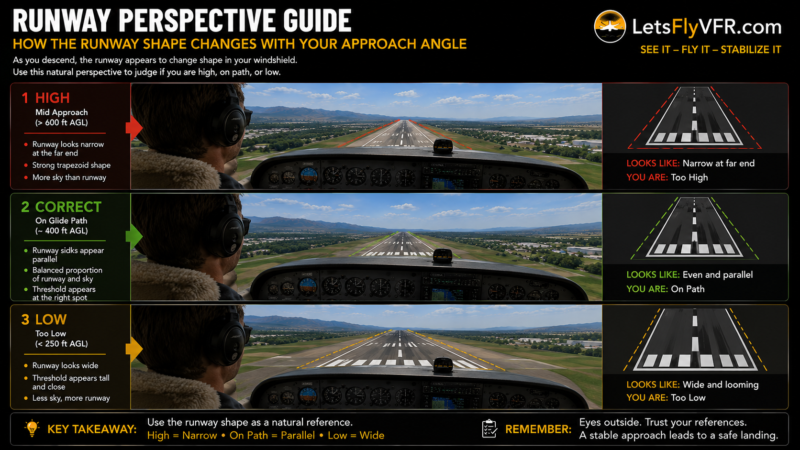
But the shape of that runway also gives you information. From the air, perspective makes the runway appear roughly like a trapezoid. The edges converge toward the far end.
The FAA uses this runway perspective as one of the visual references for judging whether an approach is stable.
Too Shallow vs Too Steep.
This is where things get really interesting.
Imagine two approaches.
Approach A — Too Shallow
You’re approaching at a shallow angle.
The runway can appear:
- Wider
- Shorter
- More “spread out”
Your apparent aiming point tends to move farther away.
The aircraft’s flight path is taking you toward a touchdown farther down the runway.
Approach B — Too Steep
Now imagine the opposite.
Your approach is too steep.
The runway tends to appear:
- Longer
- Narrower
- More stretched out
Your apparent aiming point tends to move toward you.
The aircraft is on a flight path that would result in a touchdown closer to the approach end.
The FAA describes these same perspective changes: a shallow approach makes the runway appear shorter and wider, while a steeper approach makes it appear longer and narrower.
Don’t Try to Fix Everything With Pitch.
This is an important concept. If you’re low on approach, the solution isn’t automatically:
Pull up.
If you’re high:
Push down.
The aircraft is an energy-management system.
Your approach is affected by:
- Power
- Pitch
- Airspeed
- Configuration
- Wind
- Glide path
The correct correction depends on why you’re off the desired path.
For example, if you’re high but already at the correct approach speed, reducing power may be more appropriate than simply pushing the nose down and allowing the aircraft to accelerate. (Note – Attitude changes speed)
Likewise, if you’re low, adding power may be appropriate rather than simply pulling back and allowing the aircraft to slow. (Note – Attitude changes speed)
This is why approach flying is about energy management, not simply pointing the nose at the runway.
Pitch Controls More Than You Think.
One of the biggest lessons for a new pilot is understanding the relationship between pitch and airspeed is if you change pitch, you change the aircraft’s energy state.
If you change power, you influence the aircraft’s ability to maintain its flight path and this is why random control inputs can create an unstable approach very quickly.
It’s also to create a Pilot Induced Oscillation where the aircraft becomes a broking Bull rising then dropping as you chase it with control inputs. This is bad!
Instead of thinking:
“I need to get the nose pointed at the runway.”
Think:
“I need to control the aircraft’s energy and flight path so that the runway remains where I want it.”
That’s a much more useful way of thinking.
What About the Horizon?
The horizon is another important visual reference. As you approach the runway, compare the runway and your aiming point to the horizon. You’re effectively building a three-dimensional picture in your mind.
You don’t need to calculate angles mathematically because you’re learning what the correct picture looks like.
This is why repetition is so important so the more approaches you fly, the more familiar the correct picture becomes.
Eventually you’ll start recognising:
“That looks high.”
or:
“That looks low.”
before you even look at the altimeter.
That’s the skill we’re after.
What About Airspeed?
Here’s where we need to be careful.
Judging an approach visually does not mean ignoring airspeed.
Airspeed remains critical. The aircraft must be flown at the appropriate speed for its configuration, weight, wind conditions and aircraft type. This changes with each landing depending on passengers, baggage and fuel remaining.
The exact target speed should come from the aircraft’s operating guidance & not from a generic number we give you here. For our X-Plane 12 training flights, we’ll use the aircraft’s published/appropriate procedures.
Try flying the Cessna 172 in circuits within X Plane 12 and see how a light aircraft reacts to a heavy aircraft by adding weight.
You can also move the centre of gravity and see how that effects controllability. She goes from light hearted to a bit sluggish from one extreme to the other.
The visual technique complements that information.
It doesn’t replace it.
The Three Things You Should Constantly Ask Yourself.
When you’re on final, develop three simple questions.
1. Am I Going to the Runway?
That’s your lateral alignment. This seems really obvious but you can get caught up with everything happening, especially when your new and start taxiing for the wrong end of the runway. I have to be honest, I’ve done this at our small Gawler airport when I was new and another aircraft radioed me. All was ok but learnt my lesson.
Are you lined up with the runway centreline?
2. Am I Going to the Right Part of the Runway?
That’s your flight path. In bigger airports there are many entrances to a runway so ensure your entering (withe permission) to the correct end. Also check if you need to back track to the beginning of the runway! Remember that all the runway behind you is useless if you don’t use it.
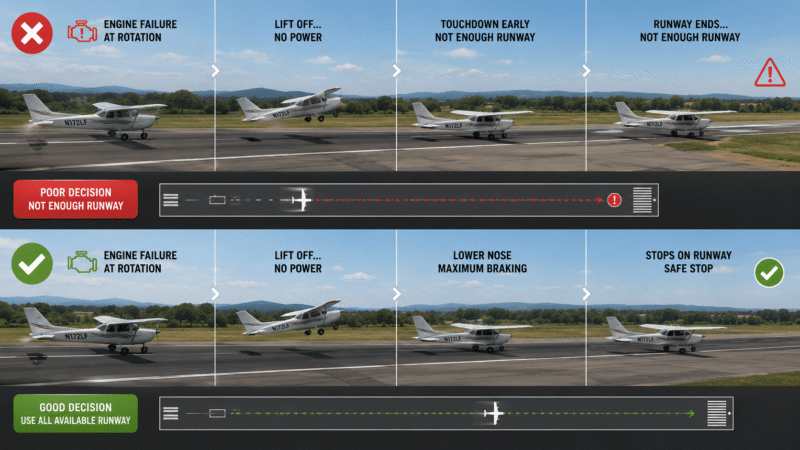
We see aircraft taxi out and use 3/4 of the available runway because its faster and maybe they are impatient. If they lose their engine just as they rotate all that runway they chose not to use could have given them time to stop on the runway and not off the end and impossibly damage the aircraft.
Is your apparent aiming point where you want it?
3. Is the Aircraft Stable?
Getting to be a smooth pilot requires practice for sure. Considering these points will make you better!
That’s your energy and configuration.
Is your speed appropriate?
Is the aircraft configured?
Are you making small corrections?
If you can answer those three questions, you’re developing genuine approach awareness.
The Runway Centreline Is Your Friend.
Look at the centreline & don’t simply use it as something to point the nose at. Use it to detect movement as you start to drift. Your eyes will detect this and in time you will automatically adjust but it takes time.
If the centreline appears to move toward one side of the windscreen, you’re drifting so make a small correction then return to your normal attitude.
Don’t make a massive correction and then chase the opposite direction. This is another reason why smooth pilots often appear to be doing almost nothing.
They’re making small corrections early.
Stop Flying the Instruments on Final.
Here’s an exercise I’d recommend to X-Plane 12 pilots.
Set yourself up for a normal VFR final approach. Fly the aircraft correctly but deliberately reduce the amount of time you spend looking inside.
You should always be Looking outside and use both the runway and horizon as references when appropriate. Be aware of your aiming point but don’t just stare at it.
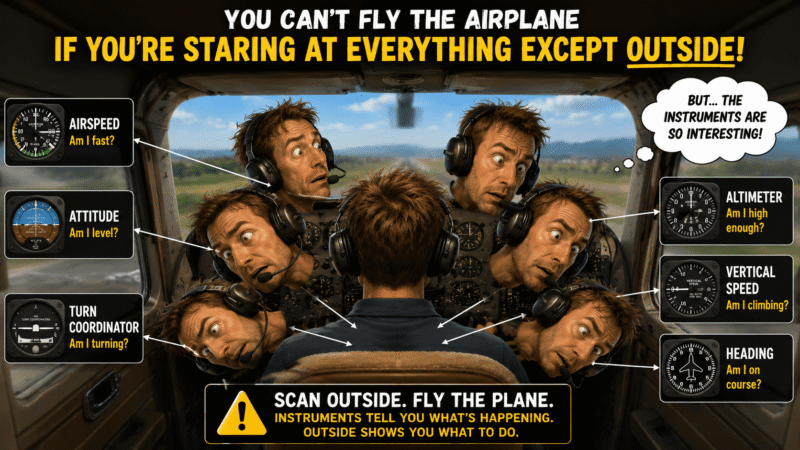
Use the centreline as well as the aircraft’s visual attitude and occasionally you can briefly check the instruments. Once you have had a glance at the instruments once again look outside again.
You’re not trying to make the instruments irrelevant. You’re learning to use them as confirmation rather than allowing them to become your only source of information.
Try This Exercise in X-Plane 12.
This is where we turn the theory into a skill.
Choose a familiar light aircraft.
A Cessna 172 is ideal for this type of exercise then choose a runway you’re comfortable with at your local airport maybe. Set up a normal VFR traffic pattern and fly downwind, turn base then establish final. Now start paying attention to the runway.
What’s happening? Is it to long or is it looking fat closer to you, are you lined up? Now its time to become fluent in landing with your EYES!
Exercise One: The Aiming Point
Pick your aiming point and watch it. The last thing you want to do is stare at the instruments.
Ask yourself:
Is it staying still?
If it stays approximately stationary, you’re maintaining the visual relationship.
If it moves, ask yourself:
Which direction is it moving?
Then make a small correction.
Exercise Two: Deliberately Fly High.
On a training approach, deliberately create a situation where you’re higher than your desired flight path.
Look at the runway but don’t immediately dive toward it. Understand what the sight picture is telling you!
Notice how the perspective changes then correct the situation using appropriate power, pitch and configuration.
The objective isn’t to make a bad landing. It’s to learn what high looks like.
May I suggest you want to di this a few times to really get the idea and the sight picture in your head. Set up in X Plane with a 3 Mile Final. This would be easier if you just want to practice this single aspect.
Exercise Three: Deliberately Fly Low.
Do the opposite on another training approach.
Again, this is a controlled simulator exercise & not something to imitate in real-world flying without proper instruction. Again observe the visual picture & notice how the runway appears.
Notice what happens to your aiming point you can then then correct the approach.
You’re building a visual library of situations from too high as well as too low.
Eventually your brain begins to recognise these pictures automatically and you’ll correct without thinking about it.
Exercise Four: Look Inside Less.

Now fly a normal approach.
Try this:
Outside → brief instrument check → outside.
Don’t sit staring at the airspeed indicator. & don’t spend the entire final approach looking at the altimeter. Look outside because that’s where the runway is.
That’s where the traffic is & That’s where your visual information is and where your landing is going to happen.
What Does “Too High” Actually Look Like?
This is something that simulator pilots should practise deliberately.
A high approach may give you the visual impression that:
- The runway appears unusually close below you
- The runway perspective appears steeper
- Your intended touchdown area appears to move upward
- You’re likely to reach the runway sooner than planned
But don’t rely on one cue alone.
Combine the visual picture with:
- Airspeed
- Power
- Aircraft configuration
- Altitude
- Wind
- Your position in the traffic pattern
The best pilots don’t make decisions from a single piece of information.
They build a picture.
What Does “Too Low” Look Like?
A low approach may produce the opposite visual impression.
You may notice:
- The runway appears flatter
- The aiming point appears to move downward
- The touchdown area seems to be moving farther away
- You appear to be losing the desired approach angle
Again, don’t simply pull back.
Understand the aircraft’s energy state.
If appropriate, power may be needed to restore the desired flight path while maintaining the correct airspeed.
The Big Mistake: Trying to Rescue a Bad Approach.
Here’s an important lesson. I would say the biggest lesson on the whole page because pilots crash and die because they refuse to GO AROUND when its going bad! I can fix it! I can get this!
Often no you can’t is the correct answer!
There comes a point where an approach is simply not going to work.
Maybe you’re:
- Too high
- Too low
- Too fast
- Too slow
- Too far off centreline
- Too unstable
- Too late correcting
New pilots often think:
“I can save it.”
That’s how unstable approaches turn into bad landings. A go-around isn’t failure because its a normal pilot decision. It’s a SMART decision!
The ability to recognise that the approach isn’t developing correctly is part of being a good pilot.
Personal Note! You will always have that day when its not working! The wind has got stronger and changed direction and your REALLY STRUGGLING! I ‘ve had a days like this in the real world! You have to land because the other answer no body wants! This is real!
I was alone on a solo local flight in my Jabiru 170 with no one to help me! All of the above happened!
You take a deep breath and if need be leave the pattern and fly away for 10 minutes and just fly level. Get your head back! Lose that OH S%$T perspective and focus!
You keep saying I can do it! FOCUS on your training, listen to your instructors voice that’s there in your head like a recording telling you what to do! You can do it! I did!
A Stable Approach Is the Goal.
The objective isn’t to make the runway appear perfect at every instant.
It’s to establish a predictable approach and keep it there.
Think:
Stable.
Small correction.
Stable again.
Not:
Correction.
Correction.
Correction.
Correction.
If you’re constantly fighting the aircraft all the way down final, something earlier in the approach probably needs fixing. GO AROUND and try again!
Learn the Picture, Not Just the Numbers.
This is perhaps the second most important lesson in this entire article. The first is GO AROUND if it looks WRONG!
Numbers are useful.
But numbers don’t teach you what a runway looks like. The airspeed might tell you you’re flying 70 knots and the altimeter might tell you you’re at 500 feet. The VSI might tell you you’re descending at 500 feet per minute. Ask yourself is that the picture I see?
But none of those instruments directly show you:
“This runway looks right.”
That’s something you need to learn visually.
And once you learn it, you’ll start developing something that every VFR pilot needs:
judgement.
Why This Matters in X-Plane 12.
Flight simulators give us an enormous advantage here and especially in VR with a great headset like those in the Pimax range with their clarity.
We can practise & & practise & And practise. You can fly ten approaches in an afternoon.
You can intentionally make one approach high.
Another low.
Another fast.
Another slow.
Another perfectly stable.
And you can immediately try again.
That makes X-Plane 12 an excellent environment for developing the visual recognition skills that support VFR flying. The addition of VR for me was the true game changer because it gave me the depth perception when practicing final and flare! I struggled a bit with this aspect till my Rift S made the sight picture real!
But don’t simply practise landing.
Practise recognising the approach.
There’s a difference.
Your New Approach Scan.
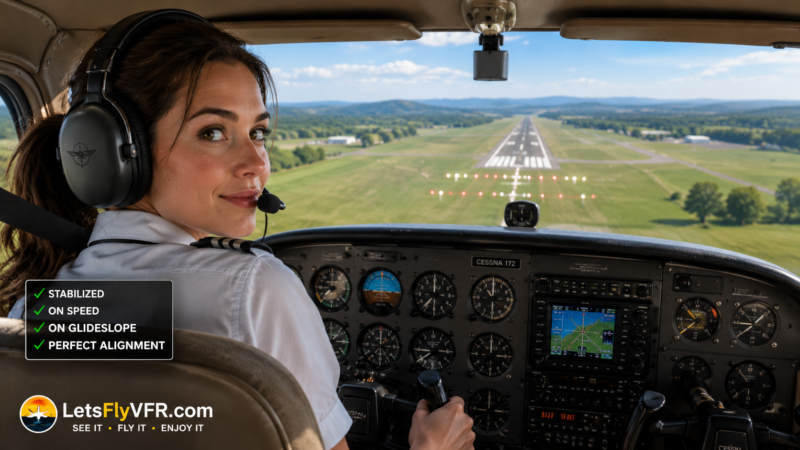
As you fly final, develop a simple mental scan:
LOOK OUTSIDE
Runway
↓
Aiming point
↓
Centreline
↓
Horizon
↓
Runway perspective
↓
Aircraft attitude
↓
Brief instrument confirmation
↓
Back outside
And repeat.
The more you practise this, the more natural it becomes.
The Approach Should Start Looking Predictable.
Eventually, something changes.
You stop thinking:
“What does 500 feet look like?”
And start thinking:
“That looks high.”
You stop thinking:
“What does a 3-degree approach look like?”
And start thinking:
“The runway picture looks right.”
That’s the transition from simply operating an aircraft to actually developing pilot judgement.
One Final Rule.
If you remember nothing else from this lesson, remember this:
Don’t chase the runway. Learn to read it.
The runway is constantly giving you information. Watch your aiming point while learning the runway perspective. Check your alignment then reference the horizon.
Learn what a stable approach looks like.
Then use your instruments to confirm what your eyes are telling you.
That is how you start developing real VFR visual judgement.
BUILD THE PERFECT COCKPIT… THEN DRESS THE PART.
Discover Premium Flight Simulator Apparel, Wall Art, Pilot Gifts and Aviation Accessories at LetsFlyVFR – ETSY STORE.






Your X-Plane 12 Challenge.
For your next X-Plane 12 session, don’t make your goal:
“I want to land perfectly.”
Make your goal:
“I want to recognise whether my approach is high, low, fast, slow, left, right or stable before I reach the runway.”
Fly five approaches.
After each one, ask yourself:
- Was I high or low?
- Was I fast or slow?
- Was I aligned?
- Where was my aiming point?
- Did it remain stable?
- Did I make too many corrections?
- Would I have continued the approach in a real training situation?
- Did I recognise the problem early enough?
That’s how you build skill.
Not by chasing perfect landings.
By learning to recognise what is happening before it becomes a problem.
What’s Next?
We’ve now covered two important pieces of our VFR progression.
In the first lesson, we learned how to take the aircraft from startup to the runway.
Now we’ve started developing the visual skills needed to judge the approach.
The next logical step is to put those skills into the VFR traffic circuit.
That’s where everything starts coming together:
Downwind → Base → Final → Approach → Landing
And one of the most important questions we’ll answer is:
When exactly should you turn base?
Because if you get that decision wrong, no amount of perfect flying on final will completely fix the approach.
A Note for Real-World Flying.
This series is designed around X-Plane 12 and flight-simulator training.
The techniques discussed here are intended to help you understand the principles behind VFR flying, not replace real-world flight instruction. Ask your QFI if your real world flying.
Aircraft handling, speeds, configuration, traffic-pattern procedures, runway markings, regulations and operating practices can vary significantly by aircraft, airport and jurisdiction.
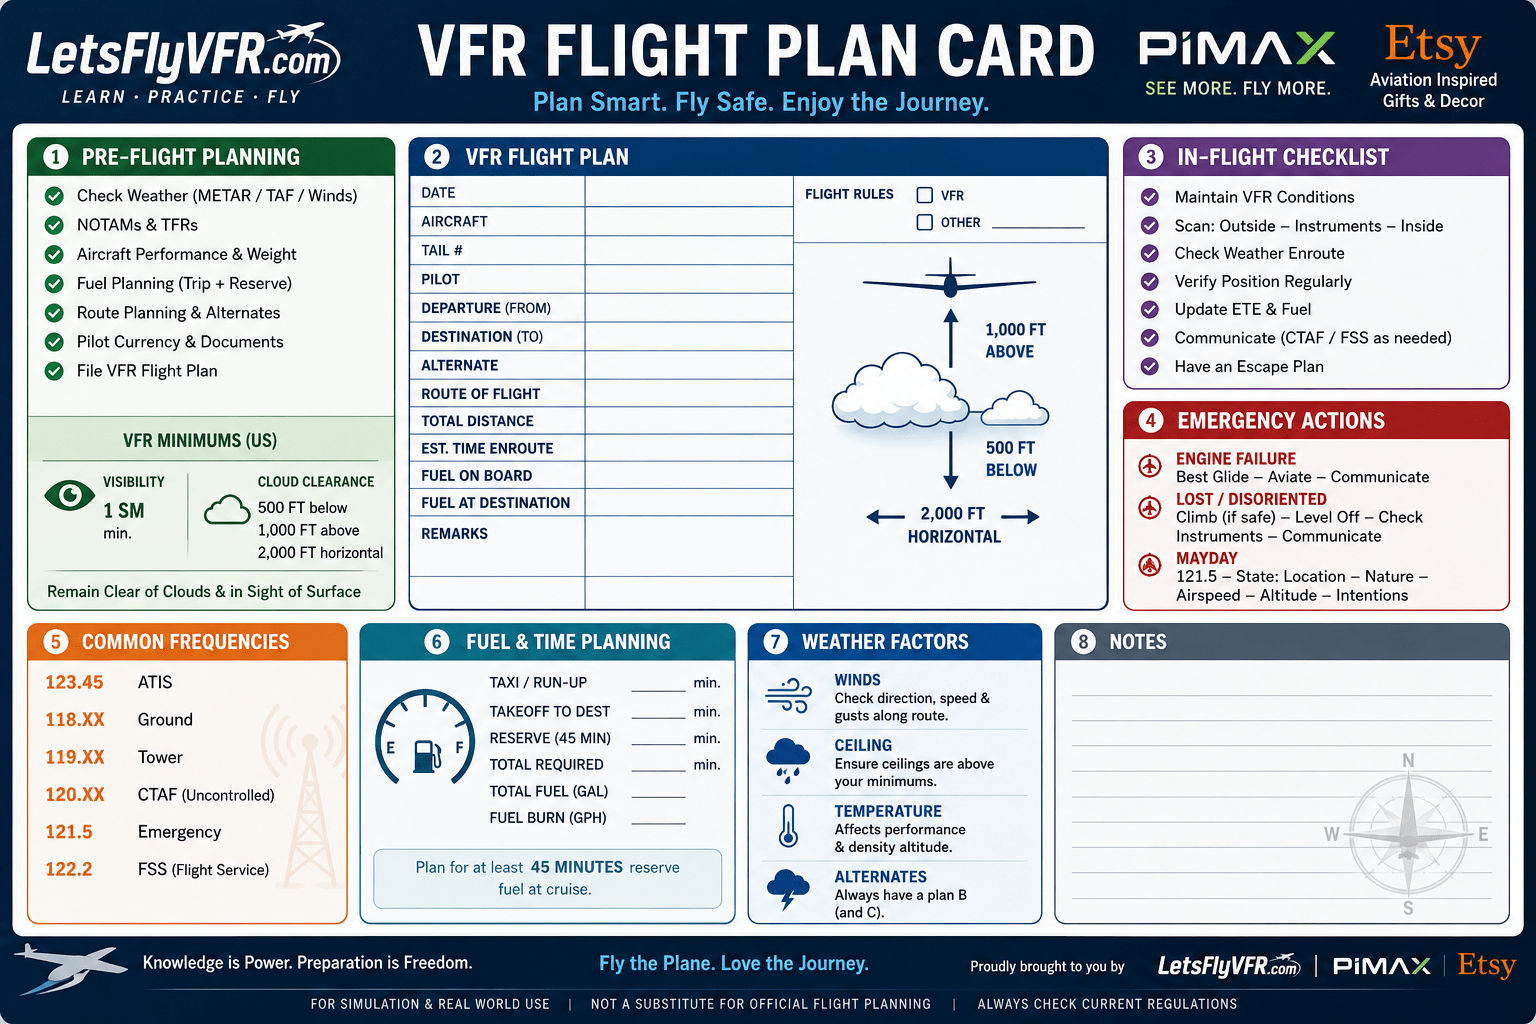
For real-world flying, use the aircraft’s approved operating information and follow the instruction of a qualified flight instructor.
The FAA’s Airplane Flying Handbook provides further formal guidance on approaches, landings, visual aiming points and stabilized approaches.
Next in the series: How to Fly a Better VFR Circuit — Downwind, Base & Final
Learn the picture. Understand the aircraft. Build the judgement. Become a better virtual pilot.
Author

Brendon McAliece (Aka Gunnie) is a military veteran with 23 years working on Jet Fighters, their weapons systems and ejection seat/module systems as well as munitions and R&D. Involved with flight simulation since the 1980s, he has flown all the major flight simulators over the years.
He is an Australian expat who has lived in Malaysia, UK, Saudi Arabia and more recently Thailand. He is a multi-lingual blogger who loves to share his life experiences here on LetsFlyVFR.com and DreamingGuitar.com, with his lifestyle and Travel experiences Blog plus his Dreaming Coffee website.
Learn More @
DreamingGuitar.com – DreamingCoffee.com
LetsFlyVFR ETSY Store – Discover PIMAX VR Now!