
Falcon BMS 4.38 Viper Emergency & Landing Guide
Master the Viper’s landing procedures — from normal recovery to worst-case engine-out scenarios.
1. Introduction.
Landing proficiency in Falcon BMS is a critical skill. Whether you’re returning from a high-threat combat mission, managing a flameout, or simply running low on fuel, the ability to land safely can be the difference between mission success and disaster. This guide covers:
- Normal landing procedures and pattern flying
- Emergency flameout approaches
- Fuel management and best glide techniques
- High Key / Low Key pattern theory
- DED pages for cruise and range optimization
- Quick reference kneeboard material
2. Normal Landing Procedure (VFR Pattern)
Lets look at the basic landing pattern before making the world a lot harder for out pilots. Getting the landing pattern to be a second nature is a great piece of knowledge so when everything goes bad you have options.

Key Numbers:
- Final Approach Speed: 11° AoA = ~135–150 KIAS (depends on weight)
- Touchdown Speed: ~130 KIAS
- Glidepath: 3° (Aim for 12° pitch ladder + VV on threshold)
Standard Overhead Break Pattern:
- Entry Altitude: 1,500′ AGL
- Downwind: 1,500’ AGL, 220 KIAS
- Base Turn: Gear down, flaps full, slow to 180–160 KIAS
- Final: 11° AoA (~140 KIAS)
Checklist:
- Gear: Down
- Flaps: Full
- Speed Brakes: As needed
- AoA Bracket: Center the VV
- TCN: Optional for ILS or Tacan landing
3. How to Fly a VFR Circuit in Falcon BMS
Ok here are the basic figures to fly a landing in Falcon BMS. These are pretty hard and fast so commit them to memory and you’ll be easing your viper onto the pavement with professional efficiency in no time.
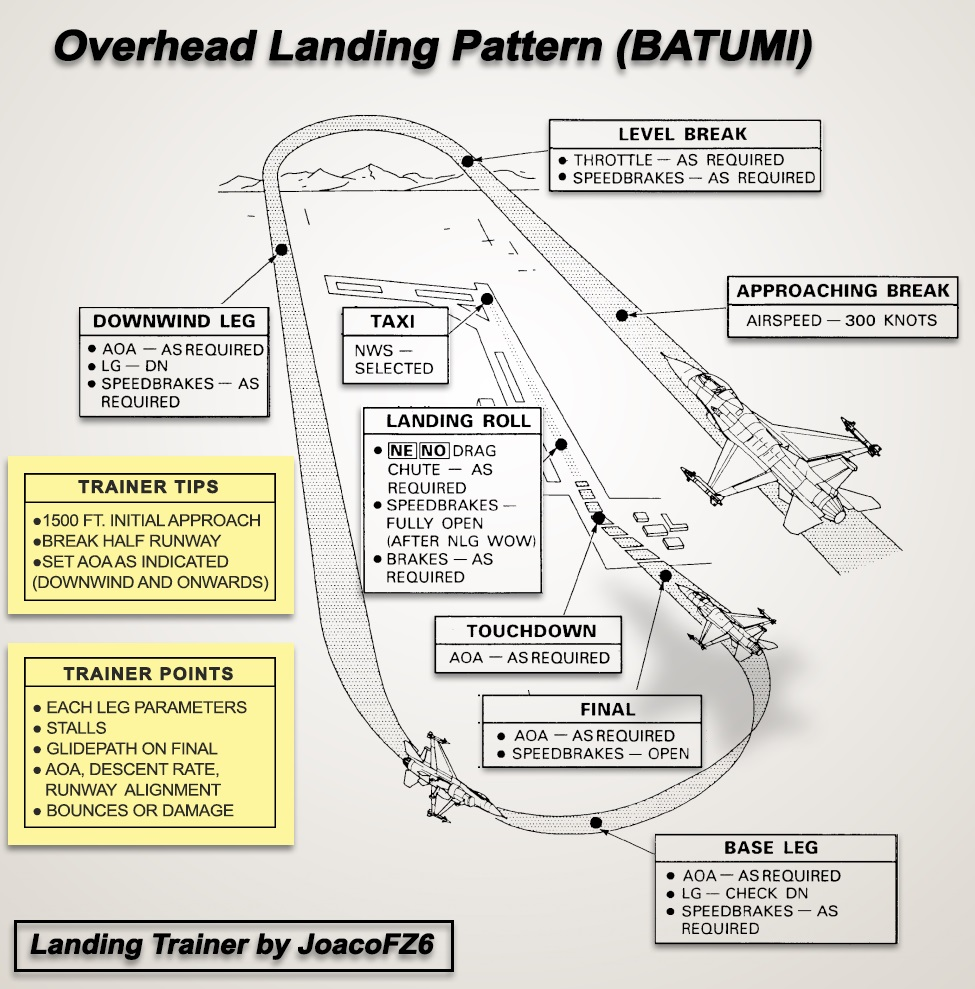
Pattern Geometry:
| Segment | Altitude | Speed | Notes |
|---|---|---|---|
| Initial | 1,500’ | 350-400 | Overhead approach entry |
| Break | 1,500’ | 250-220 | Pull Gs, enter downwind |
| Downwind | 1,500’ | 220 | Flaps full, gear down abeam |
| Base | ~1,200’ | 180 | Begin turn to final |
| Final | ~800’ | 140 | 11° AoA to touchdown |
Note: Practice the VFR pattern until it’s second nature. Smooth AoA management on final is key.
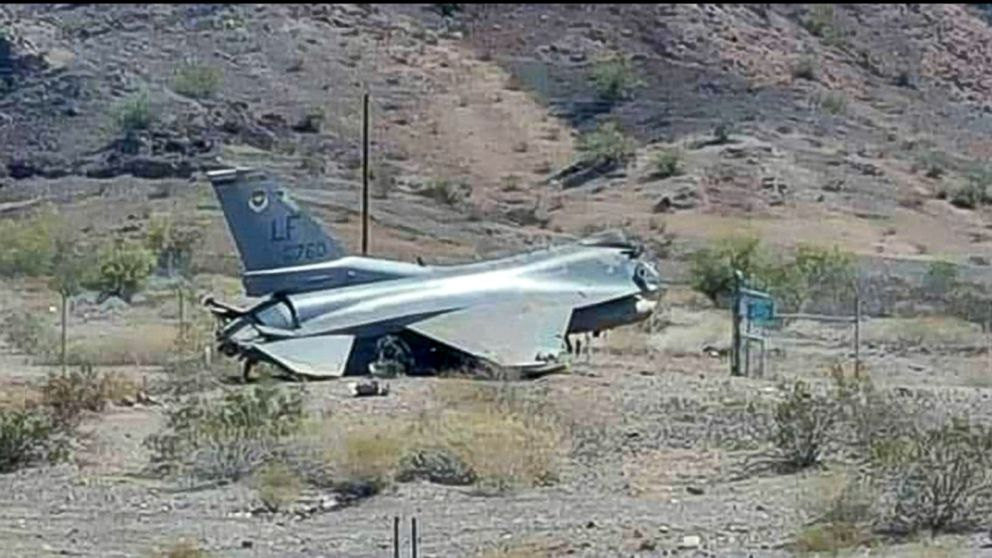
4. Engine-Out / Flameout Landing Procedure.
Missions in Falcon BMS are extremely demanding and maybe you’ll get back with less fuel that you wanted. Bad things happen but a good pilot can rise to the occasion with the right knowledge.
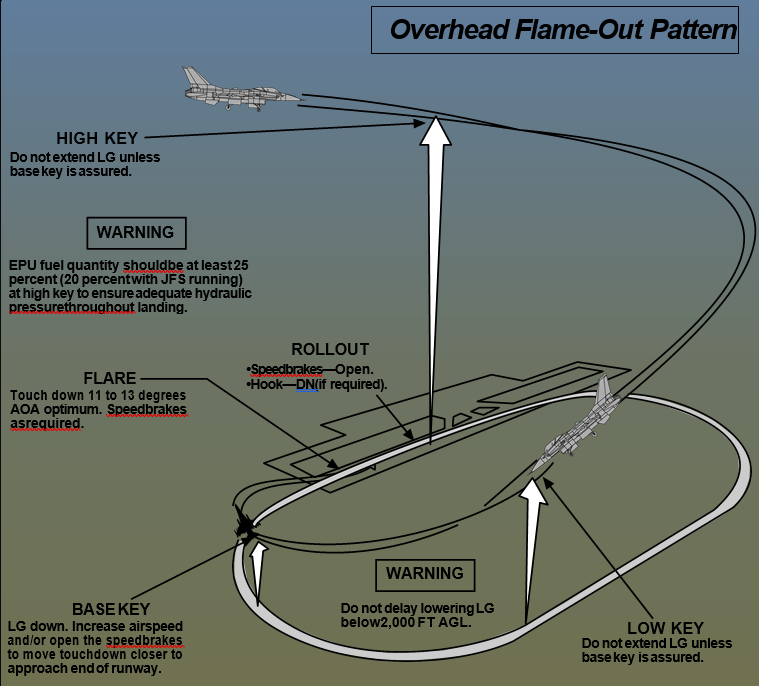
4.1 Understanding High Key & Low Key Positions
Note: High Key and Low Key are visual and geometric markers that help guide you through an unpowered landing. Used extensively in military training, they let you build a safe glide path without guessing.
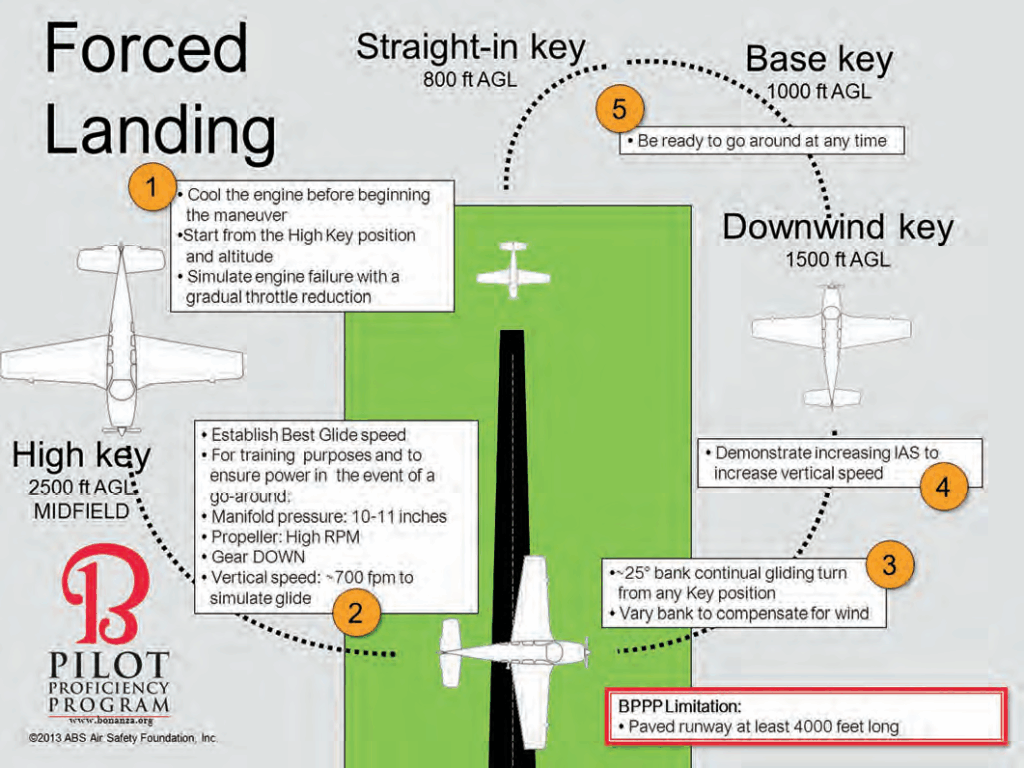
🔹 High Key
- Altitude: ~7,000’ AGL
- Position: Directly overhead the landing runway
- Configuration: Clean (gear/flaps up), 230–250 KIAS
- Purpose: Start point for a descending 180° turn to Low Key
🔹 Low Key
- Altitude: ~3,000’ AGL
- Position: Abeam the intended touchdown point (left or right pattern)
- Configuration: Gear down, flaps optional
- Speed: ~180 KIAS
- Purpose: Commit to landing, begin 180° descending turn to final
Note: Use High Key to gauge if you can make the field. If you can reach Low Key from High Key with energy to spare, you are safe to land.
4.2 Best Glide Performance: Speeds, AoA, and Range
| Altitude | Best Glide Speed | Glide Ratio | Range (NM) |
|---|---|---|---|
| 10,000 ft | ~230 KIAS | ~12:1 | ~20 NM |
| 20,000 ft | ~240 KIAS | ~13:1 | ~42 NM |
| 30,000 ft | ~250 KIAS | ~14:1 | ~65 NM |
| 35,000+ ft | ~255 KIAS | ~14.5:1 | ~75+ NM |
Glide Profile Techniques
- AoA: ~4°–5° (trim for stable descent)
- Zoom climb if flameout occurs at >250 KIAS
- Avoid banking >30°
- Gear down only once field is assured
5. Low Fuel / Imminent Flameout Strategy
Fuel Reference Points:
| State | Fuel (lbs) |
|---|---|
| Joker | Custom set mid-mission |
| Bingo | Based on RTB range |
| Min Fuel RTB | ~2,000 lbs |
| Emergency | <1,200 lbs |
Strategy:
- Monitor CRUS page for optimum cruise alt/speed
- Use max range speeds (see next section) if engine is running
- Plan flameout glide from 30,000+ ft when possible
Note: Rule of Thumb: 1,000 ft = ~2 NM glide range
6. DED Pages for Navigation & Fuel Efficiency

Cruise Info:
- ICP: LIST → MISC → CRUS (Page 2)
- Displays:
- Optimum Altitude
- Max Range KTAS / Mach
- Max Endurance Speed
Navigation:
- ICP: LIST → 1 (DEST)
- Fuel Remaining / Distance to Waypoint
- ICP: LIST → 0 (DTC)
- Confirm DTC loaded
7. Quick Reference Kneeboard Inserts
Normal Landing Quick Guide
Downwind:   1,500’ AGL, 220 KIAS
Gear Down:  Abeam threshold
Base:       180–160 KIAS
Final:      11° AoA (~140 KIAS)
Touchdown:  ~130 KIAS
Flameout Pattern (No Power)
High Key:   ~7,000’ AGL, clean, 230–250 KIAS
Low Key:    ~3,000’ AGL, gear down, 180 KIAS
Best Glide: ~240 KIAS, 4°–5° AoA
Range:      ~12–14 NM per 10k ft
Final:      11° AoA, firm touchdown
DED CRUS Info
Opt Alt:        Displayed on CRUS
Max Range SPD:  ~275–300 KTAS
Max Endurance:  ~200–220 KTAS
AoA:            3°–6°
8. Practice Scenarios (Optional Section)
Include practice missions to simulate:
- Normal VFR patterns
- Dead-stick approaches from 30,000 ft
- Fuel emergencies
- ILS/Tacan landings

Bonus: Download the Free Falcon BMS Navigation Kneeboard
Available here: – Includes ICP shortcuts, DED reference pages, TACAN list, and ILS setup cheat sheet. DOWNLOAD Kneeboard Here!
Author
Brendon McAliece (Aka Gunnie) is a military veteran with 23 years working on Jet Fighters, their weapons systems and ejection seat/module systems as well as munitions and R&D. Involved with flight simulation since the 1980s, he has flown all the major flight simulators over the years.
He is an Australian expat who has lived in Malaysia, UK, Saudi Arabia and more recently Thailand. He is a multi-lingual blogger who loves to share his life experiences here on LetsFlyVFR.com and DreamingGuitar.com, with his lifestyle and Travel experiences Blog plus his Dreaming Coffee website.
Learn More @
DreamingGuitar.com – DreamingCoffee.com – LetsFlyVFR.com
(HOME – BLOG – SHOP – ABOUT)
This page has been viewed 0 times.
As an Amazon affiliate I may benefit from qualifying sales.