Falcon BMS 4.38 Survival Guide: Surface-to-Air Missiles & AAA.
Introduction
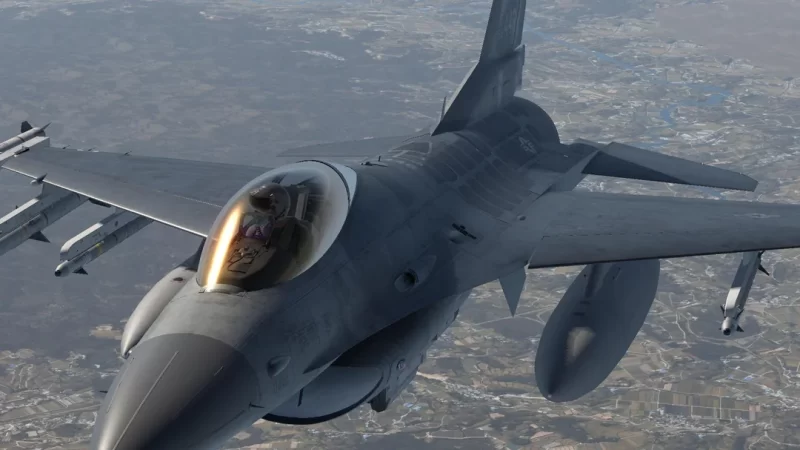
Facing a barrage of surface-to-air missiles (SAMs) and anti-aircraft artillery (AAA) in Falcon BMS 4.38 can feel overwhelming & even fatal if you don’t have the right tactics. Whether you’re flying the F-16 Viper, F/A-18 Hornet, or the F-15C Eagle, understanding missile behavior, radar tracking modes, and countermeasures can mean the difference between survival and an in flight fireball.
This guide will walk you through modern missile avoidance strategies, countermeasure deployment, radar types, and critical comparisons between Russian/Chinese and Western weapons. Get ready to fly smarter—and stay alive longer.
Perfect — here’s a version tailored for your Falcon BMS Surface-to-Air Missile (SAM) and AAA threats guide, keeping it relevant, accessible, and simulation-focused:
What is RADAR?
RADAR (Radio Detection and Ranging) is the primary detection method used by SAM sites and AAA systems in Falcon BMS. It works by emitting radio waves and detecting their reflections from aircraft. Most older or basic systems use Doppler radar, which tracks the speed and direction of targets by measuring changes in the radio signal’s frequency.
This creates a tactical opportunity for pilots to use the beaming technique ie. turning perpendicular to the radar to reduce relative speed and drop off the radar’s Doppler filter.
However, newer systems use Electronically Scanned Array (ESA) radars, such as AESA, which can rapidly scan, track multiple targets, and switch radar modes without moving parts. These radars are much harder to defeat with simple maneuvers and often require advanced evasion tactics like terrain masking, jamming, chaff deployment, or altitude changes.
Falcon BMS does not have any ESA radar equipped threats as yet so your knowledge of avoicing doppler radars is super important. Knowing the type of radar you’re up against in BMS is crucial & your survival may depend on using the right tactic at the right time.
Missile Evasion Tactics
Beaming and the 3/9 Line (✅ Best Practice)
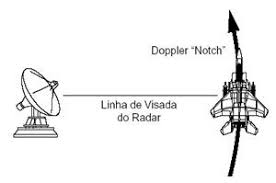
Beaming means turning perpendicular (90°) to an incoming radar-guided missile or tracking radar. This puts your aircraft on the missile’s Doppler notch also known as the 3/9 line making you momentarily invisible to certain types of radar (especially Pulse-Doppler).
Why does this Work?
Doppler radars rely in the constant referencing of pulses of radar anergy fired at your aircraft. It measures the time between each pulse measuring the time between them. Knowing if the time between each received pulse tells the targeting radar if your flying towards it or away.
If the time between it receiving pulses is longer then it understands your flying away from it & conversely if the time gets shorter it knows your flying towards it.
But if there is little or no difference in the pulse times then the radar discounts it as ground clutter but not a target and does not register it on the display. You disappear!
What tools and systems do pilots have to track and detect AAA/SAM system radars, and how effective are they?
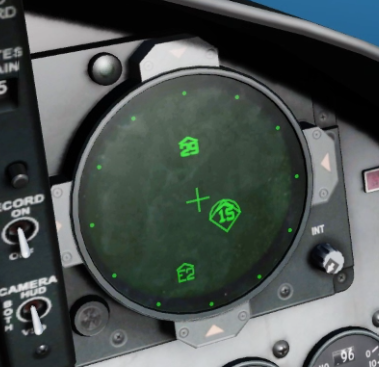
Pilots in modern fighters like the F-16, F/A-18, and F-15C rely on Radar Warning Receivers (RWRs) to detect emissions from ground-based SAM systems and airborne radar threats. The RWR provides directional cues, radar type (search, track, or missile guidance), and threat priority. Generally the closer the symbol is to the centre which is you the higher the threat is.
You should not take this as the radar is closer to you. Some systems could be much further away but have powerful radars as well as long range dangerous missiles.
These systems can identify known radar signatures such as SA-2, SA-10 missile sites as well as AAA fire-control radars for ground based guns.
While highly effective at detecting traditional radar-guided threats, RWRs cannot detect infrared or electro-optically cued systems, making those threats more difficult to anticipate.
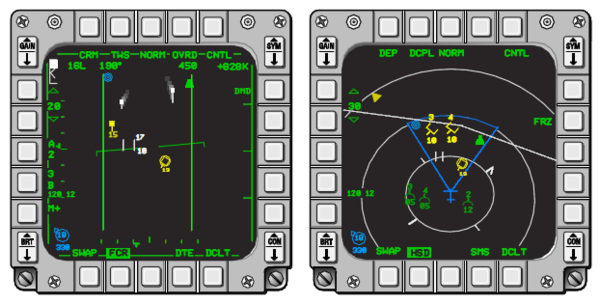
F-16 Viper & Link 16 Data Link Advantage.

Additionally, data link systems (e.g., Link 16 in Falcon BMS) can enhance situational awareness even further by sharing threat information across many friendly aircraft as well as seaborn and ground based systems.
However, the effectiveness of these tools depends on factors like radar line of-sight, jamming interference, and whether the threat radar is actively emitting (RAW).
Tactical Tip.
Tactically you can put your own radar on standby in the Viper & use your link 16 data link to keep abreast of all the threats while you sneak into a dangerous target
Lets Dance with Missiles!
Missile Avoidance and Maneuvering.
Its difficult but not impossible to out maneuver a surface to air missile, especially when you see it launch or have a launch indication with a direction on your RAW scope.
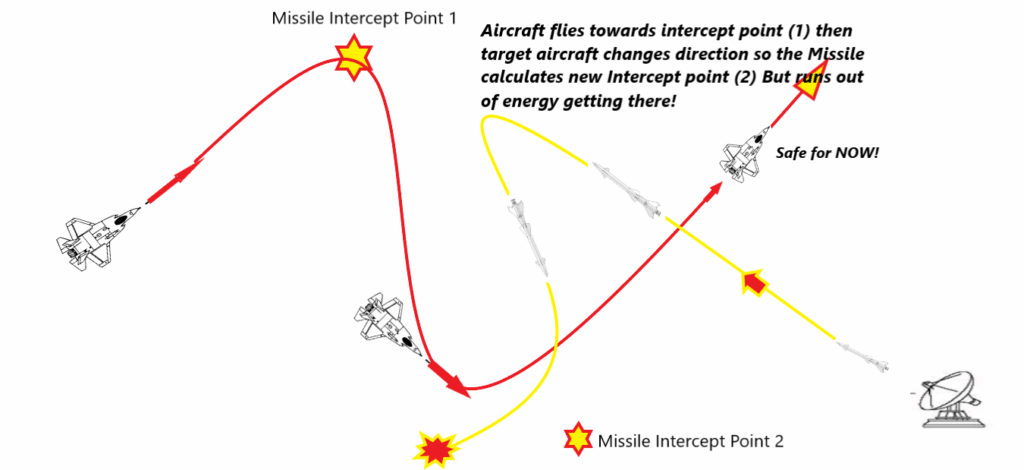
The idea s to treat the missile like any other fighter. You break hard towards the missile ie turn tightly making the time it has reduce while maneuvering away from it!
This gives the missile a lot more problems to solve from increasing closure speed plus your turn it has to lead you to make an impact. If you them maneuver again the missile has to resolve a second intercept point in 3D space all the while the time it has is reducing incredibly fast.
Surface to air missiles are big and fast but because they are both of these they are not as maneuverable as an Air to Air missiles for example. A couple perfectly timed turns can make the missile miss you!
Chaff & Flares.
Chaff and flares are common decoys and when in a threat environment your countermeasures systems have specific programs to dispense them saving you the need to do it manually. Of course you can but if your in a high treat environment your countermeasures and electronic jamming suite should be active as you see the need.
If your here flying in BMS or DCS im going to take it for granted you know what chaff and flares are. I have loaded a lot of them in my military days and working in the middle east on Tornado’s.
My suggestion is if you get locked dispense and then beam the source of danger. If you have a launch indication let the Vipers automatic programs deal with the dispensing and you fly the aircraft as we have already discussed. Don’t save them for latter! Use them when you need them as any you take home were not a help!
Flighting a SAM example.
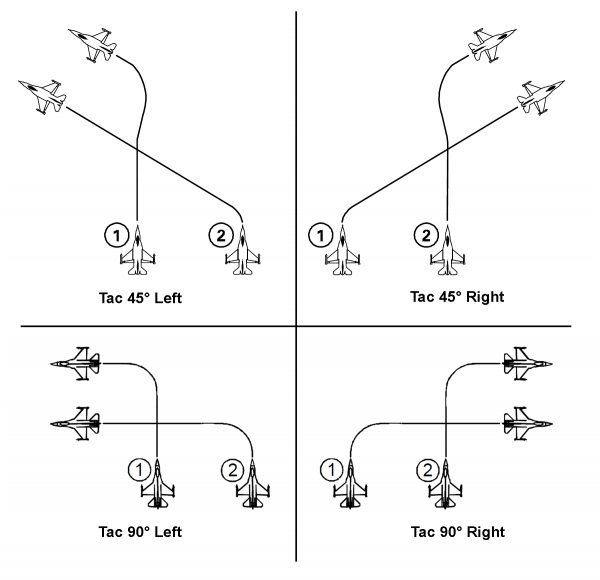
If your flying at 000 degrees and a missile launches at your 45 degree position then you turn hard toward it and dive! This can often force the missile to break lock because it cannot turn as tight as you!
If the missile launches from on your nose say 000 degrees you can dive and turn 45 degrees left ( 315 Deg) forcing the missile to lead you to try and intercept you. Be patient and wait 20 seconds then then hard back 90 degrees the other direction (045 Degrees. As per the diagram above.
The missile already getting lead on you going with you to your first turn left now has to correct and lead back ahead of you to your right side. This in itself can be enough to have the missile run out of energy and miss you altogether.
This is not a perfect technique and relies that you have seen the AAA/Missile radar system lock you up. Practice in the sim will help you improve your survival.
✅ Effective against:
- Pulse-Doppler radar missiles (e.g., AIM-120, R-77)
- Ground-based tracking systems
🔻 Less effective against:
- IR-guided missiles
- Electro-optically cued weapons
Turn & Run Maneuver (✅ Situationally Useful)
Simply turning cold (turn away) can also increase distance to the missile and waste its energy. This can be especially effective if you’re already near the edge of the missile’s no-escape zone. Your close so you need to be quick and decisive here to survive.
- Maneuvering options depends on the system if you are hard locked (STT) and the RAW gear is screaming at you then a MISSILE is in the air already after you. If so, turning to put the missile on your 3/9 line is a good start as well as diving if your at altitude fast.
- If the missile is close and maneuvering to intercept you diving and running directly away is one of the safest options at maximum available speed. Yes light the burner and go as fast as you can possibly go! The overtake on a fighter going very fast makes it hard for even a missile to catch you.
- A third option to this from a BMS pilot is to turn around and run at a 45 degree angle to the rear so the missile has to both chase you down and also lead you makes it more complex. It seems fair to try this but I cant say its a real world option.

Remember – You cannot continue to fight if your dead!
Altitude is Your Friend!
Diving to low altitude also ensures the air is much thicker and this makes a big difference to the missiles range. Think of it as if your running in the air then jump into a pond and try to keep running.
It’s pretty hard and although the density of high altitude and low altitude air is not quite as a dramatic as jumping into water the change it is significant to the amount of energy the missile expends trying to get you!

You should always dive for lower altitude and its worth reminding you the missile doesn’t know the ground is there! It’s going to lead you, so the faster your descending the missile will try and lead you even more possibly having it fly into the ground!
Don’t crash yourself and be ready to pull up before your a smoking hole in the terrain.

The Missile You Didn’t See?
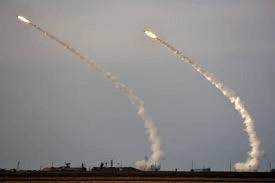
The missile you don’t see is the one that gets you! You must be aware at all times. The video is real below. The pilot is over Baghdad I understand and evades SIX MISSILES! His countermeasures failed to launch so no chaff or flare were dispensing. He found out one he returned to base safely. The interview with this pilot is interesting.
Here’s his HUD footage.
Speed is life so being fast is always helpful in these environments. You can see how quickly the Viper pilot bleeds air speed while maneuvering to avoid being hit.
Its eye watering!
✅ Best at longer ranges
❌ Dangerous if missile is already active or close
Altitude, Speed & Launch Zones
Missile launch success and survival are heavily impacted by your altitude and airspeed:
| Altitude | Speed | Result |
|---|---|---|
| High & Fast | Mach 1.0+ | Increases missile launch range – for both you and the enemy |
| Low & Slow | < Mach 0.7 | Reduces enemy detection, but limits your own escape options |
| Medium Alt | 20,000–30,000 ft | Balanced performance; most ideal for radar tracking dodging |
⚠️ Tip: Use afterburner to extend the time a missile takes to reach you, but only briefly but note if your below possibly 15000 ft you’re a bright IR target!
Understanding AAA / SAM Missile Threats.
Radar-Guided SAMs (✅ Primary Long-Range Threat)
Examples: SA-2 Guideline, SA-10 Grumble, HQ-9, Patriot
These systems use ground-based radars to track and guide missiles. Many can engage targets at long ranges (20–100+ NM) and high altitudes.

🟥 Once a SAM goes “active” (missile transitions to its own radar seeker – (Pitbull), evading becomes extremely difficult unless you break lock early with terrain masking, jamming, or aggressive maneuvering.
Infrared (IR) SAMs & MANPADS (⚠️ Short-Range Ambush Threats)
Examples: SA-7 Grail, SA-18 Grouse, Stinger
These heat-seeking missiles don’t emit radar signals, making them completely silent until launch. Effective at low altitudes and short ranges (<5 NM), especially during approach or egress.
🟥 RWR won’t detect these threats. Look for launch smoke, rely on visual scanning, flares, and IR missile approach warnings (if equipped). Newer Aircraft may have IR detectors such as the F-111 which had a large IR detector in the tail. It could see a launch of an IR missile.
Electro-Optical / Passive SAMs (⚠️ Low-Probability, High-Risk)
Examples: SA-19 Tunguska (optical mode), some newer Chinese/Russian systems
These use TV or IR tracking instead of radar, meaning no emissions & they are invisible to RWR.
🟥 You won’t know they’re tracking until a missile is fired. Terrain masking and minimizing exposure time in known threat zones is key.
Anti-Aircraft Artillery (AAA) (⚠️ Deadly in the WEZ)
Examples: ZSU-23-4 Shilka, Type 95 SPAAA, 57mm emplacements
Effective at very short ranges (1–3 NM) and low altitude (<10,000 ft). Most systems use radar or optical tracking and fire high rates of rounds.
🟥 Gun threats give minimal warning. If you’re flying low and slow, you’re in the kill zone get out fast, jink unpredictably, and avoid flat terrain near known sites.
Ideally just stay high above 10,000ft generally to be safe from AAA and Manpads!
Threat Detection Mk 1 Eyeball
Detecting these threats relies as much on you and your wingman having their eyes out of the cockpit! Missiles fired in your forward quarter will have a better chance of leading you so you can also see them! Time will be short so reaction time is critical.
If missiles are launched in your rear quarter it’s pretty hard to see them but that’s why you change direction very frequently and crossover with your wingman so you are always checking behind you visually.
You can avoid AAA and Manpads often it you stay 10,000 ft or more! Eyes out looking for flashes of enemy manpads or tracer heading your way. Eyes cannot be replaced by technology in a lot of situations.
Deployment Methods & Threat Platforms – Surface-to-Air Threats in Falcon BMS 4.38
Understanding how and where SAMs and AAA are deployed is vital for survival in hostile airspace. In Falcon BMS 4.38, threats are realistically modeled, often layered into Integrated Air Defense Systems (IADS), with strategic placement, radar networks, and engagement coordination across multiple platforms.
Common Deployment Methods.
🟦 Static Fixed-Site Deployments
- Used by: Long-range SAMs (e.g., SA-2, SA-10, Patriot)
- Behavior: These are hard-wired into the IADS grid, with dedicated search, track, and guidance radars.
- Tactics: Terrain masking, low-level ingress, and DEAD/SEAD missions (e.g., with HARMs) are critical.
🟨 Mobile/Relocatable Systems
- Used by: Medium-range SAMs (e.g., SA-6, SA-11, HQ-7), Short-range SAMs (e.g., SA-13, SA-15)
- Behavior: Can “shoot and scoot,” reposition between missions. Often camouflaged and set up near key infrastructure or troop convoys.
- Tactics: Expect sudden engagements; use RWR and recon tools to identify and avoid kill zones.
🟥 Man-Portable & Infantry-Deployed (MANPADS)
- Used by: SA-7, SA-18, Stinger
- Behavior: Deployed by infantry, these IR-guided weapons pose the highest risk during takeoff, landing, and low-altitude attack runs.
- Tactics: Fly above 15,000 ft when possible; deploy flares on low passes; never loiter near frontlines.
⚫ AAA Emplacements & Mobile Platforms
- Used by: ZSU-23-4, Type 95 SPAAA, 57mm static guns
- Behavior: Radar or optically guided. Can engage low and medium altitudes with deadly volume of fire.
- Tactics: Avoid level flight below 12,000 ft near known installations; AAA is most effective when you’re slow or predictable.
Integrated Air Defense System (IADS)
IADS is a long standing defencive system of combining radars systems from surface systems with ships and now aircraft are in the mix. This makes for a comprehensive sky coverage making it hard for 4th gen and earlier aircraft to penetrate it.
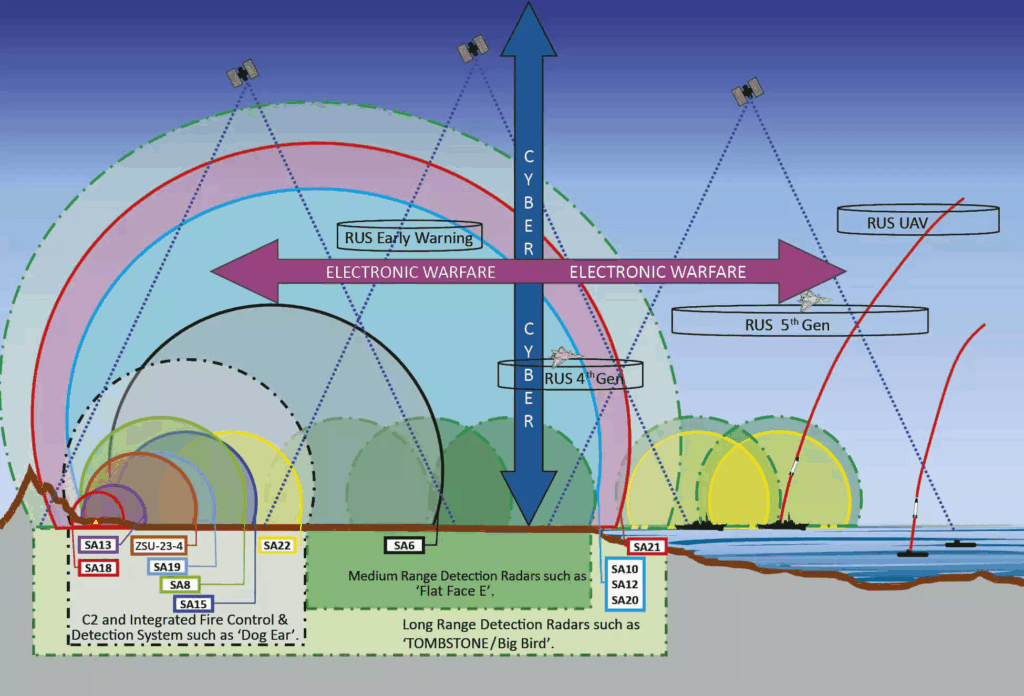
Now combine the range of various missile systems and AAA weapons to overlap the airspace being defended. You can be assured there will be multiple threats to your existence flying into a heavily and well planned IADS area.
Falcon BMS models an IADS that:
- Shares radar tracks across platforms (EW radars feed SAM sites).
- Automatically hands off targets from search to engagement radars.
- Can coordinate multi-layered coverage, with low, medium, and high altitude threats overlapping.
Typical IADS structure:
- Early Warning Radar: Detects aircraft at long range, hands off to…
- Acquisition Radar: Assigns threats to…
- Fire Control Radar: Guides the missile in terminal engagement
⚠️ Disabling one part of the chain (e.g., the search radar) can temporarily blind a whole sector.
Surface-to-Air Threat Table (Range & Altitude Profiles)
| System | Type | Range (NM) | Max Altitude (ft) | Guidance Type | Notes |
|---|---|---|---|---|---|
| SA-2 Guideline | Long-Range SAM | 25–30 | ~80,000 | Radar (CW/Semi-Active) | Fixed-site, deadly at altitude |
| SA-3 Goa | Medium SAM | 15–20 | ~60,000 | Radar | Often covers gaps in SA-2 zones |
| SA-6 Gainful | Mobile SAM | 20 | ~50,000 | Radar | Highly mobile, can surprise |
| SA-10 Grumble | Strategic SAM | 50–70 | ~100,000 | Radar (Track-While-Scan) | Modern, multi-target, very deadly |
| SA-11 Gadfly | Mobile SAM | 20–30 | ~72,000 | Radar (Pulse-Doppler) | Effective vs high-speed targets |
| SA-13 Gopher | Short-Range SAM | 3–5 | ~11,000 | Infrared (IR) | Silent killer; uses IR, no RWR cue |
| SA-15 Tor | Mobile SAM | 6–8 | ~20,000 | Radar | Can shoot down HARMs, fast reaction |
| SA-18 Grouse | MANPADS | 2–3 | ~10,000 | Infrared (IR) | Very hard to detect pre-launch |
| ZSU-23-4 Shilka | AAA | 1.5–2 | ~8,000 | Radar/Optical | Rapid fire, radar-guided |
| Type 95 SPAAA | AAA | 1.5–2 | ~10,000 | Radar/IR Combo | Mobile, often escorts SAMs |
| Patriot (PAC-2/3) | Long-Range SAM | 45–60 | ~80,000+ | Radar (Track-via-Missile) | Western, highly accurate |
| HQ-9 | Strategic SAM | 50–65 | ~100,000 | Radar (Phased Array) | Chinese equivalent to SA-10 |
🟡 Note: Ranges and altitudes vary based on radar horizon, terrain masking, and BMS mission editor values.
🔧 Tips for Identifying and Surviving Threat Zones
Much of your missile avoidence is done in the planning room where you have intelegence to where missile systems are and you can plan to minimise the risk of being intercepted.
Route planning with altitudes to maintain your safety. High altitude with jamming assets alongside you. Yes take EW (Electronic Warfare) aircraft) in your package to attack a given target!
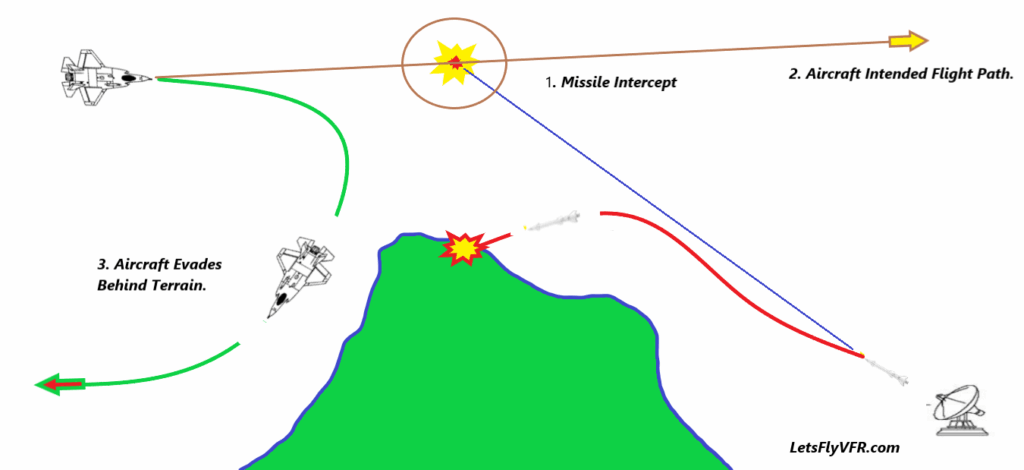
If suitable do the Top Gun Maverick technique and go in low level being masked by terrain. This had been done since aircraft became weapons of war and nothing has changed except for the speed it happens. Very useful tactic if there is terrain to use!
- Use TEWS/RWR actively – interpret radar codes (e.g., ’10’ for SA-10, ’15’ for SA-15).
- Mark known emitters with steerpoints and fly threat-avoidance routes.
- Stay below radar line-of-sight when passing near SAMs—terrain masking is key.
- Pre-emptive chaff/flares are useful in SAM zones, especially when suspecting IR SAMs or optically guided AAA.
- Use ECM pods and employ jamming when feasible, but know many modern SAMs can burn through jamming.
ECM & Countermeasures Programming
ECM Pods (✅ High-Altitude Benefit)
ECM pods are available for many aircraft but it’s worth noting they really only work in the front and rear quarters is my understanding. If threats are on you wings then the jammers may not be as effective.
- Jams enemy radar tracking
- More effective at long range
- Ineffective vs IR or EO missiles
Chaff & Flares (✅ Crucial Last-Ditch)
- Chaff = Radar decoy
- Flares = IR decoy
Program your countermeasure systems based on mission intel:
| Situation | Loadout |
|---|---|
| High SAM threat | 60% Chaff / 40% Flare |
| High IR threat | 30% Chaff / 70% Flare |
| Mixed threat | Balanced or dual program banks |
🔄 Use CMS programs A/B/C/D in BMS to customize based on your loadout and threat zone. Auto delivery removes the pilot load when your already mentally maxed out flying and maneuvering at high Gs!
✅ Quick Survival Checklist
| Tip | Status |
|---|---|
| Use 3/9 line notch to break radar lock | ✅ |
| Turn cold before missile goes active | ✅ |
| Don’t overuse ECM – it’s not a magic shield | ✅ |
| Always scan for EO threats (no RWR alert) | ✅ |
| Program countermeasures based on threat | ✅ |
| Monitor altitude/speed to manage energy | ✅ |
| Avoid flying straight after launch | ✅ |

Author
Brendon McAliece (Aka Gunnie) is a military veteran with 23 years working on Jet Fighters, their weapons systems and ejection seat/module systems as well as munitions and R&D. Involved with flight simulation since the 1980s, he has flown all the major flight simulators over the years.
He is an Australian expat who has lived in Malaysia, UK, Saudi Arabia and more recently Thailand. He is a multi-lingual blogger who loves to share his life experiences here on LetsFlyVFR.com and DreamingGuitar.com, with his lifestyle and Travel experiences Blog plus his Dreaming Coffee website.
Learn More @
DreamingGuitar.com – DreamingCoffee.com – LetsFlyVFR.com
( HOME – BLOG – SHOP – ABOUT )
This page has been viewed 15 times.
As an Amazon affiliate I may benefit from qualifying sales.