X-Plane 12: How to Plan a VFR Flight for Beginners.
X-Plane 12: How to Plan a VFR Flight for Beginners What You Should Know Before Heading to Your Aircraft is an important consideration if you’re wanting to make the flight as realistic as possible.
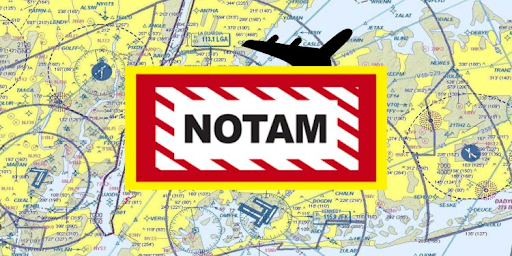
The things you should first consider are what you plan to do in this flight. What aircraft you’re planning to fly? What time of flight i.e. early morning or later in the day? Weather and forecasts, NOTAMS & TFR’s are often forgotten by sim pilots but they are super important.
Lets dive into each facet you should consider when conducting a VFR flight in your favorite X Plane 12 aircraft.
If Realism is your Goal – Follow These Steps!
This tutorial walks you through the real-world basics of planning a VFR (Visual Flight Rules) flight in X-Plane 12 for even for a short hop. It’s designed to help new sim pilots fly more like real-world pilots, with proper preflight thought and structure.
It also explains items you may not be aware about such as VFR Limits – Transition Levels and what they are – Radio and ATIS information and much more!

Step 1: Understand What VFR Means (Visual Flight Rules).
VFR (Visual Flight Rules) means you’re flying with visual reference to the ground, not relying on instruments or ATC vectoring.
You need to stay:
- Clear of clouds.
- Within legal visibility minimums.
- Away from controlled or restricted airspace (unless cleared.)
What is the Transition Level?
The Transition Level (TL) is the lowest flight level (pressure altitude) that can be used above the Transition Altitude (TA). It’s part of the system used to safely separate aircraft vertically by using standard pressure (1013.25 hPa or 29.92 inHg) at higher altitudes.
Essentially, it’s an altitude limit for VFR pilots unless given clearance to cross. It varies around the world but think of it as a limit to how high you can fly normally. Can you fly higher than the transition level? Well yes, but normally the limit is about 18000 ft around the world.
This becomes airliner and pilots with specific training. They are also traveling in air routes or airways which we will talk about in the IFR post to come.
Why does it matter?
Aircraft flying at higher altitudes use Flight Levels (FL) which are based on standard atmospheric pressure, not actual local pressure (QNH). This helps standardize altitudes for all aircraft, avoiding conflicts.
So:
- Below the Transition Altitude (TA) = You use QNH (local pressure) → Altitude (ft) See ATC or ATIS for details. X Plane 12 ATC will give you your QNH.
- Above the Transition Level (TL) = You use Standard Pressure (1013.25 hPa or 29.92 inHg) → Flight Level (FL)
Transition Levels by Country
| Region | Transition Altitude | Transition Level (typical) | Notes |
|---|---|---|---|
| USA | 18,000 ft | FL180 | Class A starts at FL180; standard worldwide pressure above |
| UK | 3,000 ft (varies) | FL40–FL60 (approx.) | Varies with terrain and airport; always check ATIS |
| Europe | 3,000–5,000 ft (varies) | FL60–FL80 (approx.) | Each country has specific rules; TL published in charts or ATIS |
| Australia | 10,000 ft | FL110 | Set by CASA; varies by region and conditions |
Always check local charts, NOTAMs, and ATIS for exact TL at your location.
Altimeter Settings: What to Set and When
| Phase | Altitude Range | Altimeter Setting | Altitude Displayed |
|---|---|---|---|
| Climbing through TA | Up to Transition Altitude | QNH (local pressure) | Altitude (e.g., 8,000 ft) |
| Climbing above TL | Above Transition Level | Standard (1013.25 hPa or 29.92 inHg) | Flight Level (e.g., FL120) |
| Descending below TL → TA | Below Transition Level | Back to QNH | Back to Altitude (e.g., 6,000 ft) |
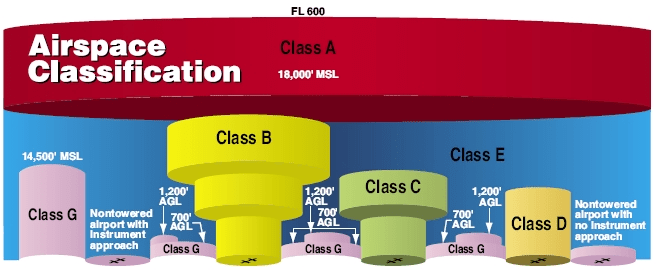
Class A airspace is always flown using Flight Levels and Standard Pressure, and only IFR is allowed.
For VFR Pilots: Key Things to Know
- VFR flight is not permitted in Class A (which always uses Flight Levels).
- If you’re flying below the TA, use QNH.
- If your route requires going above the Transition Altitude, you’ll need to:
- Set 1013.25 hPa / 29.92 inHg
- Use Flight Levels, not feet (e.g., FL065 not 6,500 ft)
- When descending through the TL, switch back to QNH.
Example:
Flying VFR in the UK (TA = 3,000 ft):
- Departing airport with QNH 1010
- Climb to 2,500 ft → Use QNH (local pressure ATC will give you or ATIS.
- Climb through 3,000 ft → Set 1013.25 hPa
- Level at FL050
- Descend later through TL (say FL045) → Reset altimeter to QNH
What is ATIS?
ATIS stands for Automatic Terminal Information Service.
It is a continuous broadcast of recorded information at busier airports, giving pilots the latest essential data before arrival or departure.
What does ATIS include?
- Weather (wind, visibility, clouds, temperature, altimeter setting/QNH)
- Runway(s) in use
- Approach types active (e.g., ILS, VOR)
- NOTAMs (temporary or important advisories)
- Airport or taxiway closures
- Transition Level / Transition Altitude
- Other operational info
Why is ATIS important?
- Pilots tune in before contacting ATC to reduce radio congestion.
- It ensures pilots have current info to prepare for landing or takeoff.
- When you call ATC, you say “Information [Letter]” to confirm you’ve heard it.
Example: “Phuket Tower, Cessna 172, ready to taxi, with Information Bravo.”
How does ATIS work?
- Each update gets a letter (e.g., Bravo, Charlie, Delta…)
- New info = new letter (especially when weather changes or runways switch)
- The ATIS updates regularly and is assigned a Letter so when you speak to ATC, they will ask you do you have Bravo or Yankee information. This is a check to see if you have listened to the ATIS and that you’re up to date.
Where do I hear ATIS?
- Tune to the ATIS frequency listed on airport charts or in your simulator and ATC.
- In real-world flying and sims like X-Plane or MSFS, it plays on loop. You will find it listed on most airport’s frequency list of frequencies. Look in your radio menu for it in X Plane 12.
Standard VFR Radio Brief – Pilot Reference Table.
A generalized flow of Pilot to Airtraffic Control (ATC) from Start to finish.
| Phase | Frequency | Example Call | Purpose / Notes |
|---|---|---|---|
| Pre-Taxi (Listen to ATIS) | ATIS (e.g., 124.85) | (No call – just listen) | Weather, runway, altimeter, NOTAMs, transition level |
| Taxi Clearance | Ground (e.g., 121.9) | "Baron 58 at GA ramp, ready to taxi with Information Bravo" | Request taxi to runway |
| Before Takeoff (Hold Short) | Tower (e.g., 118.3) | "Baron 58 holding short Runway 27, ready for departure" | Inform tower you’re ready to go |
| Takeoff Clearance | Tower | "Cleared for takeoff Runway 27, Baron 58" | Tower clears you for takeoff |
| Departure (If required) | Departure (e.g., 124.7) | "Baron 58, passing 1,500 climbing to 4,500 VFR, request flight following" | Optional: request VFR flight following (radar service) |
| Inbound to Non-Towered | CTAF / UNICOM (122.8) | "Cessna 172, 10 miles east, inbound for landing Runway 27, [Airport] traffic" | Report position and intentions |
| Entering Circuit | CTAF / UNICOM | "Cessna 172, turning downwind Runway 27, [Airport] traffic" | Report circuit entry |
| Final Approach | CTAF / UNICOM | "Cessna 172, turning final Runway 27, [Airport] traffic" | Final call before landing |
| After Landing | Ground / CTAF | "Baron 58 clear of Runway 27, taxiing to parking" | Let others know you are clear and exiting the runway |
VFR Comms Tips
- Always identify yourself, your position, and your intentions.
- Use the correct runway number, info letter (from ATIS), and airport name in CTAF calls.
- Stay brief but clear — avoid unnecessary chatter.
Here’s how that exchange would typically sound assuming you’re at a controlled airport with ATIS code Information Tango and requesting engine start for an IFR flight:
EG. Pilot:
FORMAT:
“[Tower/Ground], (callsign], stand [Gate /Stand Number], request engine start, Information “Tango” (Latest Info from ATIS).“
Example:
“Bangkok Ground, Thai 123, stand B7, request engine start, Information Tango.”
ATC Response:
“Thai 123, start-up approved.“
Or, if there’s a delay:
“Thai 123, expect start-up in 5 minutes due traffic congestion.“
DOWNLOAD – PILOT RADIO NOTEPAD – HERE.
Notes:
- If ATIS isn’t available, you’d request departure information instead.
- Some airports combine start-up and pushback into one clearance.
- If you’re flying VFR, you’d say “request start-up VFR, Information Tango.”
What is VFR?
VFR (Visual Flight Rules) refers to a set of aviation regulations that allow a pilot to operate an aircraft in visual meteorological conditions (VMC) — basically, when the weather is good enough to fly by sight, not just by instruments.
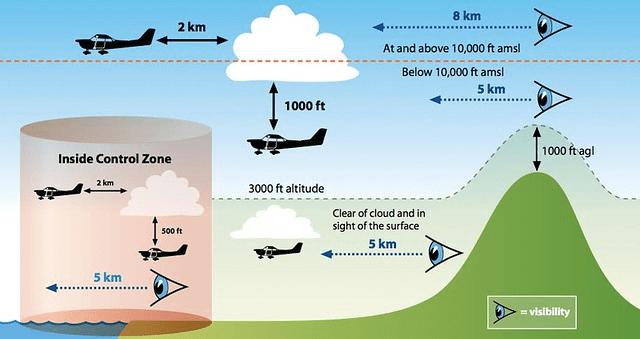
Core VFR Parameters (Simplified)
Here are the essential conditions and limits you need to understand as a beginner flying VFR:
| Parameter | Day VFR Minimum | Night VFR Minimum | Description |
|---|---|---|---|
| Cloud Clearance | 500 ft below, 1000 ft above, 2000 ft horizontal (in controlled airspace) | Same as day | Distance from clouds you must maintain |
| Visibility | 5 km (3 statute miles) | 5 km (3 statute miles) | How far you must be able to see |
| Ceiling (cloud base) | Usually at least 1000 ft AGL (Above Ground Level) | Higher ceilings recommended at night | Lowest layer of clouds you can fly under |
| Flight Visibility | Same as above | Same | Based on reported or in-flight visibility |
| Altitude | 500 ft AGL min over non-populated areas, 1000 ft AGL over populated | Same | You must not fly too low over terrain or people |
| Airspace Restrictions | Varies by class (see below) | Same | Some airspace requires clearances or higher VFR minimums |
Basic Weather Minimums (VMC)
VMC = Visual Meteorological Conditions.
These are the minimum weather conditions for VFR flight.
Uncontrolled Airspace (Class G) – At or Below 1,200 ft AGL:
- Day: 1 SM visibility, clear of clouds
- Night: 3 SM visibility, 500 below, 1000 above, 2000 horizontal
Controlled Airspace (Class C, D, E):
- Day/Night: 3 SM visibility
- Cloud clearance: 500 ft below, 1000 ft above, 2000 ft horizontal

Key Tips for Beginners
You can fly VFR only if:
- You can see the ground or horizon clearly
- You’re outside of clouds
- Visibility meets or exceeds minimums
- Weather reports and forecasts (METAR/TAF) support VFR
- You are legally and physically qualified to fly (pilot license, medical, etc.)
Do NOT fly VFR if:
- Weather is marginal VFR (MVFR) or IFR conditions (low ceilings, fog, or rain)
- At night without proper VFR night training. (Separate qualification).
- In Class A airspace (VFR not allowed — this is for high-altitude instrument flying)
Quick Reference: VFR Minimums by Airspace (Simplified)
| Airspace | Visibility | Cloud Clearance |
|---|---|---|
| Class A | N/A (IFR Only) | N/A |
| Class B | 3 SM | Clear of clouds |
| Class C | 3 SM | 500 below, 1000 above, 2000 horizontal |
| Class D | 3 SM | Same as Class C |
| Class E | 3–5 SM (altitude dependent) | Same as Class C |
| Class G (low alt) Non Controlled Airspace | 1 SM (day), 3 SM (night) | Clear of clouds (day), standard at night |
Example: VFR Conditions Checklist
Before takeoff, ask:
- ✅ Is visibility ≥ 5 km?
- ✅ Are clouds ≥ 1000 ft AGL?
- ✅ Am I clear of controlled airspace or have I contacted ATC?
- ✅ Am I trained and current for VFR flight at night if needed?
- ✅ Is my aircraft VFR legal and equipped?
Extra Learning Resources (Optional)
- VFR Sectional Charts: Learn to read airspace, terrain, frequencies
- METAR/TAF Decoding: To check weather at airports
- Class Airspace Rules: Learn what airspace you’re in and what’s required
- “See and Avoid” Procedures: Looking out for other traffic
- VFR Navigation Techniques: Pilotage and dead reckoning
Know the Weather – Know Your VFR Limits
Before every flight, it’s crucial to confirm that conditions meet VFR weather minimums. Even in a sim like X-Plane 12, flying with these standards improves realism, decision-making, and confidence.
Note: In X-Plane 12, you can simulate different weather layers in the weather menu or inject real-world METAR data for full realism.
Stay outside Class B/C/D unless you’re going to request ATC clearance.
When Can You Fly VFR?
VFR flights are generally limited to daylight hours, unless you’re flying Night VFR and meet special requirements. Here’s how to handle that in the sim:
Day VFR
- Legal VFR “Day” is defined as: 30 minutes before local sunrise to 30 minutes after local sunset
- Outside this window, you must be qualified and equipped for Night VFR (including lighting, additional instruments, and more careful weather evaluation).
Night VFR (Optional for X-Plane Sim Use)
If you’re simulating realism:
- You need:
- Position and anti-collision lights
- A landing light (if flying for hire or practicing realism)
- An aircraft with proper instrument lighting
- Minimum visibility at night is 3 SM, even in Class G
- Simulate extra caution with terrain and cloud clearance
In X-Plane 12, you can adjust Time of Day in the Weather/Environment settings to practice both dawn and night operations. You can also use plugins like X-Realistic or Enhanced Skyscapes to boost immersion during low-light flights.
Step 2: Define Your Flight Details
Its great practice to define what your flight is intended to entail. Using the five W’s you can confirm to yourself what your plan for your flight is.
Start with the “5 Ws”:
- Where are you departing from? (ICAO code or airport name)
- Where are you landing? (Is it a towered or untowered airport?)
- What is your route? (Scenic route? Straight-line? Avoiding terrain or airspace?)
- What altitude will you fly at?
- Below 3000 ft AGL: Any altitude.
- Above 3000 ft AGL: Use VFR cruising altitudes:
- Odd thousands + 500 ft heading 000–179°
- Even thousands + 500 ft heading 180–359°
- What time are you departing? (Consider lighting and weather conditions)
Flight Planning Form – LetsFLyVFR.com
VFR FLIGHT PLANNING FORM – “The 5 W’s”
Use this before every flight to clarify your plan and build real-world pilot habits.
1. DEPARTURE AIRPORT
- ICAO Code / Name: ___________________________________________
- Towered or Untowered? ☐ Towered ☐ Untowered
🛬 2. DESTINATION AIRPORT
- ICAO Code / Name: ___________________________________________
- Towered or Untowered? ☐ Towered ☐ Untowered
🗺️ 3. ROUTE PLAN
- Type of Route:
☐ Direct (Straight-line)
☐ Scenic (Landmarks, practice area, VFR waypoints)
☐ Airspace Avoidance (e.g., Class C/B, restricted areas) - Planned Visual Checkpoints:
⬆️ 4. PLANNED CRUISING ALTITUDE
- Altitude (ft): ___________ ft
- Altitude Justification:
☐ Below 3,000 ft AGL – Any safe VFR altitude
☐ Above 3,000 ft AGL – Choose appropriate VFR cruising altitude:
| Heading Direction | VFR Altitude Rule |
|---|---|
| 000° to 179° | Odd + 500 ft (e.g. 3,500 ft, 5,500 ft) |
| 180° to 359° | Even + 500 ft (e.g. 4,500 ft, 6,500 ft) |
- Terrain Avoidance Required? ☐ Yes ☐ No
🕓 5. TIME OF FLIGHT
- Planned Departure Time (Local): ____________
- Planned Arrival Time (Local): ____________
- Time of Day:
☐ Morning ☐ Midday ☐ Late Afternoon ☐ Sunset ☐ Night - Lighting & VFR Conditions Considered?
☐ Yes ☐ No – Review sunrise/sunset & cloud layers
🧠 NOTES / REMARKS
Notes:
DOWNLOAD FLIGHT PLANNER FREE HERE.
Step 3: Basic Navigation Prep
Even in VFR, you should have:
- A chart/map (VFR sectional or moving map like SkyVector, Little Navmap)
- A plan to identify visual checkpoints (towns, rivers, roads, etc.)
- A rough heading and distance for each leg of the flight
- A printed or digital navigation log (even basic is better than none)
VFR flying and technology have moved so so fast with most pilots today having everything they need on APPS on a tablet. Amazing as it is technology can let you down unforeseeably so its always great practice to have paper backups.

Reviewing visual checkpoints using tools like google maps or another map service may be a great X Plane 12 option. In addition to visual references like lakes, river bends, bridges and more knowing where alternate airports are on your route is a great idea if you need to divert.
It’s your reasonability as PIC (Pilot in Command) to be ready for all possibilities from the first moment you start planning for a flight & not really the moment you close the door. Your already way behind the safety ball if that is the case in your planned X Plane 12 VFT flight.

Step 4: Check the Weather
Even in the sim, weather matters!
- Wind direction and strength (affects takeoff runway, cruise speed)
- Cloud layers (make sure you’ll stay VFR)
- Visibility (more than 3 SM is a must under standard VFR)
- Temperature/Density Altitude (impacts performance)
Weather in X Plane 12 is pretty incredible as we are receiving the X Plane 12.2 updates. Clouds are incredible as well as the ability to simulator changing weather causing you some possible headaches as an X Plane 12 VFR pilot.
Winds can have quite an effect on your flight offering blistering headwinds making your fuel management and time management more critical. Ensuring you are prepared with alternate airport options if the weather changes and goes beyond your comfort level.
Now lets talk about whats acceptable! We all know the VFR minimums but if you step into X Plane 12 with minimal VFR conditions you may ask yourself “Really? Isnt this IFR?” You need to decide even in your favorite flight simulator what your prepared to fly into as far as weather conditions.
I see people like “Short Field” YouTube Channel flying in weather I would be very nervous about flying in but its about experience. My own VFR flying experience is under 100 hours so I would say im still very wet behind the ears.
Flying above clouds and finding a gap to get back below in a VFR flight is pretty challenging. There are quite a few that have fallen foul of this decision! On my first solo navigation flight I took off on a day when the clouds came in thick and fast at about 4000ft AGl and i was so nervous already. Worrying about the clouds made the flight quite a lot more stressful.
There is a great YT video where a pilot is stuck VFR above clouds and icing becomes an issue. Finger biting situation you don’t want to find yourself in in a simulator and especially not real world. Check this Ice & CLoud Video out for reference. Click here PilotWorkshop YT VIDEO
Use X-Plane’s weather settings or real-world METAR injection if you want realism.
Step 5: Perform Aircraft Checks
Before you even step into the cockpit:
- Know your fuel requirement (+30 mins minimum)
- Set your aircraft weight/balance
- Review takeoff and landing performance
- Confirm aircraft is airworthy (especially if using a wear & tear model like REP or SimCoders)
Knowing your weight and balance is easy in X Plane 12 so use the aircraft setup window to customise your aircraft, add passengers (weight only) as well as cargo and fuel. Ensure your weight and balance is all correct. If your interested in how to do it manually you need a POH for your favorite aircraft which I have available here on LetsFlyVFR in the posts below as well as a tutorial on how to actually do a weight and balance.
More available Ple search the BLOG section.
Step 6: Airspace Awareness
You should be aware of:
- Controlled airspace (Class B/C/D) around your departure and destination
- Restricted or Prohibited areas
- TFRs (in real life, and optionally in the sim if realism is your goal)
X Plane 12 maps show different airspace boundries around airpoers primarily as well as published air routes for you to follow.
If your not aware then Air routes are the roads in the sky used more by IFR flights but they exist with their own numbers for identification. Other than IFR routes there are also VFR routes used in areas that are already busy.
You can use a free tool like SKYVECTOR.com or other similar website to plan your route and create a full flight plan for yourself. Skyvector allows you to export the file which you can reformat with a free X Plane tool to make a flight plan file.
This FLP file can load quickly and easily be placed in the flight plan folder in the back end of X Plane 12 ready to call up in your GPS.
X-Plane doesn’t enforce these automatically, but you can simulate realism by avoiding Class C/B airspace unless you pretend to call for clearance.
Step 7: Make a Basic Flight Plan
(Optional for Sim, Required IRL)
Even if you’re not using ATC, log:
- Departure & Arrival airports
- Estimated time en route
- Altitude plan
- Visual checkpoints (e.g., river bend, mountain peak)
- Frequencies (ATIS, CTAF, nearby tower)
Planning any flight is super important so download and fill in your flight plan in the Flight Planning PDF available above for download.
Step 8: Preflight in the Sim
Once in X-Plane 12:

- Load your aircraft at the ramp (not on the runway!)
- Perform a preflight if using REP or similar realism tools
- Tune in weather/ATIS
- Set altimeter, radios, heading bug
- Taxi with awareness of real-world airport layout
Its still important to check the sim is ready for you to go flying. Ensure windows updates etc are not going to interrupt your flight. Any messaging or other apps are not functioning to send unwanted notifications. Check your Laptop is plugged in correctly if your flying on one.
If your flying in VR you will likely have an app to upload your flight plan, maps and any relevant info. Check you have already uploaded the info you need. Ensure family are aware and not going to interrupt you little bit of me time! We all deserve a little me time!
Final Tip: Think Like a Pilot!
Even if it’s just a sim, approaching each flight with a real-world mindset makes it more immersive and educational. You don’t need to be perfect just be deliberate and curious. Every good sim pilot becomes a better virtual (and possibly real) aviator this way.
Immerse yourself and enjoy the escape and challenges flight simulation brings to a budding pilot. Invite your Son or Daughter to join you if you have a cockpit setup and have some family time sharing your passion with them. Just enjoy your time surfing in the virtual skies!
Lets Fly VFR has a whole range of blog posts on your favorite X Plane 12 aircraft with POH available: Search for – Cessna 172 – Baron 58 – Stensen – Piper Arrow and more!

Author
Brendon McAliece (Aka Gunnie) is a military veteran with 23 years working on Jet Fighters, their weapons systems and ejection seat/module systems as well as munitions and R&D. Involved with flight simulation since the 1980s, he has flown all the major flight simulators over the years.
He is an Australian expat who has lived in Malaysia, UK, Saudi Arabia and more recently Thailand. He is a multi-lingual blogger who loves to share his life experiences here on LetsFlyVFR.com and DreamingGuitar.com, with his lifestyle and Travel experiences Blog plus his Dreaming Coffee website.
Learn More @
DreamingGuitar.com – DreamingCoffee.com – LetsFlyVFR.com
( HOME – BLOG – SHOP – ABOUT )
This page has been viewed 56 times.
As an Amazon affiliate I may benefit from qualifying sales.