
Falcon BMS 4.38 Navigation Guide for Beginners: Mission Planning, VOR, and Radio Navigation.
By Brendon McAliece – Aka Gunnie
Published on LetsFlyVFR.com
Introduction
Falcon BMS (Benchmark Sims) 4.38 is a highly realistic combat flight simulator built on the legacy of Falcon 4.0. With deep avionics, tactical realism, and dynamic campaigns, Falcon BMS offers one of the most accurate F-16 simulations available.

For new pilots, mastering the complex navigation systems is critical not only for mission success but also for safe and confident flying. This guide will walk you through the basics of navigating in Falcon BMS 4.38, from mission planning to using steer points, radio navigation (like TACAN and VOR), and working with your aircraft’s onboard systems.
1. Understanding Navigation in Falcon BMS
Navigation in BMS isn’t as simple as “fly toward the marker.” You’ll work with real-world systems like:
- Steer points – Your mission flight path.
- TACAN (Tactical Air Navigation) – Military radio navigation.
- ILS (Instrument Landing System) – Used for precision approaches.
- VOR (VHF Omnidirectional Range) – Civilian radio navigation (available in limited use).
- INS/GPS – Inertial and satellite navigation, integrated in the F-16.
2. Mission Planning in the Briefing Room.
Before stepping into the cockpit, you’ll plan your mission. This is done in the Tactical Engagement (TE) or Campaign screen.
1. Choose or Create Your Mission.
Falcon BMS allows you the option of going full on into a dynamic campaign where every step you make will make a difference to the end result. The other option is to create single missions so you can practice specific aspects you want to improve on in combat.
You can start from either:
- Campaign (dynamic war environment)
- Tactical Engagement (TE) (controlled/custom mission)
✅ TE is ideal for practicing navigation and understanding mission planning mechanics without pressure from a dynamic battlefield.
2. Select Your Aircraft.
There are different models of the F-16 available as well as different mission focus when checking which Viper will be your stead for the upcoming mission.

From the ATO (Air Tasking Order) or TE selection:
- Choose your package (group of flights with a shared objective).
- Select the specific flight you want to fly (e.g., SEAD, Strike, Escort).
- Click “Take off” to open the mission planner.
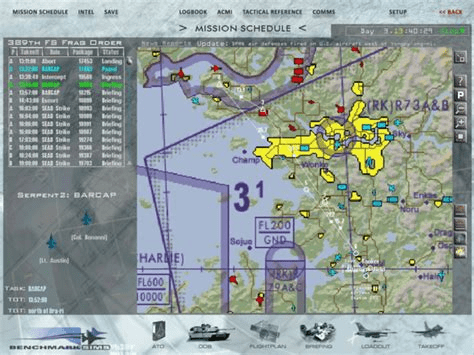

3. Open the Mission Planner Interface.
You’ll now see:
- Map of the theatre (KTO, Balkans, etc.).
- Your route: series of steer points (waypoints).
- Air defence threats, enemy zones, friendly airbases.
- Weather layers (optional but realistic if enabled).
4. Tactical Route Planning
Here’s where the real pilot work begins.
Avoid Threat Zones (SAMs, AAA, Fighters)
The colored circles are the ranges of KNOWN weapon systems such as AAA or Surface to air missiles. You want to avoid these or at least fly as far towards the Centre as possible. If its a big circle the further toward the edge the safer it is as this is the range of the missile.
Look for:
- Red circles on the map: enemy SAM coverage (SA-2, SA-10, etc.).
- Red triangles: known enemy units or AAA concentrations.
- Red icons for airborne enemy fighters (e.g., MiG-29).
- EWR (Early Warning Radar) zones—can cue fighters to intercept you.

🧠 Tactics Tip: Avoid flying through SAM rings unless you’re tasked with SEAD. Fly around them or low to stay under radar if forced to enter.
Plan a Logical Route Using Steer points
Steer points are automatically created by Falcon BMS 4.38 and should give you the safest guidance possible. Its not always possible to fly around all the SAMS and AAA so looking at the terrain you may fly low and fast to hide from potential dangers. Consider all options.

Often a High altitude transition to a Low Altitude attack then High altitude RTB is planned. It will depend on the weapons your planning to use as well as the threat and difficulty hitting the required target.
Each steer point represents a phase of the mission:
- STPT 1: Ramp (start)
- STPT 2–3: Departure, assembly
- STPT 4–5: Ingress toward the target
- STPT 6: Target
- STPT 7–9: Egress (safe exit route)
- STPT 10+: Recovery and landing
You should:
- Reposition steer points to avoid threats.
- Use terrain (mountains, valleys) to mask radar detection.
- Ensure spacing is practical—don’t turn every 5 nm.
📐 Adjust Key Parameters for Each Steer Point
| Parameter | Why It Matters |
|---|---|
| Altitude | Set for threat avoidance (high vs. low level). |
| Speed | Impacts Time on Target (TOT) and fuel. |
| TOT | Must be coordinated in package missions. |
| Heading | Controls how you approach the target or IP (Initial Point). |
🎯 Target Approach: Use the IP → Target route to set up an ideal attack angle. Plan a smooth, controlled run-in that supports your weapon type (e.g., LGBs vs. JDAM vs. cluster bombs).

5. Analyse Your Mission Profile
Check the following:
- Fuel flow and bingo fuel (see CRUS page in DED later).
- Threat proximity at ingress and egress points.
- Package timing (if part of a coordinated attack).
- Weather layers (e.g., avoid high clouds for laser weapons).
6. Save the Mission and Prepare the Data Cartridge
Once satisfied:
- Save the TE or let the Campaign autosave.
- Click “Save DTC” to export all flight and avionics data.
- This DTC includes:
- Steer points
- Comm presets
- Weapon settings
- Countermeasures
- Nav points (TACAN, ILS, etc.)
Later in the cockpit, you’ll load the DTC via ICP LIST → 0.
🧠 Tactical Planning Summary (Checklist Format)
| ✅ Planning Item | ✔ Checked |
|---|---|
| Avoided all major SAM rings | ☐ |
| Accounted for airborne threats | ☐ |
| Adjusted altitude based on threat level | ☐ |
| Planned safe ingress and egress | ☐ |
| Created a clean attack run-in to target | ☐ |
| Checked fuel range and recovery options | ☐ |
| Saved DTC after changes | ☐ |
| Matched TOT with package lead | ☐ |
Altitude vs. Threat Trade Offs
| Altitude | Pros | Cons |
|---|---|---|
| High (30,000+ ft) | Fuel efficiency, good radar coverage | Visible to long-range SAMs |
| Medium (15–25,000 ft) | Balance of visibility and safety | Vulnerable to medium SAMs |
| Low (under 5,000 ft) | Avoid radar, safer against SAMs | High fuel burn, more terrain risk |
🧠 Consider flying low during ingress, high on egress to save fuel after the threat area is behind you.
This expanded planning process reflects the realism and depth Falcon BMS 4.38.
Mission Planning Checklist for download?
3. Uploading the Mission to the Aircraft
Once your mission is planned, the data needs to be loaded into your aircraft:
The date cartridge is a real world tool used modern aircraft although from early days being loaded on a cassette tape (if you are old enough to remember them) to more modern storage devices.
Using the Data Cartridge (DTC) in Falcon BMS 4.38
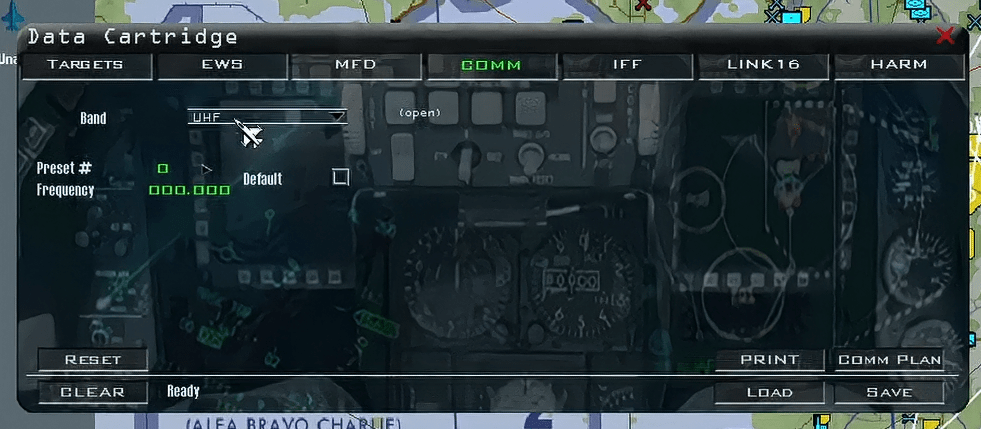
The Data Transfer Cartridge (DTC) is a virtual system that stores your mission-specific data and loads it into your aircraft’s avionics, much like in the real F-16.
Without properly loading the DTC, your jet will lack essential steer points, communications presets, and stores configuration, making the mission harder or even impossible to complete.
Here’s a step-by-step breakdown of how to use the DTC correctly:
1. What Does the DTC Store?
The DTC holds the following mission-critical data:
- Steerpoints (flight plan waypoints)
- Radio presets (UHF/VHF COM channels)
- TACAN/ILS frequencies
- Weapon configurations (SMS loadouts, profiles)
- Countermeasure programs (chaff/flare settings)
- RWR threat tables
- Pilot preferences (HSD range, cursor speed, etc.)
📌 TIP: Every time you make a change to your mission plan or aircraft setup in the planner, you should re-save your DTC to preserve those settings.
2. Pre-Flight: Loading the DTC in the Briefing Room
Before launching into the cockpit:
- In the Mission Briefing screen, look for the “DTC” button (usually bottom-left).
- Click “Load DTC” to open the DTC interface.
- Review your flight settings:
- Steerpoint sequence
- Comm channels
- Weapon programs
- Countermeasure presets
- Click “Save” to store this configuration.

💡 You can optionally export your DTC to an external file and share or reuse it between missions.
3. In-Cockpit: Verifying and Loading the DTC
Once you’re inside the aircraft, the DTC won’t be fully active unless you load it via the ICP (Integrated Control Panel).
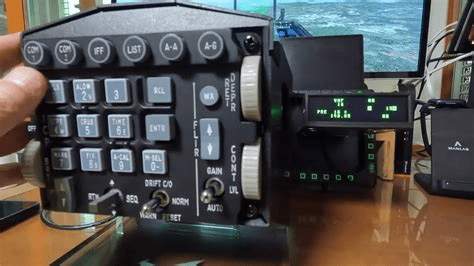
Steps to Load and Verify the DTC:
- Press
LISTon the ICP (bottom-left key). - Select
0(DTC) using either the ICP keypad or DCS switch. - The MFD should show a short loading indication or jump to the DTC-configured state.
- Now verify:
- Steerpoints show correctly on HUD and DED (STPT page).
- Comm channels are preset (press
COM1orCOM2on ICP to view). - TACAN/ILS frequencies match your landing airfield.
- SMS (Stores Management System) has correct weapon profiles.
📌 NOTE: If steer points appear missing, or your SMS is in default state, the DTC likely wasn’t loaded successfully.
4. Troubleshooting Common DTC Issues
| Symptom | Possible Cause | Fix |
|---|---|---|
| Steerpoints missing | DTC not loaded in cockpit | Load via LIST → 0 |
| Comm channels are blank | Incorrect DTC saved | Re-save DTC from Briefing screen |
| SMS has default settings | Loadout not saved | Reconfigure SMS, then Save DTC |
| Wrong TACAN/ILS | Didn’t set or save freq | Enter manually or re-save DTC |
Realism Note
The DTC system in Falcon BMS is based on the real-life F-16 MMC (Modular Mission Computer) setup. In actual squadrons, pilots configure their DTC using mission planning software, then load it physically into the aircraft before flight.
BMS simulates this entire workflow virtually.
✅ Summary Checklist
| Task | Done |
|---|---|
| Set up flight plan and steerpoints | ☐ |
| Reviewed comm channels and presets | ☐ |
| Configured weapons and countermeasure programs | ☐ |
| Clicked “Load DTC” in briefing screen | ☐ |
| Saved DTC after all changes | ☐ |
Loaded DTC in cockpit via LIST → 0 | ☐ |
| Verified steerpoints and systems loaded correctly | ☐ |
Download your own “DTC Setup & Load Reference Sheet” if you’d like to keep it handy in the cockpit of your F-16 Viper/Falcon.
DTC Setup & Load Reference Sheet Download HERE!
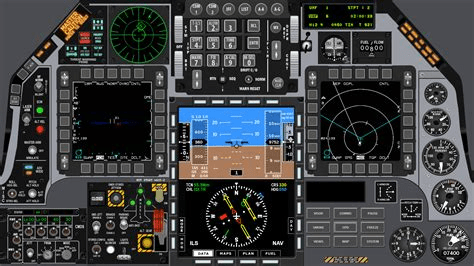
4. Navigating with Steer points and DED
Steer points are the main navigation method in Falcon BMS. These are displayed on your MFD (Multi Function Display) and on your HUD (Heads Up Display) to make your life as easy as possible. The DED (Data Entry Display) is where you can manage these steer points.
Unless its a target of opportunity and you want to save a target point you should not normally be programming waypoints in the aircraft. This is all done in the flight planning room on the flight planning station.
Key Tools:
- HUD (Head-Up Display) – Shows the current steerpoint heading and distance.
- HSD (Horizontal Situation Display) – Radar map with route and steerpoints.
- DED (Data Entry Display) – Access steer point data directly.
In-Flight Navigation:
- Use the ICP → 4 (STPT) page to scroll through your route.
- Steerpoint info (heading, range, altitude) will be shown on the HUD and DED.
- The F-16 autopilot can fly toward steer points (STRG mode).
5. Using Radio Navigation: TACAN, VOR, ILS
Falcon BMS supports realistic radio navigation, vital for diversions or landings. The TACAN is a useful tool for both navigation and even landing. It relies in transmitting antennas that have directional information so you can tell your relative bearing to and from them.
TACAN (Primary in Military Jets):
- Provides bearing and distance to a station.
- Found on most airbases and tankers.
How to tune:
- Press
ICP → 1 (T-ILS)page. - Set TACAN channel (e.g., 015X for Kunsan).
- Enable TCN (right MFD → NAV page).
Use: Your HSI or HUD will show distance and bearing.
VOR (Optional/Civil Use):
- Less commonly used in the F-16 but still functional.
- Requires using VHF NAV radio—not all theatres support VOR stations.
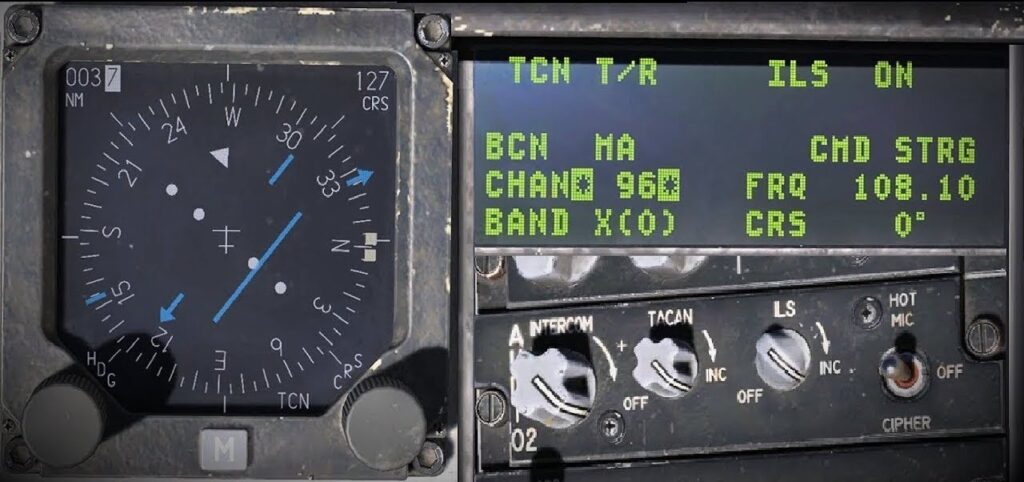
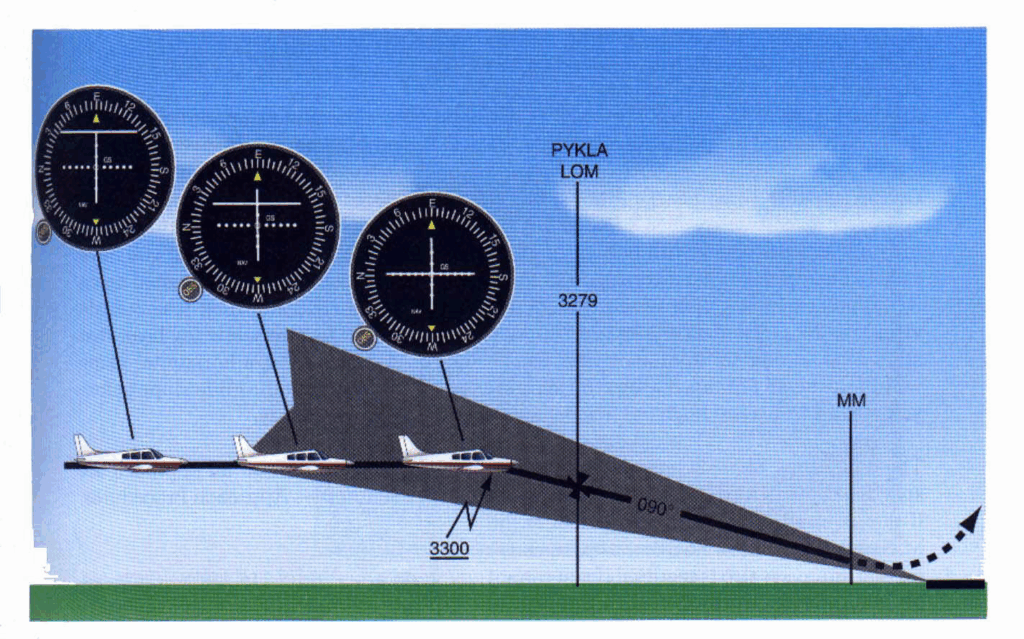
ILS (Instrument Landing System):
Used for precise landings in bad weather or at night.
The Instrument landing system relies on two direction radio beams that for a virtual cross in the sky. This is reflected in your ILS needles and how they react as you approach in both vertical and lateral directions. Simply tune your ILS radio frequency into the jet and set the HEADING on the HSD so it aligns with runway heading.
How to use:
ICP → 1 (T-ILS)to enter ILS frequency.- Set course (CRS) and intercept the localizer and glideslope.
- Use HUD or HSI for guidance.
6. Navigation Tips and Best Practices
- Always verify your DTC loaded after start up.
- If steer points are off, use TACAN as a backup.
- Reference charts for TACAN frequencies (available in BMS docs or online).
- Familiarize yourself with:
- ICP Shortcuts
- DED Pages: DEST, NAV, CRUS
- HSD & HSI interpretation
7. Additional Navigation Tools and Mods
Enhance your experience with these tools:
- Mission Commander – Edit campaigns/TEs easily.
- Online Kneeboards or Checklists – Great for referencing TACAN, ILS, comms.
- Falcon BMS Charts Database – Community-driven TACAN and airfield listings.
- VoiceAttack (optional) – Control ICP with voice for immersion.
8. Conclusion
Navigation in Falcon BMS 4.38 is a critical skill that bridges realism with immersion. By learning how to plan your missions, load them properly, and fly using steer points and radio aids like TACAN or ILS, you’ll feel more confident and mission-capable in every sortie.
Take your time practice navigating to alternate airfields, try flying a route by TACAN only, or conduct an ILS landing at night. Falcon BMS rewards knowledge, and navigation is at the heart of that.

Bonus: Download the Free Falcon BMS Navigation Kneeboard
Available here: – Includes ICP shortcuts, DED reference pages, TACAN list, and ILS setup cheat sheet. DOWNLOAD Kneeboard Here!
Author

Brendon McAliece (Aka Gunnie) is a military veteran with 23 years working on Jet Fighters, their weapons systems and ejection seat/module systems as well as munitions and R&D. Involved with flight simulation since the 1980s, he has flown all the major flight simulators over the years.
He is an Australian expat who has lived in Malaysia, UK, Saudi Arabia and more recently Thailand. He is a multi-lingual blogger who loves to share his life experiences here on LetsFlyVFR.com and DreamingGuitar.com, with his lifestyle and Travel experiences Blog plus his Dreaming Coffee website.
Learn More @
DreamingGuitar.com – DreamingCoffee.com – LetsFlyVFR.com
(HOME – BLOG – SHOP – ABOUT)
This page has been viewed 17 times.
As an Amazon affiliate I may benefit from qualifying sales.