
Mastering Air-to-Air Combat in Falcon BMS 4.38: F-16 Viper Weapons & Tactics Guide.
Welcome to LETSFLYVFR’s comprehensive guide to dominating the skies in Falcon BMS 4.38 using the all powerful F-16 Viper. Whether you’re a rookie or brushing up for multiplayer combat, mastering air-to-air (A/A) weapon employment and fighter tactics is essential. This guide covers:
- Gunsight functionality
- Missile types: AIM-9, AIM-7, AIM-120
- Optimal launch ranges: Max Range (Rmax), No Escape Zone (Rne), and Min Range (Rmin)
- Viper performance: Speed, Gs, Dogfight speed
- Dogfight tactics: Two-circle vs. One-circle fights
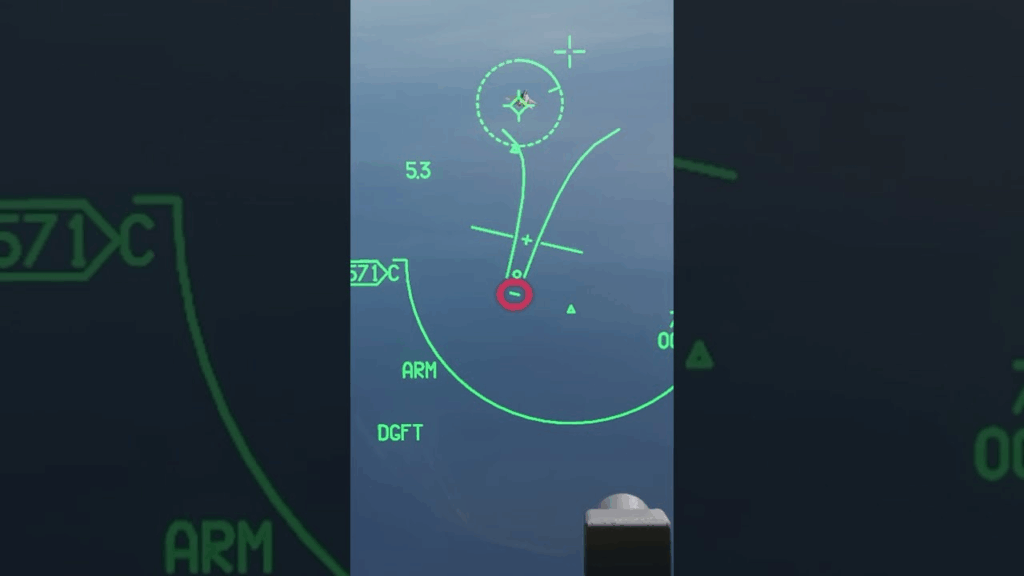
Understanding the F-16 Gunsight
The Viper’s A/A gunsight is designed for close combat. It projects a funnel-style reticle to assist with gun solutions:
- LCOS (Lead Computing Optical Sight) automatically calculates target lead based on range and G-load.
- Funnel Gunsight appears when guns are selected in Dogfight Mode. Align the enemy aircraft inside the funnel wingspan cue.
- Range-to-Target impacts funnel size. Use radar lock or the radar gun mode to auto-range.
Effective Guns Range: ~1000-1500 ft. Fire short bursts while maneuvering for high closure shots.
Missile Employment Guide
AIM-9 Sidewinder Series
The Aim-9 Sidewinder comes in several models with the L,M and X all aspect missiles so they can see the heat on a leading edge of a closing fighter. This makes them super deadly from any angle in a fight.
The AIM-9X is another beast altogether with a high off boresight capability pretty much allowing you to use the Helmet Mounted Cueing System (HMCS) to target aircraft even beside you.
If you have an ISRAELI jet, you may get the PYTHON missile which has been proven to fly back behind the launch aircraft to kill and enemy on their six o’clock. The latest versions can self-acquire but that may be an issue if friendlies are nearby. That’s amazing and a real-world capability. Top 10 Tips to Improve Your Dogfighting Skills in Falcon BMS.
🔥 AIM-9L & Python Missiles – Heatseekers with Bite
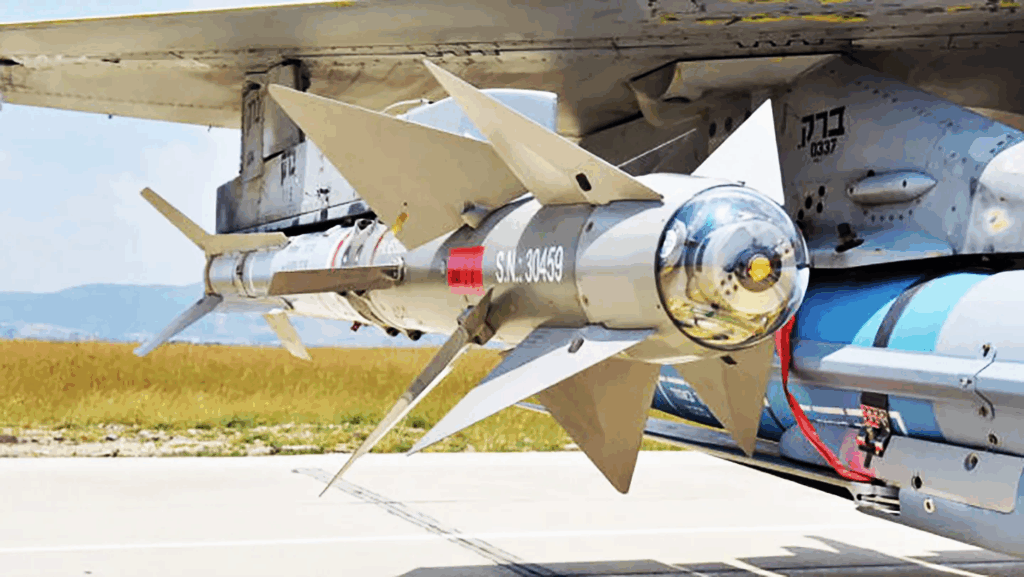
Sidewinder
The AIM-9L Sidewinder was a game-changer in air combat. Introduced in the late 1970s, it was the first all-aspect infrared-guided missile, meaning it could lock onto targets from any angle, not just from behind.
This gave NATO pilots a huge edge in the Falklands War and later Middle East conflicts. In Falcon BMS, the AIM-9L is a reliable short-range missile with decent tracking but limited agility by today’s standards. It’s best used within 3–5 NM and against non-maneuvering or unaware targets.

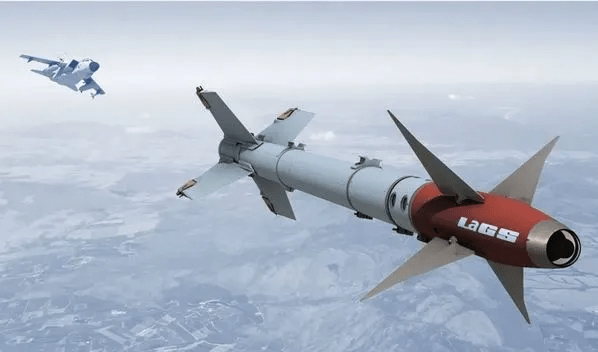
Python
By contrast, the Python 3 and Python 4 (used by Israeli Air Force and export users) push IR missile performance to the next level. The Python 3 already offered high off-boresight targeting and tighter turn rates in the 1980s. While the Python 4 was introduced with imaging infrared seekers and LOAL (lock-on after launch) capability it closer to modern high-end missiles like the AIM-9X.
In BMS, Python missiles are more agile, harder to spoof, and often favored in close-range dogfights, especially when paired with helmet cueing systems.
🎯 Bottom line for BMS pilots: The AIM-9L is a solid Cold War heatseeker—reliable but dated. The Python series? That’s what happens when IR missiles grow fangs.
Models in BMS: AIM-9M (all-aspect), AIM-9X (high off-boresight + HMD compatible)
- Min Range: ~0.3 – 0.5 NM
- Max Range (Rmax): 5-8 NM (closer for 9M, longer for 9X)
- Rne (No Escape Zone): 2-4 NM
Tips:
- Use high closure and rear-aspect shots for AIM-9M.
- For AIM-9X, off-boresight shots are possible using HMCS in great in dogfights.
Joint Helmet Mounted Cueing System (JHMCS)
The Joint Helmet Mounted Cueing System (JHMCS) is a game-changing feature available in later-block F-16s within Falcon BMS. It allows the pilot to cue sensors and weapons simply by looking at the target. Mounted within the pilots helmet it has a sight and electronics so as the pilot turns their head the weapons and or sensors can be slaved to the pilots line of sight.
This includes slaving the radar or AIM-9X seeker head to your line of sight, drastically reducing lock-on time in high-G or close-range fights. In Falcon BMS, if your selected F-16 has JHMCS capability (such as Block 50/52 or later), you’ll see a monocle-style symbology when it’s active.
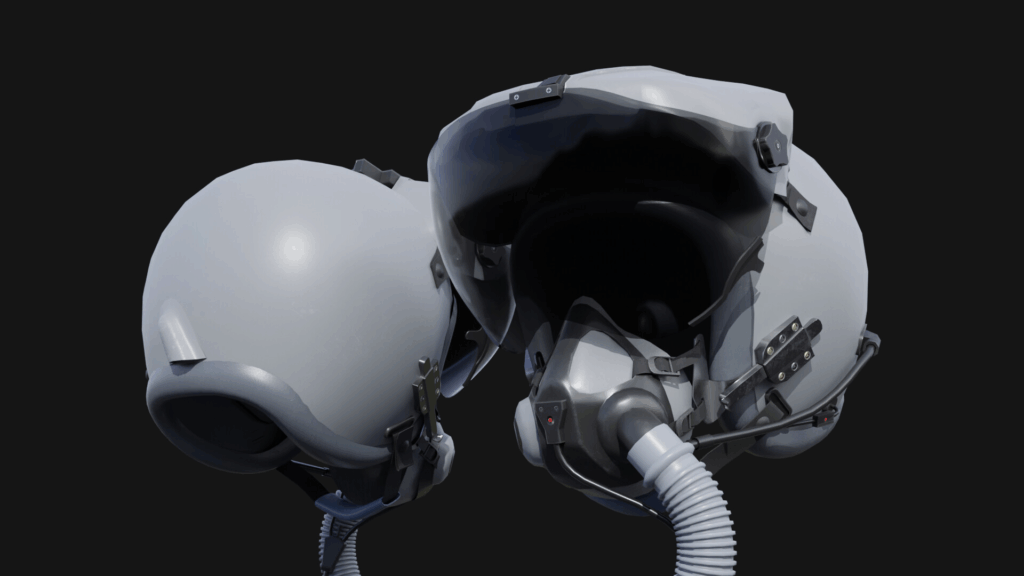
It’s particularly effective in visual-range combat where off-boresight missile shots (especially with AIM-9X) become much more lethal. Simply look, lock, and launch all without needing to point the nose of your jet at the target.
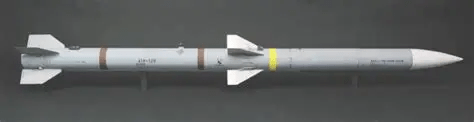
AIM-7 Sparrow in Falcon BMS – A Legacy of BVR Warfare
If you’ve flown any modern era campaign in Falcon BMS, especially with early F-16 blocks or legacy jets like the F-4 Phantom, chances are you’ve armed up with the AIM-7 Sparrow a missile with a long and storied combat history.
Origins and Evolution
The AIM-7 Sparrow was developed by the U.S. Navy in the late 1940s as one of the first air-to-air missiles capable of engaging targets beyond visual range. It uses semi-active radar homing (SARH), meaning your jet must maintain a lock on the target all the way to impact no fire and forget here.
Over the decades, the missile evolved:
- AIM-7E – Vietnam-era workhorse, but plagued by reliability issues.
- AIM-7F – Introduced better range and a two-stage rocket motor.
- AIM-7M – Most reliable variant, used effectively in the Gulf War.
- AIM-7P – The final upgrade with improved electronics and ECCM, rarely seen outside late 90s inventory.
Combat Performance – Real World vs BMS
In real-world combat, the Sparrow had a mixed reputation:
- Vietnam War: Hit rates were often under 10%. Poor training, restrictive rules of engagement, and early tech limited effectiveness.
- Gulf War (1991): With the AIM-7M fired from F-15Cs, kill probability jumped significantly—more than a dozen confirmed kills with far better accuracy (60%+ in ideal conditions).
In Falcon BMS, you’ll find the AIM-7 useful under the right conditions:
- Requires continuous radar illumination (your target must stay locked with STT).
- Works best head-on, high aspect, and above 10,000 ft.
- Vulnerable to notching and chaff—don’t expect AMRAAM-like reliability.
- Ideal for legacy platforms or when BVR rules limit AMRAAM use.
Tactical Tips for BMS Pilots
- Keep your target centered and avoid losing lock—if you break radar lock, the missile will go ballistic.
- Fire at high closure speeds (> Mach 1) and high altitude for maximum energy.
- Always support the missile—you are the radar!
Legacy and Replacement
The AIM-7 eventually gave way to the AIM-120 AMRAAM, which uses active radar guidance and is far more effective in a multi-target environment. Still, in Falcon BMS, the Sparrow remains an excellent training missile for mastering radar control and BVR tactics the old-school way.
Flying with Sparrows in BMS teaches discipline—timing, radar management, and support. If you can score with an AIM-7, you’re building solid air combat fundamentals.
Guidance: Semi-active radar homing (requires continuous radar lock ie STT – Single Target Lock.)
- Min Range: ~1.5 NM
- Max Range: 15-20 NM
- Rne: 6-10 NM
Tips:
- Higher success with head-on, non-maneuvering targets.
- Beam or notch maneuvering easily breaks lock.
AIM-120 AMRAAM – The BVR Gold Standard
The AIM-120 AMRAAM (Advanced Medium-Range Air-to-Air Missile) is the modern backbone of Western BVR (Beyond Visual Range) air combat. Unlike the AIM-7 Sparrow, the AMRAAM features active radar guidance, meaning it can guide itself to the target in the final phase—allowing the shooter to “fire and forget.”
Introduced in the early 1990s, the AIM-120A/B offered reliable mid-range performance and quickly proved its worth in conflicts like Operation Allied Force. The AIM-120C variants brought improved range, ECCM (Electronic Counter-Countermeasures), and smaller fins for internal carriage (e.g., F-22).
The AIM-120D, still mostly limited to top tier platforms in real life, features even greater range, better data-link, and higher kill probability.
In Falcon BMS, the AMRAAM is your go to BVR weapon:
- Use TWS (Track While Scan) to launch without fully locking.
- Mid-course updates help guide the missile until it goes active.
- At longer ranges, fire from high and fast; at closer ranges, it can be deadly in a notch-proof dive.
🧠 Smart, fast, and lethal—AMRAAMs let you shoot, support briefly, and survive. Just don’t forget: even “fire and forget” still needs smart tactics.
Models in BMS: AIM-120B, AIM-120C
- Min Range: ~1-2 NM
- Max Range (Rmax): 25-30 NM at high altitude/speed
- Rne: 10-18 NM
Active Radar Guidance: Allows “fire-and-forget” beyond pitbull activation (~10-15 sec after launch).
Tactics:
- Launch at Rne for kill probability.
- Crank and notch post-launch to delay enemy detection.
- Maintain radar lock until pitbull to support missile.
Info CLASSIFIED but Estimated Range Figures
Officially, the U.S. military does not publicly confirm the exact maximum range of the AIM-120 series, but based on open-source data, declassified reports, and manufacturer estimates:
| Variant | Estimated Max Range (Ideal Conditions) |
|---|---|
| AIM-120A/B | ~30–35 NM (55–65 km) |
| AIM-120C-5 | ~45–55 NM (85–100 km) |
| AIM-120C-7 | ~60+ NM (110+ km) |
| AIM-120D | 70–90 NM (130–160 km) |
In ideal high-altitude, high-speed launch conditions (e.g., Mach 1.5+ at FL400), some sources claim shots may reach 100–120 NM, but that’s not the same as effective range.
Range vs Kill Zone (NEZ)
It’s crucial to distinguish between:
- Kinematic range (how far the missile can fly)
- No Escape Zone (NEZ) – the range where a target cannot evade even with hard maneuvering
A missile may have a maximum range of 90+ NM, but the reliable kill zone is often much shorter (15–30 NM), especially against maneuvering or aware targets.
In Falcon BMS 4.38
- The AIM-120C-5 and C-7 in BMS reflect realistic performance based on known physics and doctrine.
- Long shots (~40–50 NM) are possible but require:
- High-speed, high-altitude launch
- Cooperative target (not maneuvering or jamming)
- Good mid-course support via datalink
🔎 Bottom line: The AIM-120D might reach 100 NM+ in a perfect shot, but its effective kill range is usually far shorter—and Falcon BMS models that reality fairly well.
————————————–
F-16 Viper Performance: Get the Most from Your Jet
Speed and Altitude
- Top Speed: Mach 2+ at altitude, Mach 1.2 at sea level
- Best BVR Launch Altitude: 30,000 – 40,000 ft for max missile range
G Tolerance & Turn Performance.
- Max G: 9G capable
- Sustained Turn Speed: 350-450 KIAS
- Instantaneous Turn Speed: ~300 KIAS (higher AoA, rapid nose-pointing)
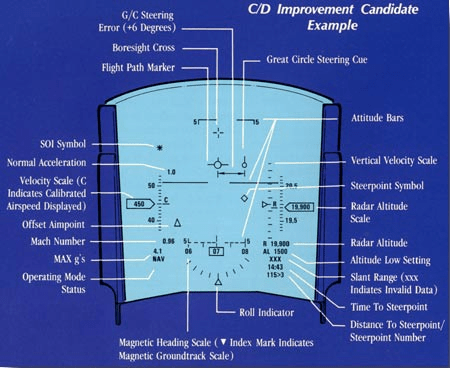
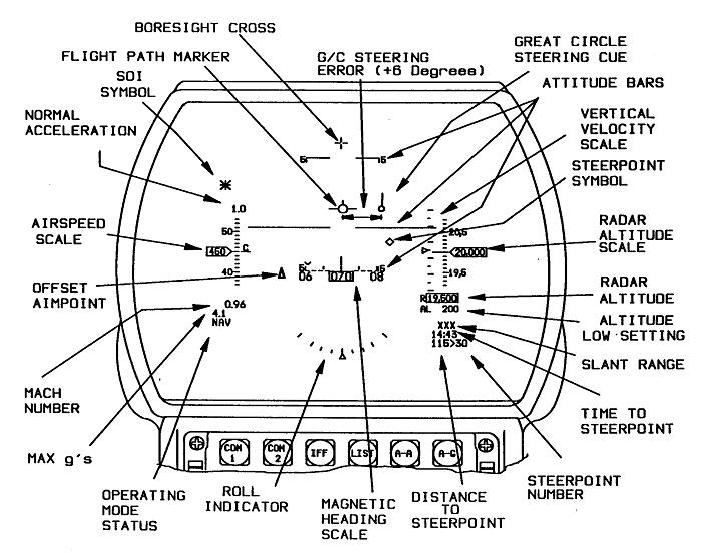
The STRG Cue – Better Energy Management
Dogfight Tip: Use the STR (STRG) cue on HUD for sustained turn rate. I had never heard of this but am keen to utilize it next flight in the VIPER.
STR / STRG Cue on the HUD
In Falcon BMS (or real F-16s), the STR (or sometimes shown as STRG) cue stands for:
Sustained Turn Rate Guidance
This cue helps you turn efficiently — specifically, at the speed where your jet can pull maximum Gs without losing energy (airspeed). It’s a guide for energy-sustaining turns, not max-rate or instantaneous turns.
Why It’s Important in a Dogfight:
- If you turn too hard (pull too many Gs at low speed): you’ll bleed energy fast, making you a sitting duck.
- If you turn too softly: you won’t out-turn the enemy, and you could get shot.
- The STR cue helps you hit the sweet spot — best compromise between G-force and energy management.
How to Use It:
On your HUD, when in DGFT mode or ACM radar mode, you’ll see the STRG cue as a small circle (like a command turn indicator). It may appear below the FPM (Flight Path Marker) or off to the side.
To follow it:
- Roll your aircraft to place your lift vector over the STR cue.
- Pull Gs to keep the FPM moving toward the cue.
- Maintain your speed near corner speed (~330–440 knots depending on weight/config) — that’s where sustained turn rate is optimal.
STRG Summary:
- The STRG cue tells you where to turn to maintain the best sustained turn — keeping energy while still pulling enough G to be effective.
- It’s essential for energy management in a prolonged dogfight.
- Don’t confuse it with the Gun Cross or aiming reticle — this isn’t for shooting, it’s for flying your jet well in combat turns.
Ideal Dogfight Speed Range
- Beginner Tip: Maintain 370-400 KIAS in the merge for strong turn performance.
- Avoid dropping below 300 KIAS unless forcing overshoots or using vertical tactics.
One-Circle vs. Two-Circle Fight
The One Circle vs Two Circle is the most basic dogfighting parameter you need to start with. The Viper is a deadly Two Circle Fighter in the Real world so it will chase you around coming behind you like a rabid dog till it bites you!
An aircraft like the Mirage 2000 and SU-30 are incredibly agile with high AOA capabilities so they will turn fast and come at you head on and this is a One Circle fight.
One-Circle Fight:
- Nose-to-nose turn after merge
- Prioritizes nose authority
- Better for aircraft with high instantaneous turn rates (e.g., F-18)

Two-Circle Fight:
- Both aircraft turn in opposite directions
- Maximizes turn radius and energy management
- F-16 excels in two-circle fights due to high thrust-to-weight and sustained G
Pro Tip: Initiate a two-circle fight when entering a merge unless you know the bandit has better nose authority.
What is “HUD BFM”?
“HUD BFM” refers to a bad habit where a pilot tries to fight the enemy while keeping them in the center of the HUD—as if it’s a first-person shooter.
It usually means:
- Overusing the stick to chase the bandit on-screen
- Flying nose-centric instead of energy- or position-centric
- Losing situational awareness, energy, and eventually angles
In short, you’re flying the jet like a gun turret, not like a maneuvering aircraft. It’s often what new Falcon BMS players or VR users instinctively do.
Why HUD BFM Is a Problem

- 🩸 Kills Energy Fast
Chasing the bandit on the HUD usually means pulling too hard or too soon—causing massive energy loss. You end up slow, defenseless, and a sitting duck. - 🔄 Poor Geometry
Good BFM is about angles and position. Keeping the bandit in the HUD doesn’t necessarily give you turning room, lead pursuit, or closure—you often overshoot. - 👀 Tunnel Vision
Fixating on the HUD blinds you to the bandit’s actual maneuvering. You miss cues like high yo-yos, reversals, or rate fights because you’re watching the screen, not the sky.
Where Should You Keep the Bandit Instead?
In the canopy above the HUD about 1-2 fists above the canopy bow in most aircraft and a little more above the HUD in a VIPER – Just not the HUD!
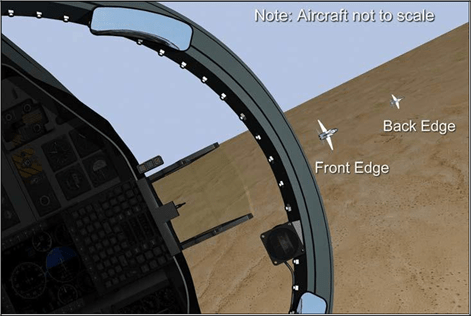
Until you’re ready for a guns shot or missile lock, you should:
- Place the bandit just above or below the canopy bow (roughly between the 10 and 2 o’clock positions)
- Keep them on your lift vector or just offset from it (ideal for rate fights)
- Use lag pursuit to manage closure and keep energy
- Maintain tally, not just track on the HUD
Once you’ve created angles or energy advantage, you can transition to lead pursuit, roll in, and bring the HUD around for the shot.
Think Like a Fighter Pilot
- Don’t fly the HUD, fly the jet
- The HUD is for reference, not for target tracking
- Use your eyes, canopy cues, and lift vector to maneuver — the HUD comes into play when you’re ready to pull the trigger
🕹️ *In BFM, the HUD is for weapons delivery. Victory is built out on the edges of your canopy—where energy, geometry, and tactics live.
More Combat Tips
- Radar Modes Matter: Use RWS for SA, TWS for BVR launches, STT for missile support.
- Defensive Flying: Use notch, chaff/flares, and drag tactics post-launch.
- Offensive Flying: Maintain speed, manage energy, and don’t overshoot!
Defensive Tips for the F-16 Viper
BVR Defense – Survive the Missile Fight
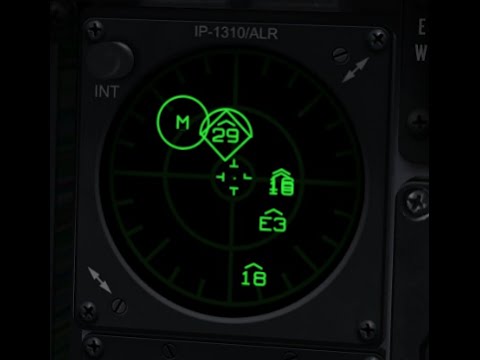
- 🌐 Maintain Situational Awareness (SA)
- Use your HSD and RWR constantly.
- Watch for missile launch cues—RWR tones, spikes, or TWS lock transitions.
- Don’t fixate on radar scope—keep scanning and listening.
- 🧊 Defeat the Launch Before It Happens
- Crank after you fire (offset 45–60° while maintaining datalink).
- Don’t beam too soon—wait for missile launch or “pitbull” warning.
- Use ECM sparingly and unpredictably if it’s modeled.
- 💨 Notch and Drag Smart
- Notching means flying 90° to the missile’s radar (pure perpendicular) while low—ideally under 5,000 ft AGL.
- Combine with chaff and aggressive maneuvering if needed.
- Drag when necessary: turn cold, dive, and burn away—live to fight again.
- 📦 Use the Environment
- Hide in terrain, use clouds, and drag missiles behind mountains or into dense ECM zones.
- In BMS, flying low into valleys or behind ridges can break missile or radar lock.
- 👊 Don’t Fight Alone
- Use wingman spacing and mutual support tactics.
- Spread out to force bandits to choose—and make them defensive.
🔴 BFM Defense – Survive the Merge
- ♻️ Lose Sight, Lose the Fight
- Always maintain tally (visual contact) on the bandit.
- Use your head, not the HUD—bandit should be in the canopy, not the center display.
- 🔻 Stay Fast (But Not Too Fast)
- Try to stay at or near corner speed (~330–440 knots for clean F-16).
- Slow = vulnerable. Don’t bleed energy with wild stick movement.
- 🎯 Use Lag Pursuit Early
- Don’t rush the nose into the bandit. Use lag pursuit to manage closure and preserve maneuvering space.
- Go lead pursuit only when you’re ready to take the shot.
- 📈 Max Performance Turns
- Use full back-stick with max G (look for ~9G at corner speed).
- Use manual control of AoA and throttle—avoid over-reliance on FBW.
- 🧠 Force an Overshoot
- If a bandit is behind you and closing fast, extend, unload, or use high-G barrel rolls and scissors to create overshoot opportunities.
Bonus Mental Rule: The OODA LOOP!
OBSERVE – ORIENT – DECIDE – ACT (Repeat as fast as possible!)
- Observe What the Enemy is Doing!
- Orient Yourself into the same Plane with the Enemy!
- Decide an Action (Immediately)
- ACT by maneuvering the aircraft and Repeat as quickly as possible.
This thought process is taught to real world pilots around the world. Its REAL!
EXAMPLE: Your in an F-16 and You Merge with a F-18 Hornet in a friendly 1v1 battle.
- Observe – The Hornet turns to make the fight ONE CIRCLE
- Orient – You Roll in Plane with the Hornet!
- Decide – Plan to reverse the circle to make it TWO CIRCLE FLOW which suits you!
- ACT – Roll and Pull to Corner Speed and Best G available. 350 – 450 Knots.
Now Start the OODA LOOP again! The faster you do this the faster you are likely to outsmart the opponent.
📘 The Viper is fast, agile, and deadly—but only in the hands of a pilot who fights smart. Stay unpredictable, manage energy, and always keep sight. Outthink and outfly the bandit.
Now Go Put Weapons On Target!
With this guide, you’re equipped to rule the skies in Falcon BMS 4.38. Whether it’s BVR missile combat or close-in gun merges, the F-16 Viper is one of the most lethal aircraft in your arsenal when flown and fought correctly.
Fly safe, shoot straight, and stay deadly. LETSFLYVFR has your six!

Author
Brendon McAliece (Aka Gunnie) is a military veteran with 23 years working on Jet Fighters, their weapons systems and ejection seat/module systems as well as munitions and R&D. Involved with flight simulation since the 1980s, he has flown all the major flight simulators over the years.
He is an Australian expat who has lived in Malaysia, UK, Saudi Arabia and more recently Thailand. He is a multi-lingual blogger who loves to share his life experiences here on LetsFlyVFR.com and DreamingGuitar.com, with his lifestyle and Travel experiences Blog plus his Dreaming Coffee website.
Learn More @
DreamingGuitar.com – DreamingCoffee.com – LetsFlyVFR.com
( HOME – BLOG – SHOP – ABOUT )
This page has been viewed 28 times.
As an Amazon affiliate I may benefit from qualifying sales.