Beginner’s Guide to Downloading and Optimizing Windows 11.
This Beginner’s Guide to Downloading and Optimizing Windows 11 is your starting point to amazing windows performance. Windows 11 is Microsoft’s latest operating system, designed to deliver improved performance, modern aesthetics, and new features for productivity and gaming. For beginners, upgrading or installing Windows 11 may seem daunting, but with the right steps and recommendations, you can make the process smooth and enjoyable.
This guide walks you through downloading Windows 11, performing an in-place upgrade, troubleshooting installation issues, optimizing it for gaming, and understanding lightweight versions of the OS.
Buy Your Own personal Copy of WINDOWS 11 – AMAZON.COM
Step 1: Beginner’s Guide to Downloading and Optimizing Windows 11 – Downloading Windows 11

Checking System Requirements
Before downloading Windows 11, ensure your system meets these minimum requirements:
- Processor: 1 GHz or faster, 2 or more cores, 64-bit.
- RAM: 4 GB or more.
- Storage: 64 GB or larger.
- TPM (Trusted Platform Module): Version 2.0.
- Graphics Card: DirectX 12-compatible with WDDM 2.0 driver.

To verify, go to Settings > System > About or use the PC Health Check Tool.
Methods to Download Windows 11
- Windows Update (For Eligible PCs):

- Navigate to Settings > Update & Security > Windows Update and check for updates.
- If eligible, you’ll see the Windows 11 upgrade prompt. Follow the on-screen instructions.
- Media Creation Tool:
- Visit the Windows 11 download page Digital Download.
- Select the Create Installation Media option and download the Media Creation Tool.
- Use this to create a bootable USB or ISO file.

- ISO File Download:
- Choose the Download Windows 11 Disk Image (ISO) option.
- Burn the ISO onto a USB drive or DVD, or mount it directly for installation.
- Joystick / HOTAS – AMAZON.com
- Rudder Pedals – AMAZON.com
- Throttle Quadrant – AMAZON.com
- Gaming Chair – AMAZON.com
- VR Headset – AMAZON.com
Step 2: Performing an In-Place Upgrade
Why Choose an In-Place Upgrade?
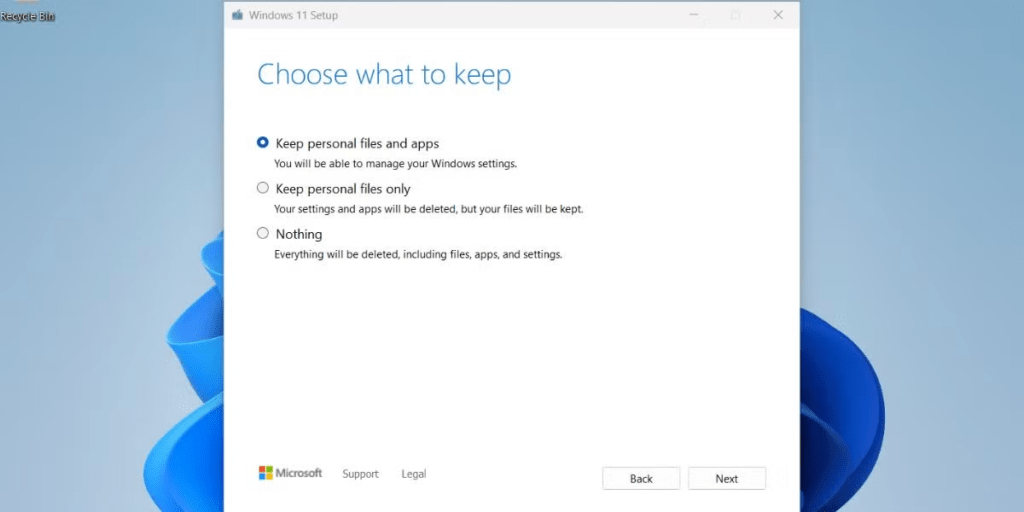
An in-place upgrade allows you to retain your apps, games, and settings while upgrading to Windows 11. This is ideal if you’re upgrading from Windows 10 and want to avoid starting from scratch.
Steps for In-Place Upgrade
- Backup Your Data:
- While in-place upgrades retain files, it’s wise to back up your critical data using an external drive or cloud storage.
- Run the Setup from ISO or Media Creation Tool:
- Open the ISO or USB drive and run the setup.exe file.
- Choose the option to Keep Files and Apps during installation.
- Follow On-Screen Prompts:
- The installer will guide you through the process. Expect multiple restarts.
- Post-Installation Check:
- Verify that your apps, games, and files are intact.
Step 3: Beginner’s Guide to Downloading and Optimizing Windows 11 – Troubleshooting Common Issues
“This PC Can’t Run Windows 11” Error
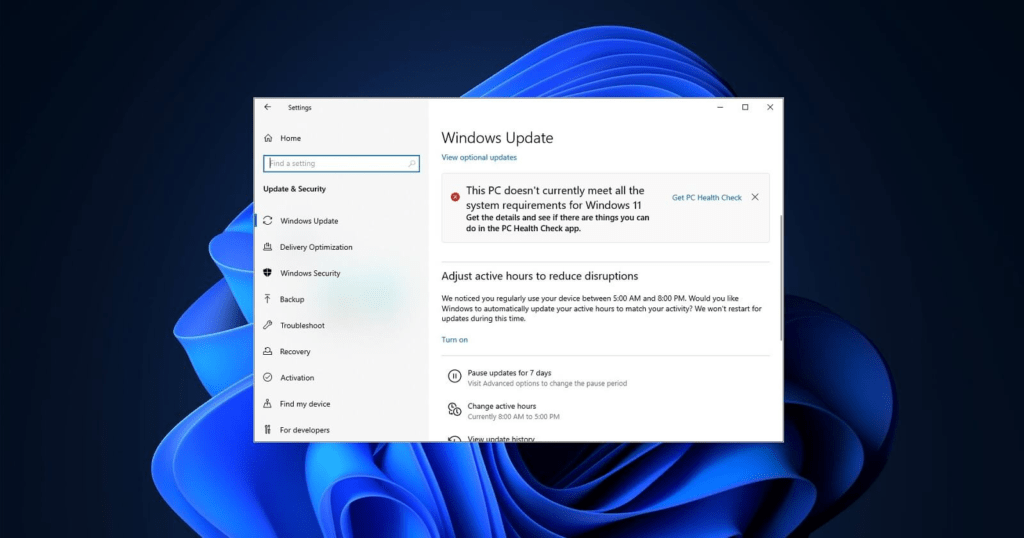
- TPM or Secure Boot Not Enabled:
- Restart your PC and enter BIOS/UEFI (usually by pressing Del or F2 during boot).
- Enable TPM and Secure Boot under security settings.
- Bypass TPM Check:
- Create a registry entry:
- Press Win + R, type
regedit, and hit Enter. - Navigate to
HKEY_LOCAL_MACHINE\SYSTEM\Setup\LabConfig. - Create DWORD keys for
BypassTPMCheckandBypassSecureBootCheckand set their values to1.
- Press Win + R, type
Low Disk Space
- Free up storage by deleting temporary files, uninstalling unused programs, or using an external drive for the installation process.
Recommendations for Optimizing Windows 11
Customize the Interface
- Taskbar and Start Menu:
- Right-click the taskbar, select Taskbar Settings, and customize icons or their placement.
- Use third-party tools like Start11 for a more Windows 10-like Start menu.
- Dark Mode and Themes:
- Enable Dark Mode under Settings > Personalization > Colors to reduce eye strain.
- Snap Layouts:
- Use Snap Layouts (hover over the maximize button) to organize open windows efficiently.
Optimize Windows 11 for Gaming
- Game Mode:
- Enable Game Mode under Settings > Gaming > Game Mode to prioritize gaming performance.

- Graphics Settings:
- Go to Settings > System > Display > Graphics and assign high-performance GPUs to your games.
- Disable Background Apps:
- Turn off unnecessary background apps under Settings > Apps > Apps & Features.
- Driver Updates:
- Regularly update your GPU drivers via NVIDIA GeForce Experience or AMD Adrenalin Software.
- Enable Hardware-Accelerated GPU Scheduling:
- Navigate to Settings > System > Display > Graphics > Change Default Graphics Settings and toggle on Hardware-Accelerated GPU Scheduling.
Beginner’s Guide to Downloading and Optimizing Windows 11 – Lightweight Windows 11 Versions: Are They Safe?
What are Lightweight Windows 11 Versions?
Lightweight versions are stripped-down builds of Windows 11 designed to minimize resource usage. Examples include:
- Tiny11: A slimmed-down version of Windows 11 without bloatware.
- Custom ISOs: Created by enthusiasts for specific use cases.
Pros and Cons
Pros:
- Lower system requirements.
- Faster boot times.
- Less disk space usage.
Cons:
- May lack critical security updates.
- Limited support for official updates.
- Potential risks if downloaded from untrusted sources.
Recommendation: Always download official Windows versions from Microsoft for maximum security and reliability.
Pro Tips to Make Windows 11 Delightful

- Use Widgets Wisely:
- Add productivity-enhancing widgets like weather, news, and calendar.
- Integrate Microsoft Teams:
- Access Teams directly from the taskbar for quick communication.
- Leverage Microsoft Store:
- Explore new apps optimized for Windows 11, like Clipchamp for video editing.
- Install PowerToys:
- Download PowerToys to enhance multitasking with features like Fancy Zones.
- Backup Regularly:
- Use OneDrive for seamless cloud backups.
- Latest CPU’s Available Now – Amazon.com
- Get a NEW GPU Best Performance – AMAZON.com
- Upgrade RAM Here today – AMAZON.com
- Prebuilt PC Options – AMAZON.com
Conclusion
Downloading and optimizing Windows 11 can be straightforward if you follow the right steps. From performing an in-place upgrade to preserving your apps and games, to optimizing the OS for gaming, this guide covers everything you need. While lightweight versions of Windows 11 may be tempting, sticking to official builds ensures security and reliability.
With the right settings and hardware, Windows 11 can enhance both your productivity and gaming experience. Ready to upgrade? The future of Windows awaits!

Author
Brendon McAliece (Aka Gunnie) is a military veteran with 23 years working on Jet Fighters, their weapons systems and ejection seat/module systems as well as munitions and R&D. Involved with flight simulation since the 1980s, he has flown all the major flight simulators over the years.
He is an Australian expat who has lived in Malaysia, UK, Saudi Arabia and more recently Thailand. He is a multi-lingual blogger who loves to share his life experiences here on LetsFlyVFR.com and DreamingGuitar.com, with his lifestyle and Travel experiences Blog plus his Dreaming Coffee website.
Learn More @ DreamingGuitar.com – DreamingCoffee.com – LetsFlyVFR.com
( HOME – BLOG – SHOP – ABOUT )
As an Amazon affiliate I may benefit from qualifying sales.
